My Weird Snack

VeganMoFo 2015 banner

Day #4: Tell us about a weird food combo that you love.

Once, when I was young, my mom told me that when she was young, her older sister used to eat the weirdest food combination: shortening plus granulated sugar. Basically, fat and sugar. My mom told me this in disgust, and on the surface I sympathized, but inside I was curious: What would shortening and sugar taste like? Needless to say, I found out: Sickeningly oily, sweet, and a teeny tiny bit disgustingly good.

Unlike my aunt, I never made a habit of sneaking the infamous shortening-sugar mixture. But, I must admit, I do have a snack habit that’s nearly as weird. These days, when I get the munchies, here’s what I mix up.

Tell us about a weird food combo that you love.

IT’S WEIRD AND GROSS AND UNHEALTHY, I KNOW. It’s a sugar and fat bomb. But it’s MY sugar and fat bomb. I mix up a big spoonful of peanut butter, a small scoop of flour, a small glug of maple syrup, a dash salt, a handful of chocolate chips, and enough powdered sugar to make into a goopier cookie dough texture. And then I eat it. And now that’s out in the open.

…so, what’s YOUR weird snack?!

Quick and Easy Pudla

VeganMoFo 2015 bannerDay 3: Quick, easy, and delicious.

Today’s prompt has me jazzed — I can’t wait to read everybody’s favorite quick, easy, and delicious meals! My contribution is something that most of you probably already know and love: pudla. If you haven’t heard of it, let me enlighten you: pudla is basically a chickpea flour-based omelette or crepe. It comes together in no time, and it’s easily adapted to any chopped veggies and spices you have on hand. I’ve been a pudla fan since Kittee’s seminal pudla post a few years back; pudla is my go-to in-a-rush meal. I’ve perfected my technique over the years, although I’ve certainly had my fair share of undercooked, scrambled, broken-up pudla patties in my day! I chose onions and tomatoes for today’s pudla simply because they’re what I had on hand.

pudla1

Quick & Easy Basic Pudla

Serves 1

  • 1 tablespoon vegetable or olive oil
  • 1/4 cup chickpea flour
  • 1/8 teaspoon baking soda
  • Dash salt
  • Dash cumin
  • Dash turmeric
  • A few twists of freshly ground black pepper
  • 1/4 cup + 1 T water
  • Small dash lemon juice (~ 1 tsp)
  • 1-2 T very finely diced (or grated) onion
  • 1 small tomato, chopped into small pieces (try to remove the juicy/seedy bits)

Add the oil to a thick-bottomed saucepan (cast iron works great) and heat over medium-low.

In a small bowl, whisk together the chickpea flour, baking soda, and spices. Pour in the water and and lemon juice and whisk to form a thick batter. Fold in the onion and tomato.

Pour the batter into the pan and cook over medium-low until the middle of the top side looks just nearly cooked through (i.e. it shouldn’t be runny). It should take 5-6 minutes. Flip and cook the other side for another 3-4 minutes or until golden brown and crispy. The key is to use low heat so it doesn’t burn, while still cooking it all the way through. If you try to flip it too soon, it’ll fall apart. If it’s sticking while you flip it, quickly drizzle a little more oil to the pan while you flip.

pudla2

Disclaimer: This post contains affiliate links. If you purchase something through my link, it costs nothing extra for you, but I get a few pennies to help cover hosting costs.

Veganized American Chop Suey

VeganMoFo 2015 banner

Day 2: Recreate a meal from your childhood.

Me: “Have you ever had American chop suey?”
Steven: “What? No. What is that?!”
Me: “It’s like, elbow macaroni and beef in tomato sauce. My mom used to make it a lot when I was a kid.”
Steven: “OH! I called that cowboy mac!”

American chop suey, cowboy mac… whatever you call it, this ever-so-basic dinner is pure comfort food. Somewhere between a casserole, a chili, and plain old pasta with tomato sauce, it was a dinnertime standby during my childhood, yet I haven’t had it for probably 15 years. Today’s MoFo prompt, therefore, was the perfect excuse!

American Chop Suey

American Chop Suey (aka Cowboy Mac)
Serves four

  • 1 T olive oil
  • 1/2 yellow onion, diced
  • 1 green pepper, diced
  • 1 cup beefy crumbles, store-bought or homemade*
  • 1/2 T garlic powder
  • 14.5 oz can diced tomatoes
  • 14.5 oz can tomato sauce
  • 8 oz elbow macaroni
  • Salt and pepper to taste

Add water to a pot and bring to a boil for the pasta. In the meantime, heat the olive oil in a large sauce pot over medium, then add the onion, pepper, beefy crumbles, and garlic powder. Sauté over medium for 6-8 minutes or until the crumbles are browned. Add both cans of tomatoes, stir to combine, and simmer uncovered on low.

In the meantime, when the water boils, add the pasta and cook according to the package’s instructions.

When the pasta is al dente, drain it and add it to the pot with the sauce. Simmer together for another 5 minutes, add salt and pepper to taste, and serve.

* I made the Basic Seitan Crumbles from 500 Vegan Recipes.

American Chop Suey

Note: This post contains an affiliate link. If you purchase something through my link, it costs nothing extra for you, but I get a few pennies. I’m not looking to make a fortune, just to cover hosting costs. :)

VeganMoFo 2015: PB&J Overnight Oats for Breakfast

VeganMoFo 2015 bannerIf you’re a regular reader, you know that every year I get very into the Vegan Month of Food (aka VeganMoFo). Themes are my JAM, and I love coming up with a new one every year. But not this year. This year, the powers-that-be at MoFo HQ are doing something a little different by offering up daily prompts that participants are highly encouraged to follow. And I’m happy to join! No more MoFo stress for me; this year, I’m going to revel in the simple deliciousness of vegan food. And what better way to start than with breakfast?!

That’s right, today’s prompt is: Rise and Shine! It’s MoFo time! Tell us about your breakfast.

Now, I’m no stranger to breakfast recipes — I’ve shared lots of ’em here. For a work-day morning, I generally keep things simple: oatmeal, a baked good, a piece of fruit… I usually don’t get much more complex than that. So for today’s breakfast, I opted for an easy, make-ahead breakfast: overnight oats. This time, I adapted a classic lunch flavor pairing (PB&J!) for breakfast. The addition of peanut butter adds a little extra hit of protein, helping keep you full for longer. You can use any jam, jelly, or preserve in this recipe; I opted for a homemade blueberry-lavender jam I whipped up a few weeks ago. It’s unsweetened and a little tart, so I added some brown sugar to my oats. Feel free to omit the added sweetener if your jam is sweet enough!

PB and J Overnight Oats

PB&J Overnight Oats
Serves two

  • 1 cup rolled oats (I use Bob’s Red Mill Rolled Oats)
  • 1 cup almond milk
  • Heaping 1/4 cup natural peanut butter
  • 1 T brown sugar, agave nectar, or maple syrup (omit if your jam is sweetened)
  • Dash salt
  • ~1/4 cup jam of choice

Add the almond milk, peanut butter, sweetener, and salt to an airtight container and whisk until the peanut butter is emulsified and fully incorporated in the mixture. Add the oats, cover the container, and shake for about 10-15 seconds. Refrigerate overnight.

To serve, layer oatmeal and jam in a serving jar or bowl. Top with chopped peanuts if desired. Enjoy!

Trying a new jam flavor? Let me know how your vegan PB&J overnight oats turn out!

Note: This post contains affiliate links. If you purchase something through my link, it costs nothing extra for you, but I get a few pennies to help cover hosting costs.

Simple Vanilla Oat Milk

As someone who’s slouching towards minimalism, the holidays pose a unique stress in my life. What to do with so many gifts? As much as I might want to request only experiences or (dare I say it?) cash as gifts, there’s a certain joy in the giving and receiving of tangible things, carefully chosen by a loved one. So I try to pre-empt the discomfort of bringing less-than-necessary new objects into my life by making my needs and occasional wants known. Case in point: last Christmas, I asked for nut milk bags and/or cheesecloths (#stereotypicalvegan) for my vegan cheese-making adventures.

Ask and ye shall receive. Receive I did — not just one, not two, but three varieties of cheesecloth and nut milk bags. Happily, they were all different, serving unique purposes in my kitchen. Did you know that you can use cheesecloth to strain cold-brew coffee? You can! We did! But while the cheesecloth was in regular kitchen rotation, my poor nut milk bag remained neglected. Honestly, I was a little apprehensive about making my own milks. I don’t have a fancy Vitamix or Blendtec; my run-of-the-mill blender has been known to require gentle coaching to perform the simplest of tasks. Even making smoothies with frozen bananas is an adventure! I expected the worst if I tried to blend something more resistant.

Vanilla Oat Milk

But then a friend mentioned how much she loves being able to whip up a batch of cashew milk whenever she’s running low. Sure, she has a Vitamix, but still! And then Steven received Miyoko Schinner’s The Homemade Vegan Pantry for his birthday, and my desire to start making my own staples finally transformed into action.

So, today, I’m sharing the easiest of easy homemade non-dairy milk recipes. To make oat milk, the only equipment you need is a blender and a nut milk bag. Unlike nuts, oats require very little soaking, so you can make a batch in nearly no time. And if you, like me, lack a fancy-pants blender, you’ll still be able to have creamy, delicious non-dairy milk without a trip to the grocery store.

Vanilla Oat Milk

Vanilla Oat Milk
Makes two cups

  • 1/2 cup rolled oats
  • 2 cups water
  • 1 teaspoon maple syrup
  • Seeds scraped from 1/2 a vanilla bean

Add the dry oats to the blender and pulse for 20-30 seconds, or until they’re in small pieces. Add the water and let soak for about 10 minutes, giving the oats a stir now and then if you think of it. Blend for 2-3 minutes, or until you don’t see any pieces. (Give your blender a little rest in between minutes if it’s not particularly strong.)

Place a nut milk bag over a large measuring bowl or mason jar and pour the oat milk through the bag. Use your hands to gently squeeze out the milk, but most of it should strain very quickly. Set the bag aside. Pour the milk back into the blender and add the maple syrup and vanilla. Blend for 10-15 seconds, pour back into jar, and refrigerate.

Oat milk will last about a week in your fridge.

Note: You can use vanilla extract instead of vanilla beans if you don’t have them or don’t want the visual effect of the seeds in your milk; I just didn’t want to add alcohol to mine.

Vanilla Oat Milk

Better-Than-Your-Average Potato Salad

I live for summer. For a few blissful months, I’m enveloped in the warmth of our personal star, tilting my head to the sky every time I’m outside. It’s the one time of year I don’t have to deal with my perpetual coldness. (Don’t even talk to me about air conditioned buildings!) I love the heat!

I also love typical summer foods: corn on the cob, salads with garden-fresh veggies, grilled everything. And, now that I’m vegan, potato salad. I stand firmly by the belief that vegan potato salads are orders of magnitude better than those gloppy, mayonnaise-y, sad non-vegan versions that are ubiquitous at summer barbecues. This version is an update on the potato salad I made five (!) years ago, and it’s full of crunchy veggies to counter the fork-tender potatoes. Dijon mustard gives this salad a kick, and a touch of vegan mayo adds just enough creaminess to keep everything together. I love this potato salad, and I hope you will, too!

Better-Than-Your-Average Potato Salad

Better-Than-Your-Average Potato Salad
Serves 3-4 as a side dish

1 1/2 lbs red potatoes, skin still on, chopped into bite-size pieces (about 3/4″)
1/2 small red onion, diced finely
3 stalks celery, diced finely
A handful green beans, chopped into 1″ pieces
2 tablespoons Dijon mustard, separated
1 tablespoon white vinegar
2 tablespoon vegan mayo
1/2 tablespoon agave nectar
1/2 – 3/4 teaspoon salt
A few dashes freshly ground black pepper

Put a medium-sized pot of water on high heat while you prepare the potatoes and other veggies. Just before the water boils, add the potatoes to the pot and boil for 7-10 minutes or until the potatoes are just fork-tender. Remove from heat and strain in a colander. Rinse briefly with cold water and let sit while you finish chopping the veggies.

In a small bowl, whisk together the vinegar and one tablespoon of the Dijon mustard. Transfer the potatoes to a large bowl and slowly pour the vinegar-Dijon mixture over the potatoes, stirring to distribute it evenly. Let the potatoes sit while you mix the mayo, agave nectar, salt, black pepper, and remaining tablespoon of mustard in the small bowl. Add the chopped onion, celery, and green beans to the potatoes, and then pour the mayo mixture over everything. Stir to coat evenly.

Refrigerate the potato salad until cold. If you’re serving it the next day, you might want to add an additional tablespoon of Dijon — the flavors lose intensity over time.

Better-Than-Your-Average Potato Salad

Enjoy outdoors on a sunny day! Be sure to double (or even triple) the recipe if you’re serving to a large crowd.

On Visiting New Zealand

NZ: Waiheke

A beach on Waiheke island

Y’all. New Zealand. I have no words.

Well, obviously that’s a lie — I could gush on and on about my trip, but nobody wants to hear unfiltered gushing. So I’ll wrap up my experience in a few paragraphs interspersed with some photos. (I’ll save the vegan-in-New Zealand stuff for later!)

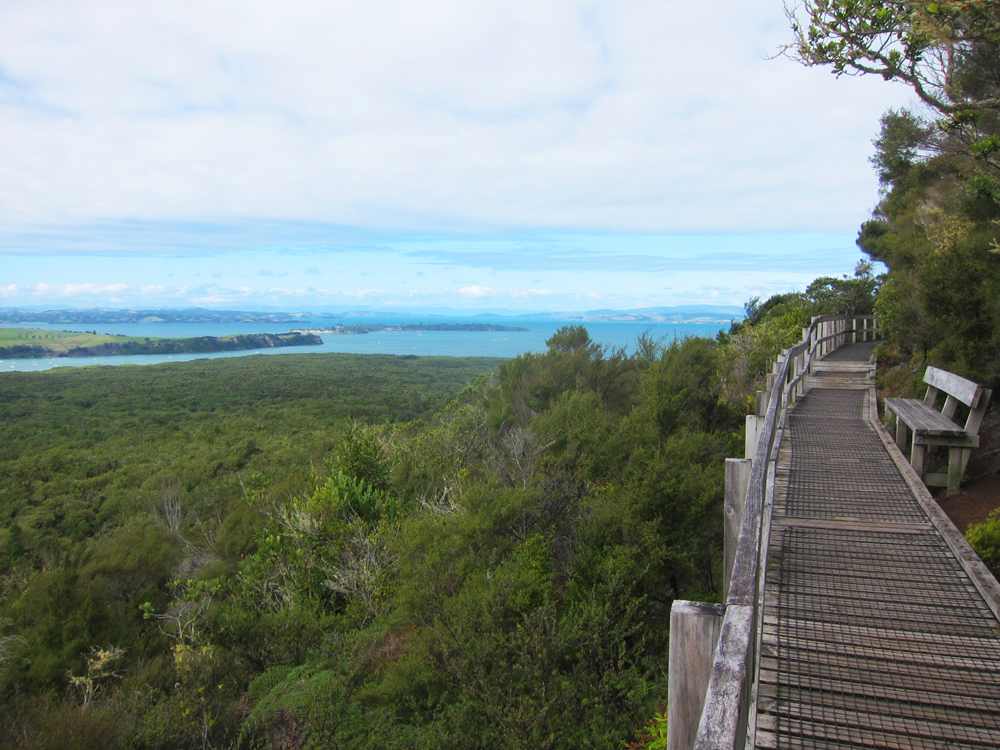
New Zealand is, by far, the most beautiful country I’ve ever visited. It has everything: snow-capped mountains; gorgeous, rugged coastlines; sandy beaches; stunning blue-green water; lush, tropical greenery; and temperate forests. And that’s just what I saw! There are plenty of sites I didn’t get to visit, like the Franz Josef glacier or Milford Sound or the west coast of the North Island. (Those are on my list for my next trip.) I spent so much time hiking and just reveling in nature; it was absolutely glorious. And it reaffirmed my commitment to environmentalism, to protecting nature and trying to leave as light a mark as I can.

NZ: Rangitoto

The view from Rangitoto

On a personal level, this trip was especially meaningful. Although I spent most of my time with my friend who’s living in Auckland, I did a little solo adventuring too. And those days were, perhaps, the most significant for me. The truth is, although I try to project an image of independence and self-confidence, it’s all too easy for me to get mired in self-doubt and anxiety. As much as I love traveling and think it’s one of the best ways to broaden one’s mind and expand one’s perspective, it does make me anxious. Thanks to my OCD*, I have some [wholly irrational!] issues, like sleeping in unfamiliar beds (especially if the sheets are white) and showering in unfamiliar showers (especially if I’m using someone else’s towel). And the very act of traveling worries me. What if I miss a bus and I’m stranded in an unfamiliar town and I can’t find wireless to contact someone and then I miss a flight?! What if I get lost and can’t find my hostel and I’m stuck outside in the middle of the night?! What if I’m stuck in an awkward conversation with a stranger and I don’t have a travel partner to turn to for rescue?!? (Only partially joking there!)

NZ: The Shire

It’s a dangerous business, stepping out your front door.

But despite all my worries, I travel anyway, fighting through the anxiety because I believe travel is worth it. On this trip, I faced many of my fears head-on. And, finally, I felt in charge of myself and my anxieties. They were certainly present, but I made sure they didn’t rule my actions; I pushed through them. I faced my fear of getting lost by, well, getting lost. I wandered around and then found my way back on my own or by asking for directions. And never once did I miss a bus or a flight or find myself trapped outside all night long. Instead, I found myself in places I might not have discovered otherwise, and I found myself getting acquainted with places I might otherwise have known on only a very surface, cursory level. I felt, truly, self-reliant. And I found myself talking to people I might not have talked with otherwise, had I had a travel partner there. I asked folks to take my photo, and I chatted with them about their travels. So even though I was alone, I found myself talking to locals and other travelers who I might have otherwise ignored.

NZ: Akaroa

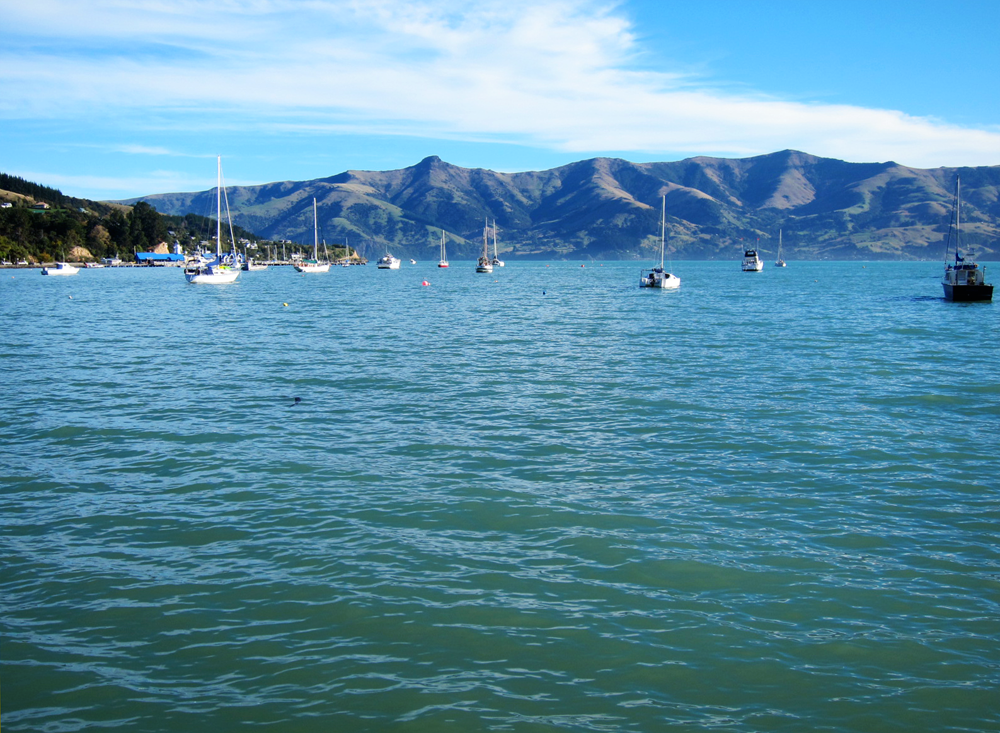
Boats by the shores of Akaroa

I know how absolutely trite this will sound, but — traveling alone is truly liberating. Doing everything on my own terms made for such a great experience. I loved being able to spend time doing exactly what I wanted for exactly how long I wanted to do it without worrying about anybody else’s happiness or comfort.

So. New Zealand? More than worth the expensive, super-long flight, both for the views and for the opportunity it gave me for self-reflection and self-growth.

I’ll be back, someday.

NZ: Fur Seals

A New Zealand fur seal colony

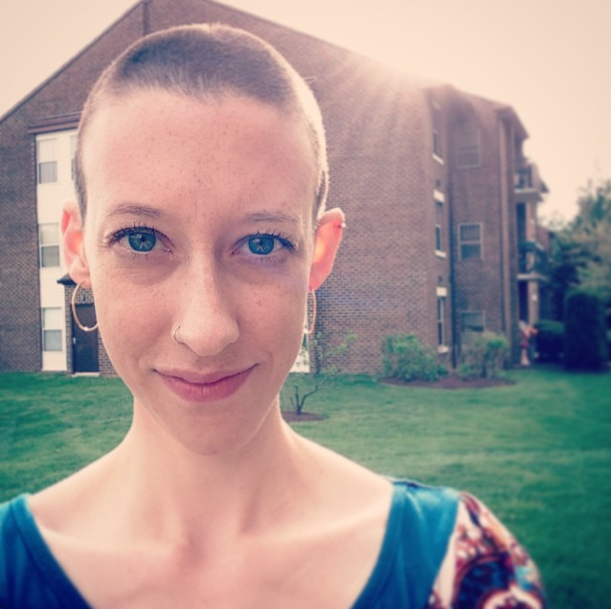
Now, after getting all heavy on you, let’s wrap up with a little levity. Let it be known that traveling with virtually no hair is freaking amazing. Showers are quick, you don’t have to worry about wet hair before bed/in the morning, and your toiletry bag is lightened. I’m such a fan!

~~~

* I mean real OCD, not like, “OMG I’m sooooo OCD because I like things to be neat!!1!”

Strawberry-Coconut Granola

I’ve got a pretty robust travel tag going, and for good reason: I love, love, love to travel. And I love talking about traveling! Besides daydreaming about my next trip, planning a detailed itinerary, and overthinking my suitcase strategy, every trip I take involves lots of pre-departure food research. This New Zealand trip has been no exception! And one very important part of my food planning is deciding what travel snacks to bring.

My strategy hasn’t deviated much from the one I employed when I went to Italy a few years ago. It’s all about nutritious, protein-rich snacks to keep my tummy full. I made a Wegmans and Trader Joe’s run to stock up on pre-made snacks, and I also whipped up a batch of granola for munching. Since I knew I’d mostly be eating this by the handful (not in yogurt or with plant milk), I needed to make sure this granola had lots and lots of big ol’ clumps. I’ve seen oil-free granola recipes that use applesauce for moisture, so I decided to try something similar. But I wanted to experiment with a different, bolder pureed fruit, one that would add flavor as well as moisture. Strawberries seemed like the perfect choice, and they worked wonderfully, especially when paired with coconut. Mmm.

Strawberry-Coconut Granola

Strawberry-Coconut Granola

  • 1 cup fresh or frozen strawberries
  • 1/4 cup maple syrup
  • 2 tablespoons coconut oil
  • 1/2 tablespoon vanilla extract
  • 1/3 cup shredded unsweetened coconut
  • 2 cups rolled oats
  • 1/4 cup ground flax seed
  • 1/4 teaspoon salt
  • 1/2 cup mix-ins of choice (I used chopped almonds and chocolate chips)

Preheat oven to 350˚ and line a baking sheet with parchment paper or spread liberally with coconut oil.

In a food processor, blend the strawberries until they’re nearly pureed. (If you’re using frozen strawberries, they should be the texture of a slushie.) Set aside.

In a small saucepan, add the coconut oil, maple syrup, and vanilla extract. Stir to combine, heating over low so that the oil melts. Once all three ingredients are well mixed, stir in the dried coconut. Let sit for a minute, then turn off the heat. Add the pureed strawberries and stir to combine, then set aside.

In a large bowl, mix the oats, ground flax, and salt together, then pour in the wet ingredients. Stir to combine, then fold in any mix-ins you’re using.

Pour the granola onto the prepared baking sheet and spread into a thin layer. Bake for 35-40 minutes, stirring every 10 minutes or so, then remove from oven and let cool completely before eating.

Kale, Sweet Potato, & Quinoa Bowl with Ginger-Peanut Sauce (and, I’m going to New Zealand!)

If it’s not clear yet, I’m all about bowls. Gimme a grain + a green + a delicious sauce and I’m a happy camper. One of my favorite veggie combos is kale and sweet potatoes — they make such a great pair, both flavor-wise and texture-wise. Today’s bowl gives kale + sweet potatoes the chance to team up with quinoa and a gingery peanut sauce for a nutritious, flavorful meal. A drizzle of fresh lime juice is the perfect finishing touch!

Kale, Sweet Potato, & Quinoa Bowl

Sorry for the subpar photo!

Kale, Sweet Potato, & Quinoa Bowl with Ginger-Peanut Sauce
Serves 3-4

For the Bowl

  • 3 cups cooked quinoa
  • 1.5 lbs. sweet potatoes, peeled and diced into 1/2″ cubes
  • 1 large bunch kale, roughly chopped (I used lacinato kale, but curly kale would be great too)
  • 1/2 lime for serving
  • Chopped peanuts or hemp seeds for serving (optional)

For the Sauce

  • 1/4 cup crunchy peanut butter
  • Scant 1/4 cup coconut milk
  • 1 tablespoon finely grated ginger
  • 1/2 tablespoon soy sauce
  • 1/2 tablespoon sambal oelek
  • Water to thin the sauce

Using your favorite steaming method, steam the sweet potatoes for about 10 minutes or until they’re fork-tender. While they’re steaming, you can chop the kale or prepare the sauce. To make the sauce, whisk together all the ingredients and add enough water to emulsify the mixture. You can add more or less water depending on how thin or thick you like your sauce. Set the prepared sauce aside.

When the sweet potatoes are fork-tender, remove them from the steamer and set them aside. Add the chopped kale and steam it for about 5 minutes or until it’s tender enough for your tastes. (I leave the stems on, so I like to make sure they’re tender too.)

To assemble the bowls, add the quinoa, top with kale, and then top with sweet potatoes. Add the sauce and a squeeze of fresh lime juice and toppings, if using. Enjoy!

~~~

In news that’s tangentially related to food, I’m going to New Zealand! I’m leaving this Thursday and staying with a friend who’s working there currently. She’s based in Auckland, but we have lots of adventures planned on both islands. I’ve been researching lots of tasty Auckland dining options, but let me know if you have recommendations! I’ll also be in the Bay of Islands, Rotorua, Christchurch, and somewhere else on the South Island yet to be determined (probably near Arthur’s Pass).

Finally, as promised… I shaved my head! I raised nearly $700 for childhood cancer research thanks to the generosity of my friends, family, and coworkers. And you know what? Having a shaved head is awesome. I feel so bad-ass! (Not to mention that my showers are now so, so quick!) I’m excited to explore New Zealand with my new look. :)

Kelly After

Tahini-Maple Cookies (and, I’m shaving my head!)

While scrolling through my recent blog posts a few days ago, I realized with not a small amount of shock that I haven’t shared a dessert recipe in quite a while. What’s more, my recipe page has a quickly growing collection of savory foods. Time to get back to the sweet stuff starting today, with a cookie recipe I really love. Tahini-Maple Cookies But first, a request. This Saturday, I’m shaving my head. I’m doing it as a fundraiser for children’s cancer research, as part of a St. Baldrick’s event in Baltimore. As someone whose naturally curly hair has elicited hundreds of compliments throughout my life, I’m not sure what it’ll be like to get rid of one of my most defining physical characteristics. But it’s so, so worth it. My extended family has been hit by childhood cancer more than once, and the effects are — needless to say — brutal. So I’m shaving my head in memory of the kids who didn’t have a choice about going bald, and to help fund crucial research. Before looking into St. Baldrick’s, I had no idea that cancer affects children and adults very differently, and that research and treatments are not the same for both groups. Yet, tragically, childhood cancer research is appallingly underfunded. I want to help. I’ve already surpassed my $350 fundraising goal thanks to my wonderfully generous friends, coworkers, and family. And now I’m thinking, maybe I can double it! Even a $5 donation will help. If you can spare it, please donate to my page. Thank you! <3 Okay, request over!

Now to the cookies. I dreamed up these tahini-maple cookies while trying to fall asleep a few nights ago. I wasn’t sure how well the tahini flavor would play in a dessert. Would it be overpowering? Not at all noticeable? Unpleasant?! I shouldn’t have worried: it’s both pronounced and pleasant, any hint of a bitter edge tempered by the caramel-y maple syrup. Tahini lends such a nuanced flavor, deeper than that of other nut butters. These are great grown-up cookies indeed, perfect for a special occasion. (Because, let’s be real, tahini and pure maple syrup aren’t exactly cheap!) They’re also lovely dipped in your afternoon coffee. If you’re feeling especially decadent, go ahead and add some chocolate chips. I prefer them without the chocolate (gasp), but the combination is great. Tahini-Maple Cookies Tahini-Maple Cookies Makes a baker’s doze (13)

  • 1/3 cup tahini
  • 1/3 cup maple syrup
  • 3 tablespoons sunflower or canola oil
  • 1-2 tablespoons almond milk
  • 1/2 tablespoon vanilla extract
  • 1 cup whole wheat flour
  • 1 teaspoon baking powder
  • 1/2 teaspoon baking soda
  • 1/4 teaspoon salt
  • 1/2 tablespoon black sesame seeds
  • 1/3 cup chocolate chips (optional)

Preheat the oven to 350˚ and oil a baking sheet or line it with parchment paper. In a medium-sized bowl, whisk the tahini, maple syrup, oil, 1 tablespoon almond milk, and the vanilla extract. Once the wet ingredients are combined, sift in the dry ingredients (except for the sesame seeds). Using a plastic spatula or wooden spoon, stir to combine all the ingredients. If the dough is still crumbly (i.e. if it doesn’t stick together in a single ball), add the additional tablespoon of almond milk. Fold in the sesame seeds (and chocolate chips, if you’re using them). Once the dough is combined, scoop heaping tablespoonfuls onto the baking sheet and flatten slightly. Bake for 11 minutes, remove from oven, and let cool for at least 5 minutes before eating.

~~~

Note: If you want a lower-fat option, you can replace the oil with 1/4 cup applesauce. Do not add any almond milk until you’ve combined all the other ingredients; the dough will be wetter and might not need it. Bake for 15 minutes instead of 11. These cookies will be puffier and a bit less rich, but still yummy!