Cooking from Cans: Pigeon Peas and Coconut Rice

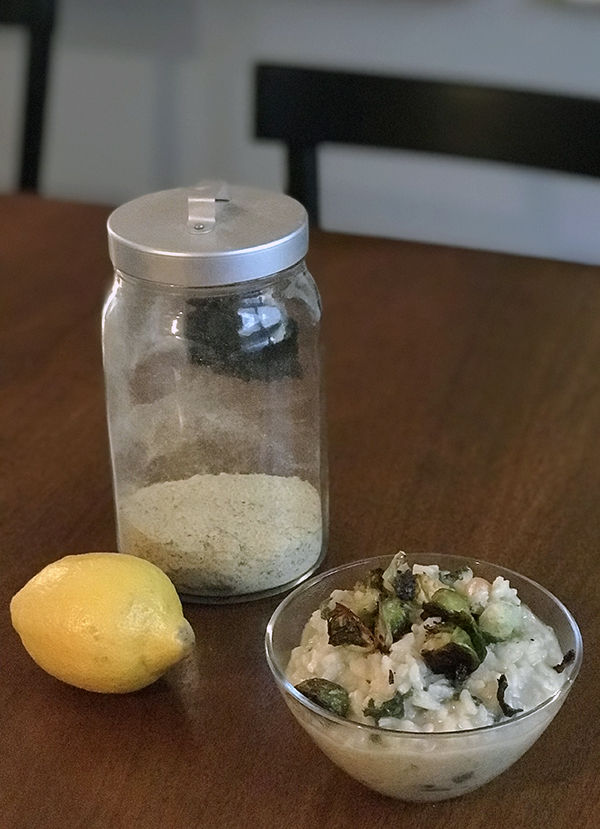
How often do you use the recipes on the boxes and cans in your pantry? I don’t do it very often. But as I was poking through my stash of canned beans, I noticed an appealing recipe on a can of coconut milk: Gungo (Pigeon) Peas and Rice. I had a can of pigeon peas; I obviously had the coconut milk; I had rice… so why not try it?!

In retrospect, choosing to make this rather heavy dish — which required 45 minutes on the stovetop (with me stirring and testing the rice frequently) and which is best eaten hot — on an 83˚F day was perhaps not my finest move. I blame my caffeine-addled brain; slightly jittery from too much cold brew and too few carbs, I clearly lacked some key critical thinking skills. No matter; a little sweat never hurt anyone. Anyway, this came together relatively easily in one pot and required minimal dishes  for preparation — just a cutting board, a can opener, and a measuring cup for the water/broth and the rice. The result? Not bad! Perhaps a little simplistic in flavor, but it’s probably because I had to make quite a few substitutions. Specifically, I:

  • Used brown rice in place of “Grace Rice,” which I can only assume is white rice.
  • Replaced the escallion (!) with a few rather anemic scallions I’ve been regrowing in water for a few weeks.
  • Opted for dry thyme rather than fresh, because I didn’t have fresh.
  • Used garlic-ginger paste rather than fresh garlic and ginger, because I was lazy.
  • Added a teaspoon of dried allspice rather than pimento berries (!).
  • Used a mysterious hot pepper (grown from seeds my dad bought in India!) rather than the Scotch bonnet.

So, yes. Given that rather extensive list of substitutions — most of which replaced flavorful fresh ingredients with, um, less flavorful and less fresh ingredients — it’s no surprised that my rice wasn’t terrifically flavorful! It was not bad at all, though, especially when I added some lime juice. (It was missing an acidic element, in my opinion!)

For the curious, the recipe is here. I also recommend scrolling through the Grace Foods produce list — I enjoyed seeing all the Jamaican and Caribbean favorites, especially this amusingly-named “Grace Food Drink.”

(If you’re curious, here’s the “chicken” broth I used (affiliate link!). Better than Bouillon is killer!)

Advertisement

Crisper Drawer Risotto | VeganMoFo 2018 Day Twenty

Week Three: Budget Week
This week, we’re going to prove once and for all that veganism is affordable!

Risotto might not be top of mind when you think of budget meals, but hear me out. What better way to glam up the floppy carrots, wilty greens, and otherwise less-than-perfect produce languishing in your crisper drawer than by throwing it all in a pot of creamy, rich rice, a dish that’s more than the sum of its parts? Sure, you could make a stew or a soup or a chili, but risotto is just a little fancier, a little more elevated.

In my kitchen sink, crisper drawer, leftover-friendly risotto, I used carrots, okra, and kale that were past their prime. I chopped them all up small and cooked my rice in vegetable broth, adding vegan butter towards the end for extra richness, then topped my dish with roasted Brussels sprouts for added texture, nutrition, and deliciousness. A squeeze of lemon brought it all together, adding a little acidic punch to the savory dish.

I’ve provided a recipe below, but you can use it as a template for any ingredients that would otherwise go to waste (and waste your money). Peas, broccoli, carrots, squash… anything and everything can find a home in risotto with a little creativity. I left my flavors pretty basic, but you can fancy up your DIY risotto by cooking the rice in tomato sauce thinned with water, adding a splash of white wine, stirring in a couple cloves of roasted garlic, topping it with vegan parmesan, etc. Be creative and have fun! (And check out the recipe notes below for a few more suggestions.)

Risotto is NOT as intimidating a dish as many folks make it out to be, and it’s just about guaranteed to taste good no matter what you throw in it. (Just be sure to cook those grains until they’re soft.) And if arborio rice is not in the budget, try it with any short-grain rice: They are a fine stand-in for arborio if you cook ‘em low and slow with lots of liquid.

Crisper Drawer Risotto with Crispy Roasted Brussels Sprouts

Serves 4-6

Ingredients

  • 2 cups arborio rice
  • 6-8 cups low-sodium vegetable broth
  • 5 cloves garlic, sliced thin
  • 1 – 2 cups chopped veggies (I used carrots, okra, and kale)
  • 3 tablespoons nutritional yeast
  • 2 tablespoons vegan butter (optional)
  • Salt and pepper to taste
  • 1 lemon, juiced

Optional topping:

  • 1 pint Brussels sprouts, trimmed and quartered (cut into sixths if the sprouts are particularly large)
  • 1 tablespoon olive  oil
  • Salt and pepper

Method

  1. Preheat oven to 415˚F and start heating about 1 tablespoon olive oil in a medium pot over medium-low heat
  2. Toss trimmed and quartered Brussels sprouts with a little oil, salt, and pepper, then tip onto baking sheet. (I don’t usually line my sheet; the oil prevents sticking and I actually like the near-burnt bits on my sprouts!) Place in preheated oven and set timer for 15 minutes.
  3. When the oil in the pot is just shimmering, add the chopped vegetables and cook for a couple minutes, then add the sliced garlic and cook for about 2 minutes, just until the garlic begins to turn golden.
  4. Add the rice and stir so that the rice is coated with the oil, veggie, and garlic mixture. Add a cup of the vegetable broth and stir to combine.
  5. Over the next 20-30 minutes, keep checking the rice and adding more broth as it starts to get soaked up. Give the rice a good stir every couple minutes, but don’t feel like you need to stand over the pot the entire time. You might not use all the broth, and that’s okay.
  6. After the sprouts have roasted for about 15 minutes, use a spatula to flip most of them over. Roast for another 10-15 minutes until they’re as crispy as you’d like them. Turn off the heat and leave them in the oven. (If they’re too blackened, remove from oven and set aside.)
    Bonus! If the leaves of your sprouts start to burn in the oven, just scoop them out with your spatula and give yourself a little mid-cooking treat. They are like crispy little sprout chips.
  7. Taste the risotto as the rice begins to soften to test whether it’s done. Towards the end of the cooking process, add the nutritional yeast, salt, pepper, and any additional spices you want to try. Turn off the heat and stir in the vegan butter (if using).
  8. Drizzle with lemon juice, top with roasted Brussels sprouts, and serve right away.
Notes:
  • Use whatever veggies you have available. They likely won’t add a ton of flavor but will provide fiber and nutrients while bulking up the rice.
  • Increase the garlic to as many cloves as you’d like, or substitute with diced shallots or onions. Do try to use at least one allium, though!
  • If you want to cut down on the veggie broth (or don’t want to make too much and waste it), you can use hot water and just add a bouillon cube to the risotto to taste.
  • Feel free to swap out the crispy roasted Brussels sprouts for another roasted veggie (like broccoli) or something crunchy (like toasted nuts). You don’t absolutely have to use a crunchy, crispy topper, but I think it provides a really nice textural counterpoint.
  • The lemon juice at the end is non-negotiable! :)

Check out my Butternut Squash Risotto with Sage and Toasted Hazelnuts for another take on risotto, and share your favorite risotto recipe with me!

PIN IT

Vegan risotto made with leftover veggies from your crisper drawer // govegga.com

Simple Spicy Green Beans and Tofu

Two  months ago, Steven and I bought a house. We’d been looking for for something old, with lots of character, in the country(ish).

We bought an early ’70s midcentury-inspired, contemporary-as-all-heck house in the suburbs. And we love it.

What I love perhaps most of all is having a beautiful backyard where I can garden and my pups can hang out. My wonderful parents came down to help us move, and my dad built us two raised garden beds. He also brought plants galore and taught me all about the best ways to transplant various little plantlings. (It pays to have a master gardener who spends most of his free time at a greenhouse for a dad!) We planted relatively late in the season and had a little deer-eating-all-the-baby-tomatoes incident, but things are finally starting to pick up out there. I have more basil than I know what to do with, and everything is coming in beautifully. I love it. Just look at these sweet filius blue peppers — aren’t they cute?!

View this post on Instagram

Cutest lil peppers that you ever did see.

A post shared by Kelly (@kelmishka) on


I also love living a mile from a wonderful weekend farmers’ market. On Saturday mornings, I walk over to the market to stock up on lush fresh veg and fruit, then treat myself to a cold-brew coffee from Brewing Good Coffee Co., a local craft coffee roaster that just happens to be run by vegans. (Their motto is “Drink coffee. Save animals.” Done.) By the time I get home, I’m extra sweaty from being weighed down by all that veggie goodness, but at least I’m caffeinated!

This Saturday, I picked up a big ol’ carton of green beans and knew I had to gobble them up right away. They starred in a spicy dish alongside some tofu and hot peppers from the garden (not the ones in the photo above). I finished everything off with a nice spicy sauce and served over brown rice. Yes, this recipe is super simple — in fact, it’s barely a recipe at all. But this time of year, when all this gorgeous produce is in its prime, I like meals that are simple enough to let the veggies shine. Plus, who wants to spend hours in the kitchen when the sun is shining and you’ve got a backyard calling your name?! :)

Green beans and tofu star in this simple, spicy vegan dinner.

Simple Spicy Green Beans & Tofu
Serves 2-3

  • 1 T coconut oil
  • 1 T freshly grated ginger
  • 2-3 large cloves garlic, minced
  • 2 small purple cayenne hot peppers, diced OR 1-2 t dried red pepper flakes*
  • 2 T low-sodium soy sauce
  • 1 T brown sugar
  • 1 tsp seasoned rice vinegar
  • 1 lb extra firm tofu, cubed
  • 1 lb green beans, chopped or snapped into roughly 1″ pieces

Melt the coconut oil in a large saucepan over medium-low heat, then add the ginger, garlic, and pepper/pepper flakes. Cook for about 3 minutes, or until the garlic starts to brown, then add the tofu.

Cook the tofu over medium-low for 7-10 minutes, turning every few minutes, until the cubes start to get crispy and golden. Keep the heat on medium-low so the tofu doesn’t burn.

Add the green beans to the saucepan and cover. Cook for another 3-4 minutes.

Remove the lid and pour in the sauce. Stir to coat, and cook for another minute or two until the sauce is absorbed. Serve immediately over brown rice.

*You can really use any fresh hot pepper you’d like — I just happened to have two of these little guys ripe and ready to go.

~~~

What’s your favorite easy summer veg-forward dinner?

Note: This post contains an affiliate link. If you purchase something through my link, it costs nothing extra for you, but I get a few pennies.

Cajun-Spiced Cabbage ‘n Kidney Beans

LVV MoFo 2014 main


My goodness, y’all. This dinner. I made it in the middle of a thunderstorm after cleaning up unholy amounts of gag-inducing dog mucus, a pee puddle, and a lone hardened turd.* (Related: I will be SO HAPPY when Luna Bug is healthy and can come to work with us!) As I was chopping cabbage, I kept noticing a hint of rotting fruit scent. A short investigation of the nearby fruit bowl revealed a grapefruit that looked whole and healthy from the top, but was green and fuzzy underneath. Delightful.

…my household hygiene issues aside, this meal itself caused me very little heartache. Aside from a decent amount of chopping, it’s a one-pot dish that’s pretty simple to prepare. Cabbage, bell peppers, tomatoes, and kidney beans join forces with a healthy dose of Cajun-inspired spices for a fresh-tasting dish with a kick.

Cajun-Spiced Cabbage & Kidney Beans

And guess what? It’s damn healthy. Each of the five servings offers up about 10 grams of protein, 23% of the recommended daily value of iron, and lots of fiber, potassium, and vitamin C. Not bad for a bunch of veggies and a can of beans! And if you serve it over brown rice, like we did, you can add a few more grams of protein and fiber to your totals.

Cajun-Spiced Cabbage & Kidney Beans
Serves 4

  • 1 T olive oil
  • 3 cloves garlic, minced
  • 2 stalks celery, diced small
  • 1 green bell pepper, chopped
  • 1/2 head cabbage, chopped
  • 2 cups diced tomato in juice
  • 1 cup tomato puree or sauce
  • 1 15 oz. can kidney beans

Spice blend:

  • 1/2 tsp onion powder
  • 1/4 tsp paprika
  • 1/4 tsp oregano
  • 1/4 tsp thyme
  • 1/4 tsp red pepper flakes
  • Salt and pepper to taste

Cooked brown rice or your grain of choice to serve.

In a large saucepan, heat the olive oil and add minced garlic. Let simmer for about a minute, then add the celery and green bell pepper. Cook until they start to soften, about 5 minutes. Add the cabbage, diced tomato, tomato puree, and spices. Bring to a low boil then turn down the heat. Cover and cook until the cabbage is softened, about 15-20 minutes. Mix in the kidney beans and add salt and pepper to taste.

Serve over a bed of brown rice or your favorite grain.

Cajun-Spiced Cabbage & Kidney Beans

She may not be the most beautiful dish, but she sure is tasty. And healthy!

What’s your favorite spice blend or flavor profile? 

* S helped. In fact, he did most of the cleaning. Thanks, darlin’.

Purple Fried Rice

Orange rectangle with the white fist-shaped Vegan MoFo logo and the text "Vegan Month of Food 2012."

Happy Monday! Happy indeed – I’ve had no ill effects from my sleepless Saturday night (to be fair, I slept for about three hours after posting). I took Sunday easy – as all Sundays should be taken – and as such don’t have much to say about it, food-wise. So how about a little throwback? All the way back to… last week. Heh.

Plate of purplish-pink fried rice with cabbage, broccoli, and cilantro on the side.

Colorful rice.

Before I started dating S, I’d never cooked rice in a rice cooker – I always used the stovetop. Now that we live together and have his rice cooker, we almost always use it make big batches of rice. The leftovers are perfect in not-so-fried rice. S whipped up this batch, which turned a pleasing purply-pink thanks to the addition of some thinly sliced cabbage. He also included onions, garlic, broccoli, and tofu. Simple, tasty, and oh-so-pretty!

What’s your favorite way to use leftover cooked rice?

Brain Games, Wheat Berries, & Pudding for Breakfast

I’m happy to report that my grumblings about the weather seem to have driven it away, as yesterday was sunny and generally lovely. I celebrated the return to summer by taking Tamale on a nice long walk, which would have been perfect if half my neighbors hadn’t decided it was a perfect day to mow their lawns. You’ll probably think I’m a freak, but I severely dislike the smell of freshly cut grass, most likely because I think I’m allergic to it since I get headaches whenever I smell it. But whatevs – I’ll gladly take a headache if it means I get to feel the sun on my face and hear the delighted screams of youth as I walk past a group of children bouncing on a trampoline. Ah, summer.

Anyway, on to the healthiness. Let’s start with my healthy mind, shall we? I think you should all check out GamesfortheBrain, a fun little website with a nice selection of games to help wake up your grey matter and justify all the time you spend puttering around the internetz! “But, ma, I was developing my brain’s ability to adapt quickly to new situations!” Heh heh heh. Brilliant.

Although some of the games are kind of lame – “Marsmoney” seems better suited for some sort of elementary school exercise – others are fun. “What Was There?” is one of those pesky ones that asks you to memorize a scene and then questions you on its details. “Memocoly” asks you to repeat patterns of colors. There are also a bunch of word games, but I haven’t tried them yet – I’m too addicted to Word Warp to branch out just yet. ;) All in all, these are not incredibly mentally taxing, but they’re still a fun way to give your brain a mini-workout. And the little “brain tips” you get when you answer a question correctly challenge you to do more – try taking a shower with your eyes closed to let your other senses take over! Hmm… we’ll see about that one. So check it out and have some fun!

But I don’t spend all my time playing on the internetz – I’m workin’ on having a healthy body, after all! Last night I experimented with wheat berries for the first time. I know I came late to the wheat berry party, but better late than never, right? Anyway, I cooked these suckers according to the package and used them as a bed for some tofu I marinated in a variation of the Italian marinade from Vegan with a Vengeance and then grilled on the George Foreman grill my aunt gave our family. I’d never used ol’ George’s grill for tofu, but it worked pretty well, even if one piece was a little more blackened than grilled.

Tofu & wheat berries & veggies, oh my!

To be honest, I was a little wary of all the balsamic vinegar in Isa’s marinade – I kinda sorta despite vinegar in all forms – but I couldn’t taste the acidity of the vinegar once the tofu was cooked, so overall it was a success. Since it was a clean out the fridge kind of night – more on that in a later post – I had some leftover garlicky green beans and sliced the corn off a leftover half corncob for my veggie sides. Yum. The wheat berries were chewy yet tasty, and I felt satisfied knowing that I was filling my body with lots of fiber and protein.

While I was hunting around in the fridge for leftovers, I noticed a big container of cooked rice. “Aha!” I thought to myself, “I can do something with that!” After dinner, I took some soy creamer that needed to be used up and poured it over a big bowl of the rice. I added some dried cranberries (because raisins are nasty, y’all – they’re like big bloated bugs when they swell up in liquid!) and a bit of almond extract and let that bowl marinate overnight. This morning I heated the conglomeration up in the microwave and had Brekkie Rice Pudding!

Rice pudding for breakfast? You bet!

So it’s not the most gorgeous mixture in the world, but I thought it tasted pretty darn good. Next time I’ll add less almond extract, because the taste was *almost* a little too strong. But overall, I was pleased with my fridge emptying skillz.

Ciao!