Chesapeake Tempeh Cakes

VeganMoFo 2015 bannerDay 17: Make (or eat!) a traditional local dish.

Maryland is one of those states that’s pretty synonymous with a specific dish — crabcakes. Or anything with crab, really. As a child, years and years before I moved to Maryland, I visited cousins who lived here and went out crabbing with them. Even then, I remember feeling unhappy with the practice and very uncomfortable with the whole boiling-and-eating-them thing.

Now, thinking about my participation in the catching and killing of perhaps dozens of crustaceans makes me feel sad and guilty. Tonight’s dinner — the Chesapeake Tempeh Cakes from Vegan Brunch: Homestyle Recipes Worth Waking Up For — is my small way of offering up a little tribute to those crabs of my youth.

Chesapeake Tempeh Cakes

With a tempeh base, these cakes are quite filling. I didn’t have a red bell pepper in the house, so I substituted a yellow pepper instead. I also made one other big substitution: using Old Bay instead of the spice blend in the recipe. You can’t make crabcakes without Old Bay!

I did have a little trouble with this recipe. The cakes didn’t hold together well at all; I ended up adding some aquafaba as a binder. They’re also pan-fried in oil, making them a little heavy for me. That side of sliced peppers certainly helped!

Here’s to you, crabs of Maryland, and here’s to eating tempeh instead of flesh!

Note: This post contains an affiliate link. If you purchase something through my link, it costs nothing extra for you, but I get a few pennies. I’m not looking to make a fortune, just to cover hosting costs. :)

Caramelized Onion and Broccoli Quiche

VeganMoFo 2015 banner

Day 15: OMG, Barack Obama is coming over because he knows you make awesome vegan food! What are you going to make?

In my most outlandish MoFo fantasy, I bake and decorate an elaborate cake fashioned to look like the GOP elephant symbol. Barack comes over and goes to town on it, a la one of those horrible first-birthday cake smash videos, to show what he thinks of the intransigent Republican congress that’s blocked his every move.

…but that would be a very un-presidential thing to do, so I opted for something a little less partisan.

According to the internet, the president once said his favorite food is broccoli. Okay then! I have my doubts about the veracity of that statement, especially since he said it to a group of elementary school children. He couldn’t very well have admitted that his favorite food was something super-duper unhealthy, right? Regardless of the truth, I decided to incorporate broccoli in my meal. I’m also assuming that Michelle is coming, and I’d want to impress her with a healthy yet delicious vegan meal. Enter quiche!

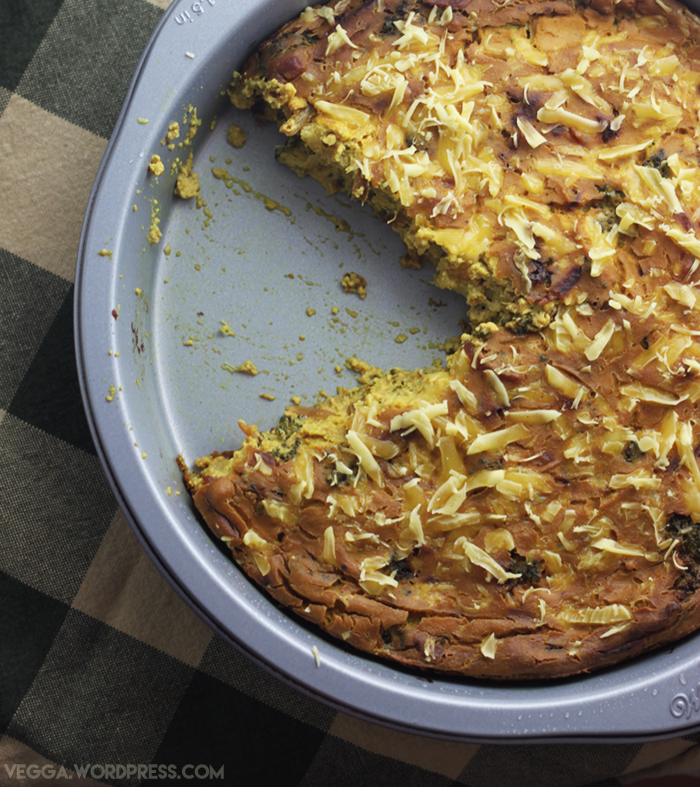
I hadn’t made a full-sized vegan quiche since Easter 2010. Needless to say, in the past five and a half years, various vegan innovations (vegovations?) have taken egg-replication into bold new frontiers. I was excited to use aquafaba in this quiche, alongside the traditional tofu base. I’m glad I did! It was so creamy and delicious. I opted to make it crustless, because I’m not a huge fan of a traditional pastry crust. Next time, though, I might have to try this hash brown crust (!) from Avocados and Ales. I topped my quiche with grated Follow Your Heart provolone, just because I had a little bit leftover and it was starting to harden. (The provolone, by the way, is surprisingly good! FYH has really stepped up their game.) It was the perfect flavor combination.

Caramelized Onion and Broccoli Quiche

Caramelized Onion and Broccoli Quiche
Serves four

  • One medium yellow onion, sliced into half moons
  • Two small heads broccoli, chopped into small florets
  • 14 oz firm tofu (not vacuum-packed), drained
  • 1/2 cup aquafaba
  • 1/4 cup almond milk
  • 1/4 cup nutritional yeast
  • 2 T cornstarch
  • 1 T soy sauce
  • 1 tsp paprika
  • 1/2 tsp kala namak (black salt)
  • 1/2 tsp garlic powder
  • 1/2 tsp turmeric
  • Salt and pepper to taste
  • 1/4 cup shredded vegan cheese

Add a little oil or vegan butter to a nonstick pan and heat it on medium. Add the onions and a pinch each of sugar, salt, and baking soda. Turn the heat to low and caramelize the onions, stirring them occasionally to prevent burning. They should cook for about 30 minutes. You want them mushy, but still holding their shape a bit.

Preheat the oven to 400˚ while the onions are on the stove. Prepare an 8” cake tin by oiling it liberally.

In the meantime, prepare the quiche mixture by combining the tofu, aquafaba (unwhipped), almond milk, nutritional yeast, cornstarch, soy sauce and spices in a blender or food processor. Blend for at least a minute to whip up the aquafaba.

When the onions are caramelized, move them to one side of the pan and add a splash of water (about 2-3 tablespoons) to deglaze the bottom of the pan. Add the broccoli, turn the heat back up to medium, and cook it for about 5 minutes, just until it softens and turns brighter green. Remove from heat and fold the onions and broccoli into the liquid quiche mixture.

Pour the mixture into the prepared cake pan and sprinkle the vegan cheese on top, if using. Bake for 35 minutes or until the top is golden brown.

Allow to cool for at least 10 minutes before serving.

Caramelized Onion and Broccoli Quiche

I’m confident that Barack, Michelle, Steven, and I would make great dinner party partners. I think we’d steer clear of politics for a while, instead talking about veganism and how healthy, environmentally friendly, and downright delicious it can be.

So, Mr. Obama, when are you coming to dinner?!

Note: This post contains affiliate links. If you purchase something through my links, it costs nothing extra for you, but I get a few pennies to help cover hosting costs. :)

My Favorite Sandwich + a Savory Marinated Tofu Recipe

VeganMoFo 2015 banner

Day 5: Best sandwich ever.

I love and hate today’s prompt. Love, because a good sandwich can be sublime. When quality bread meets fresh veggies, a savory protein, and a spreadable fat, beautiful things happen. Hate, because best ever?! How am I supposed to decide? I haven’t tasted all the sandwiches! It’s too much pressure! I can’t do it!

What I can do, however, is share my absolute favorite go-to sandwich, the one I make when I have a little prep time. It doesn’t sound like much more than a glorified TLT, but the flavor profile is totally different thanks to sauerkraut and Dijon mustard. This “recipe” is also flexible; you can modify it based on whatever veggies and toppings you have in the house. Just make sure to include the marinated tofu!

Marinated Tofu Sandwich

Here’s what you’ll need:

  • Quality bread. Homemade is great, but today I’m using Trader Joe’s sourdough pane. I usually prefer a grainier bread, but this is what I have!
  • Spread. Vegan mayonnaise and a good Dijon mustard work perfectly here. Don’t use anything with too much unique flavor, like pesto.
  • Sauerkraut. It adds such a perfect tang!
  • Sprouts. I used home-sprouted mung beans. You don’t need anything fancy; these were only sprouted for a day! I use a Handy Pantry stacking sprout garden and love it, but you can go old-school with a jar and cheesecloth.
  • Marinated Sandwich Tofu. See below! You can make this in advance and use it cold, or eat it hot off the pan. Mmm.
  • Veggies. Sliced fresh tomatoes and a few pieces of lettuce are my go-to. I’ll also add some avocado if I have it!

Marinated Tofu Sandwich

Marinated Sandwich Tofu

Serves two to three

  • 1 block extra-firm tofu (14-16 oz), pressed for at least an hour (if you have time)
  • 2 T low-sodium soy sauce or tamari
  • Scant 1/2 T vegan Worcestershire sauce
  • 1 tsp toasted sesame oil
  • 1/2 tsp hot sauce like Frank’s (optional)
  • 1/2 tsp maple syrup or maple sugar
  • 1/2 tsp garlic powder
  • Dash liquid smoke (more if you’re particularly fond of the flavor)

In a large container with an airtight lid, whisk together all the marinate ingredients (everything except the tofu). It might not look like much marinade, but it’s enough!

Prep your pressed tofu by laying it down on a cutting board and cutting it in half. Turn those two halves on their sides and slice them into four wide slices each, for a total of eight large slices.

Using a fork, poke a few shallow holes in each slab of tofu. Don’t poke too deeply; you’re not trying to go all the way through. You just want to create a few more nooks and crannies for the marinade to penetrate.

One slice of tofu at a time, place each side of the tofu in the marinade so all sides are coated. Depending on the size of your container, you might have enough room for all the tofus to lay flat. If not, you can stack them once they’re coated on each side. Cover the container and refrigerate it.

Marinate for at least 30 minutes, gently flipping the container over halfway through.

When you’re ready to cook the tofu, heat a little vegetable or olive oil in a heavy pan on low-medium heat — I like to use cast iron — and cook as many tofus as fit comfortably at a time. Don’t overcrowd it, though, or you’ll break a tofu! Cook for about 4 minutes on either side, but you can cook for longer if you want a crispy crust.

To assemble the sandwich, toast two slices of bread per sandwich very lightly. Spread liberally with mustard, mayo, or whatever spread you’re using. Place two slices of tofu on one slice of bread and a pile of sauerkraut on the other, being sure to let the sauerkraut drain for a second before adding it so the sandwich isn’t too watery. Then pile on the other ingredients, smoosh together, slice in half, and get your nom on!

Quick and Easy Pudla

VeganMoFo 2015 bannerDay 3: Quick, easy, and delicious.

Today’s prompt has me jazzed — I can’t wait to read everybody’s favorite quick, easy, and delicious meals! My contribution is something that most of you probably already know and love: pudla. If you haven’t heard of it, let me enlighten you: pudla is basically a chickpea flour-based omelette or crepe. It comes together in no time, and it’s easily adapted to any chopped veggies and spices you have on hand. I’ve been a pudla fan since Kittee’s seminal pudla post a few years back; pudla is my go-to in-a-rush meal. I’ve perfected my technique over the years, although I’ve certainly had my fair share of undercooked, scrambled, broken-up pudla patties in my day! I chose onions and tomatoes for today’s pudla simply because they’re what I had on hand.

pudla1

Quick & Easy Basic Pudla

Serves 1

  • 1 tablespoon vegetable or olive oil
  • 1/4 cup chickpea flour
  • 1/8 teaspoon baking soda
  • Dash salt
  • Dash cumin
  • Dash turmeric
  • A few twists of freshly ground black pepper
  • 1/4 cup + 1 T water
  • Small dash lemon juice (~ 1 tsp)
  • 1-2 T very finely diced (or grated) onion
  • 1 small tomato, chopped into small pieces (try to remove the juicy/seedy bits)

Add the oil to a thick-bottomed saucepan (cast iron works great) and heat over medium-low.

In a small bowl, whisk together the chickpea flour, baking soda, and spices. Pour in the water and and lemon juice and whisk to form a thick batter. Fold in the onion and tomato.

Pour the batter into the pan and cook over medium-low until the middle of the top side looks just nearly cooked through (i.e. it shouldn’t be runny). It should take 5-6 minutes. Flip and cook the other side for another 3-4 minutes or until golden brown and crispy. The key is to use low heat so it doesn’t burn, while still cooking it all the way through. If you try to flip it too soon, it’ll fall apart. If it’s sticking while you flip it, quickly drizzle a little more oil to the pan while you flip.

pudla2

Disclaimer: This post contains affiliate links. If you purchase something through my link, it costs nothing extra for you, but I get a few pennies to help cover hosting costs.

Veganized American Chop Suey

VeganMoFo 2015 banner

Day 2: Recreate a meal from your childhood.

Me: “Have you ever had American chop suey?”
Steven: “What? No. What is that?!”
Me: “It’s like, elbow macaroni and beef in tomato sauce. My mom used to make it a lot when I was a kid.”
Steven: “OH! I called that cowboy mac!”

American chop suey, cowboy mac… whatever you call it, this ever-so-basic dinner is pure comfort food. Somewhere between a casserole, a chili, and plain old pasta with tomato sauce, it was a dinnertime standby during my childhood, yet I haven’t had it for probably 15 years. Today’s MoFo prompt, therefore, was the perfect excuse!

American Chop Suey

American Chop Suey (aka Cowboy Mac)
Serves four

  • 1 T olive oil
  • 1/2 yellow onion, diced
  • 1 green pepper, diced
  • 1 cup beefy crumbles, store-bought or homemade*
  • 1/2 T garlic powder
  • 14.5 oz can diced tomatoes
  • 14.5 oz can tomato sauce
  • 8 oz elbow macaroni
  • Salt and pepper to taste

Add water to a pot and bring to a boil for the pasta. In the meantime, heat the olive oil in a large sauce pot over medium, then add the onion, pepper, beefy crumbles, and garlic powder. Sauté over medium for 6-8 minutes or until the crumbles are browned. Add both cans of tomatoes, stir to combine, and simmer uncovered on low.

In the meantime, when the water boils, add the pasta and cook according to the package’s instructions.

When the pasta is al dente, drain it and add it to the pot with the sauce. Simmer together for another 5 minutes, add salt and pepper to taste, and serve.

* I made the Basic Seitan Crumbles from 500 Vegan Recipes.

American Chop Suey

Note: This post contains an affiliate link. If you purchase something through my link, it costs nothing extra for you, but I get a few pennies. I’m not looking to make a fortune, just to cover hosting costs. :)

Kale, Sweet Potato, & Quinoa Bowl with Ginger-Peanut Sauce (and, I’m going to New Zealand!)

If it’s not clear yet, I’m all about bowls. Gimme a grain + a green + a delicious sauce and I’m a happy camper. One of my favorite veggie combos is kale and sweet potatoes — they make such a great pair, both flavor-wise and texture-wise. Today’s bowl gives kale + sweet potatoes the chance to team up with quinoa and a gingery peanut sauce for a nutritious, flavorful meal. A drizzle of fresh lime juice is the perfect finishing touch!

Kale, Sweet Potato, & Quinoa Bowl

Sorry for the subpar photo!

Kale, Sweet Potato, & Quinoa Bowl with Ginger-Peanut Sauce
Serves 3-4

For the Bowl

  • 3 cups cooked quinoa
  • 1.5 lbs. sweet potatoes, peeled and diced into 1/2″ cubes
  • 1 large bunch kale, roughly chopped (I used lacinato kale, but curly kale would be great too)
  • 1/2 lime for serving
  • Chopped peanuts or hemp seeds for serving (optional)

For the Sauce

  • 1/4 cup crunchy peanut butter
  • Scant 1/4 cup coconut milk
  • 1 tablespoon finely grated ginger
  • 1/2 tablespoon soy sauce
  • 1/2 tablespoon sambal oelek
  • Water to thin the sauce

Using your favorite steaming method, steam the sweet potatoes for about 10 minutes or until they’re fork-tender. While they’re steaming, you can chop the kale or prepare the sauce. To make the sauce, whisk together all the ingredients and add enough water to emulsify the mixture. You can add more or less water depending on how thin or thick you like your sauce. Set the prepared sauce aside.

When the sweet potatoes are fork-tender, remove them from the steamer and set them aside. Add the chopped kale and steam it for about 5 minutes or until it’s tender enough for your tastes. (I leave the stems on, so I like to make sure they’re tender too.)

To assemble the bowls, add the quinoa, top with kale, and then top with sweet potatoes. Add the sauce and a squeeze of fresh lime juice and toppings, if using. Enjoy!

~~~

In news that’s tangentially related to food, I’m going to New Zealand! I’m leaving this Thursday and staying with a friend who’s working there currently. She’s based in Auckland, but we have lots of adventures planned on both islands. I’ve been researching lots of tasty Auckland dining options, but let me know if you have recommendations! I’ll also be in the Bay of Islands, Rotorua, Christchurch, and somewhere else on the South Island yet to be determined (probably near Arthur’s Pass).

Finally, as promised… I shaved my head! I raised nearly $700 for childhood cancer research thanks to the generosity of my friends, family, and coworkers. And you know what? Having a shaved head is awesome. I feel so bad-ass! (Not to mention that my showers are now so, so quick!) I’m excited to explore New Zealand with my new look. :)

Kelly After

Spicy Potato Casserole with Tofu “Chorizo”

One of my favorite workday lunches (and quick weeknight dinners) is a baked potato smothered in baked beans, chili, or broccoli and a cheezy sauce. Keeping a few baked potatoes ready in the fridge or freezer is a great form of insurance against going lunch-less or having to go out and grab something. Cover that tater with last night’s chili or that can of baked beans you stashed in the pantry, and you’re good to go with a filling, hearty meal.

Last time I had a baked potato, I enjoyed it with Trader Joe’s veggie chili. As I ate, I began to wonder why potatoes and chili don’t meet more often. The flavor combination is perfect! I started picturing a dish that would take advantage of the flavors of chili but rely on potatoes for bulk. This casserole is the result, with layers of thinly sliced potatoes doused in a spicy tomato-based sauce. Adding black beans and tofu “chorizo” increases the protein content and gives lots of texture to a saucy dish. Cooking the potatoes right in the spicy sauce really infuses them with the spicy flavors, but it also adds substantial baking time. If you’re in a rush, feel free to boil or steam the sliced potatoes ahead of time and then bake the assembled casserole for 15-20 minutes.

Spicy Potato Casserole with Tofu Chorizo

I opted for a smoky, back-burner type spiciness, but if you love big, bold spices, go wild with adding more chili powder or red pepper flakes! The sauce is customizable to your tastes.

Spicy Potato Casserole with Tofu “Chorizo”
Serves 5-6

For the Tofu Chorizo

  • One block (14 oz) extra-firm tofu, pressed
  • 1 tablespoon red wine vinegar
  • 1 tablespoon soy sauce
  • 1 tablespoon Cholula (or your favorite hot sauce)
  • 1/2 teaspoon achiote powder or chili powder
  • 1/2 teaspoon cumin
  • 1/2 teaspoon garlic powder
  • 1/2 teaspoon Mexican oregano
  • 1/2 teaspoon onion powder
  • 1/4 teaspoon coriander
  • 1/4 teaspoon paprika
  • A few dashes liquid smoke
  • A dash cinnamon

For the Casserole

  • 1 tablespoon sunflower or canola oil
  • 1/2 large yellow onion (about 7 oz), diced
  • 2 cloves garlic, minced
  • 1.5 lbs Yukon Gold potatoes
  • 1 28-oz can tomato puree
  • 1 15-oz can black beans

First, prepare the tofu chorizo. In a container with a watertight lid, mix together all chorizo ingredients (except the tofu) and whisk to combine. Using your hands, crumble the tofu into the spice mixture. The tofu crumbles should be small but not fine; it’s okay if they’re not uniform. Put the lid on the container and shake until all the tofu is coated with the mixture. Set aside.

Preheat the oven to 425˚ F.

In a large saucepan, heat the oil on medium. Add the diced onions and cook for about 4 minutes, then add the minced garlic and the tofu chorizo. Cook for another 5-7 minutes, or until the onions are translucent, stirring periodically. While this mixture is cooking, prepare the potatoes. Leave the skins on and slice them lengthwise into about 1/4″ slices. It’s okay if some of them are larger. Once you’ve prepared the potatoes, set them aside.

By now, the onions, garlic, and tofu should be cooked. Turn the heat down to low and add two cups of the tomato puree and all the black beans. Stir to combine and let sit for a minute while you prepare a 9″ x 13″ casserole dish. Spray or lightly brush the dish with a little oil, then pour the remaining plain tomato puree into the dish so it covers the bottom.

Taste the chorizo-tomato mixture and add additional seasonings to taste (chili powder, salt, etc.). Turn the stove off.

Place roughly 1/3 of the sliced potatoes into the prepared baking dish, right on top of the tomato puree. Create a single layer; it’s okay if there are some open spaces, but don’t overlap the potatoes. Using a ladle, spoon 1/3 of the chorizo-tomato mixture over the potatoes and spread to cover them. Repeat with another 1/3 potatoes and 1/3 chorizo-tomato mixture two more times, until everything is used.

Cover the dish with aluminum foil and bake for an hour. Remove the foil and bake for another 20 minutes or until the potatoes are fork tender. If you’re feeling fancy, top with your favorite vegan cheese shreds or cheezy sauce and broil the dish for another 3-5 minutes.

Enjoy!

***

(A note about the tofu chorizo: I based the spice blend on Vegicano‘s Lentil Chorizo. That chorizo de lenteja is out-of-this world delicious! I highly recommend making it and serving it with corn tortillas, pico de gallo, guac, and a simple cabbage slaw. HEAVEN.)

Easy Cheesy Broccoli & Brown Rice Bake

Well! Hello. For once, my extended absence wasn’t due to good ol’ fashioned laziness. No, this time a minor apartment flood situation kept me from blogging. Our upstairs neighbor’s sprinklers went off, and they leaked straight through her floors and into our living room. S and I rushed home from work and found that though the damage wasn’t terrible—nothing major was damaged, and our furniture is all fine—our ceiling was not in good shape. That same night, a cleanup crew tore up our floor (apparently the water could damage the laminate) and pulled down our ceiling. They left us with about seven industrial-strength fans, two huge dehumidifiers (complete with tubes snaking to our sink to drain the water), and strict instructions not to open the windows, no matter how hot it got.

Kitchen floor and fansa

Our poor kitchen in total disarray!

Well. It got hot. Like, 95˚ hot. That heat, combined with the lack of flooring/ceiling and the constant loudness of the fans and dehydrators, sent us scurrying to S’s mom’s house, where we stayed for nearly a week. Now, about two weeks out, the fans are gone, the water is gone… and our ceilings and floors are still gone.

Ceiling

So industrial chic.

We’re anxiously waiting for a contractor to come out and assess the damage and set up a time to fix things. We’ve mostly been holed up in our bedroom and in the kitchen for now, crossing our fingers that things are resolved soon. (It’s a tricky situation involving two insurance companies, two landlords, and us basically reduced to twiddling our thumbs while we wait.)

BUT. In the hopes of restoring some normalcy, we’ve gotten back to cooking. Our first night back in the apartment, I was determined to make something easy and nourishing. This brown rice and broccoli bake is exactly that. It’s easy as can be, especially if you cook the brown rice in advance. Lots of broccoli-rice dishes require pre-blanching the broccoli or sautéing garlic and onions, but I was in no mood for that many steps when I made this dinner. No, this dish is just about as simple as it gets. You pretty much just mix brown rice and broccoli in a casserole dish and stir it up with a basic cheesy sauce. Easy peasy.

Easy Cheesy Brown Rice & Broccoli Bake

Easy Cheesy Broccoli & Brown Rice Bake
Serves three

  • One large head broccoli, chopped into small florets
  • 3 1/2 cups cooked brown rice
  • 1 cup unsweetened almond milk (and an optional additional 1/4 cup)
  • 1/3 cup nutritional yeast
  • 1 teaspoon prepared yellow mustard
  • 1/2 teaspoon salt
  • 1/2 teaspoon garlic powder or granules
  • 1/2 teaspoon paprika
  • A few shakes or twists black pepper
  • 1-2 tablespoons Earth Balance (optional)

Preheat the oven to 400˚.

Prepare a small* casserole or baking dish by spraying it with oil. Add the brown rice and broccoli florets directly to the dish and stir to combine.

In a small bowl, combine 1 cup of the almond milk, nutritional yeast, mustard, salt, garlic powder, paprika, and pepper and whisk until combined. Pour about 3/4 of the sauce over the rice and broccoli mixture, reserving about 1/4. Stir gently so that the mixture is coated. Cover the dish with foil and bake for 30 minutes.

After 30 minutes, remove the dish from the oven, uncover, and stir. Dot with the Earth Balance. If the casserole is looking dry, add the additional 1/4 cup almond milk. Return to oven (uncovered), and bake for another 10 minutes, then remove from oven and pour the remaining sauce over the top. Eat!

*I use a vintage Pyrex casserole dish that’s about 11.5″ x 6.5″ . That’s not exactly a standard size, but it seems to be a 1.5 quart dish.

~~~

I’ve made this dish twice since we’ve returned to the apartment. It’s comforting and homey—just what I need when my actual home is torn up. Here’s to hoping we get things figured out soon!

Note: This post contains an affiliate link. If you purchase something through my link, it costs nothing extra for you, but I get a few pennies. 

Grilled Cheese & Tomato Soup Sandwich

It’s one of the great thrills of my life to hear someone (usually S!) exclaim “Mmm!” after biting into something I’ve made from an original recipe. (Cue the jokes about my boring life.) Truly, though, the sensation of pride and pleasure I feel when I’m feeding someone delicious animal-free food is a unique delight. Last week, I made this amazing pumpkin bundt cake for a coworker’s birthday celebration, and I reveled in the sighs of happiness I heard from my well-fed coworkers. And tonight, when S gave a loud and enthusiastic “Mmm!” after trying this cheesy, tomato-y sandwich, I was similarly pleased.

I’ve been mulling over the idea of a thick, bean-based cheesy sandwich spread for a few weeks. Happy Herbivore has a cheesy spread that makes a decent grilled cheese, but it’s not particularly filling. I wanted to create something with a little more nutritional oomph. Enter the beans! This sandwich combines the classic pairing of grilled cheese and tomato soup into a thick, savory spread that doesn’t taste at all beany. I love it on sourdough, but you can use your favorite sandwich bread.

Grilled Cheese & Tomato Soup Sandwich

Grilled Cheese & Tomato Soup Sandwich
Serves 3 or 4, depending on your spread thickness preferences!

  • 15 oz. Great Northern beans
  • 1/4 cup unsweetened almond milk
  • 1/4 cup + 1 tablespoon nutritional yeast
  • 2 tablespoons tomato paste
  • 2 teaspoons vegetable oil
  • 1/2 teaspoon yellow mustard
  • 1/2 teaspoon garlic powder
  • 1/2 teaspoon onion powder
  • Scant 1/2 teaspoon salt
  • 1/4 teaspoon paprika
  • 2 slices bread per sandwich

In a blender or food processor, combine the beans, almond milk, nutritional yeast, and tomato paste until the beans are pureed and spreadable. Add the remaining ingredients and continue processing or blending until you have a thick, uniform spread.

Transfer the spread to a small saucepot and heat on low. In the meantime, prepare the bread the way you like it best. I like to butter it on both sides and toast it in a pan, but you can also use a toaster or toaster oven. Once the spread is heated through and the bread is toasted, add a few tablespoons of spread to the bread, make the sandwich, and enjoy!

Grilled Cheese & Tomato Soup Sandwich

Truth be told, I’ve never been a huge tomato soup fan, but as part of a cheesy sandwich spread? I dig it!

What’s your favorite sandwich spread or grilled “cheese” recipe?

Warm Lentil & Brussels Sprout Salad with Roasted Radicchio Wedges

With its slightly astringent bite, radicchio isn’t a vegetable I cook with frequently—truth be told, I’ve used it only a handful of times. Recently, though, I stumbled across a method for cooking it that promised to transform it into something much more palatable: roasting! I’m surprised I didn’t think of it myself. What vegetable doesn’t benefit from a little olive oil and some time in the oven at high heat? Roasting radicchio brings out its sweetness, especially in the tender inner leaves. The outer leaves retain some of their bite, but those inner leaves practically melt in your mouth.

I served my roasted radicchio alongside a warm lentil dish that features one of my absolute favorite veggies: Brussels sprouts. I also added pomegranates for a textural contrast and a bite of sweet juiciness that plays well with the strongly flavored sprouts, and a sprinkle of pine nuts adds the finishing touch! I flavored my lentil dish with Trader Joe’s orange muscat champagne vinegar, a lovely mild vinegar that even I—a noted vinegar-hater—can’t totally dislike. If you don’t have it, though, feel free to use another light vinegar and a bit of freshly squeezed orange juice.

Warm Lentil & Brussels Sprout Salad with Roasted Radicchio Wedges

Warm Lentil & Brussels Sprout Salad with Roasted Radicchio Wedges
Serves two

For the radicchio:

  • One head radicchio
  • 1 tablespoon extra-virgin olive oil
  • 1/2 tablespoon pure maple syrup
  • 1 clove garlic, minced as finely as you can get it (or pressed)
  • 1/4 teaspoon salt
  • Dash freshly ground black pepper

For the Brussels sprouts:

  • 1 lb. Brussels sprouts
  • 1 tablespoon extra-virgin olive oil
  • 2 cloves garlic, minced

For the lentils:

  • 2 cups water
  • 1 cup brown lentils

For the dressing/salad:

  • 1/2 tablespoon olive oil
  • 1/2 tablespoon orange muscat champagne vinegar (or 1/2 tablespoon your favorite vinegar + 1/2 tablespoon orange juice)
  • 1/2 tablespoon pure maple syrup or agave nectar
  • 1/3 cup pomegranate seeds
  • Salt and freshly ground pepper to taste
  • Pine nuts for topping (optional but highly recommended)

Add the water to a medium sauce pot and heat on high. Preheat oven to 425˚. Prepare a short-rimmed baking pan by spraying it with oil or lining it with parchment paper.

In a small bowl, whisk together the radicchio marinade: olive oil, maple syrup, garlic, and salt. Set aside.

Quarter the radicchio by trimming the woody bottom off and cutting the radicchio into four wedges. Using a pastry brush, coat all of the exposed surfaces of each wedge with the olive oil marinade. Place cut-side down on the baking pan and place in the oven while you prep the Brussels sprouts.

If the water’s boiling at this point, add the lentils, cover the pot, and turn the heat down to a simmer.

Roughly quarter each Brussels sprout (or halve them if they’re particularly small). You don’t have to use uniform precision; just make sure each piece is roughly the same size. Add to a bowl and toss with the olive oil, garlic, salt, and paprika until well coated. Remove the baking pan with the radicchio from the oven and add the Brussels sprouts to the pan. Return the pan to the oven and bake for 15 minutes, then flip the radicchio quarters so the other cut side is down and give the Brussels sprouts a good stir. Bake for another 15 minutes or until the Brussels sprouts start to crisp up.

While the veggies are roasting, keep an eye on the lentils. When all the water is absorbed, turn off the stove and remove the pot from the heat. Uncover it and let it sit, stirring the lentils frequently to cool them a bit.

After the lentils have cooled for about five minutes, drizzle in the dressing ingredients and stir until the lentils are well coated. Allow the mixture to sit while the veggies finish roasting.

Once the Brussels sprouts are crispy and the radicchio has wilted and darkened, remove them from the oven. Toss the Brussels sprouts with the lentils, top with pine nuts, and serve immediately with the radicchio wedges on the side.

~~~

What’s your favorite way to serve radicchio? Brussels sprouts?