Sweet Iced Oat Milk

VeganMoFo 2015 banner

Day 7: Make/eat something inspired by a book or film.

Today’s prompt is terrifyingly broad! On this hot Labor Day Monday, when I’m still tired out from last night’s fundraiser and post-fundraiser friend times, all I want is to drink ice-cold water and snack on healthy foods. As I perused the internet looking for inspiration, I came across this quote from A Game of Thrones:

“…Wine no longer agrees with my digestion, I fear, but I can offer you a cup of iced milk, sweetened with honey. I find it most refreshing in this heat.” (Grand Maester Pycelle to Ned Stark, p. 250)

As a fan of the book series, the idea of making something super-simple yet inspired by a King’s Landing drink appealed to me. Ned describes the milk as “oversweet to his taste,” so I made sure not to go overboard with the sweetener in my version. I think this one would be Eddard-approved!
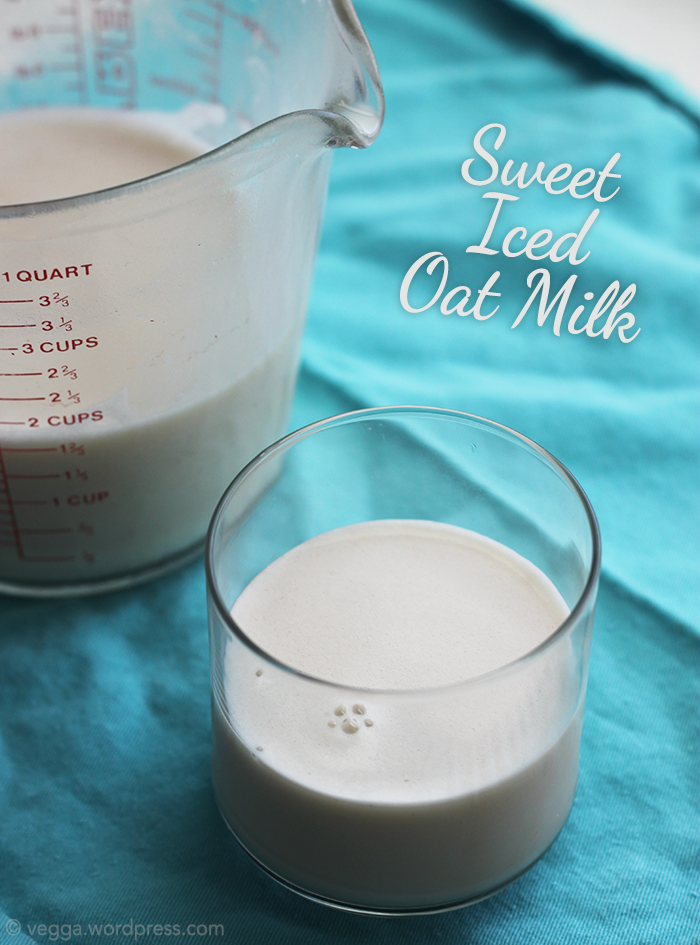
Sweet Iced Oat Milk

Sweet Iced Oat Milk
Serves 2-3

  • 1 cup rolled oats
  • 3 cups filtered water
  • 2 1/2 T pure maple syrup
  • Dash cinnamon

Add the dry oats to the blender and pulse for 20-30 seconds, or until they’re in small pieces. Add the water and let soak for about 10 minutes, giving the oats a stir now and then if you think of it. Blend for 2-3 minutes, or until you don’t see any pieces. (Give your blender a little rest in between minutes if it’s not particularly strong.)

Place a nut milk bag over a large measuring bowl or mason jar and pour the oat milk through the bag. Use your hands to gently squeeze out the milk, but most of it should strain very quickly. Set the bag aside. Pour the milk back into the blender and add the maple syrup and a dash of cinnamon. Blend for 10-15 seconds, then return to a jar for storing.

If you have time, freeze a few ice cubes made of the oat milk. To serve, add 2-3 cubes to a frosty glass, then pour in the milk. If you’re short on time, you can place the entire container of milk in the freezer for about 15 minutes so it gets very cold, and forgo the ice cubes. No matter which way you serve it, be sure to give it a quick whisk or stir to recombine any separated ingredients.

Oat milk should last for about a week in your fridge.

Sweet Iced Oat Milk

Spicy Thai Eggplant (a not-recipe)

VeganMoFo 2015 banner

Day 6: Re-create a restaurant meal.

I am not impressed with today’s prompt. You want me to make a restaurant-quality meal… on a Sunday?! I might not be religious, but Sunday is my day of rest. Sure, I might spend a few hours in the kitchen making big-batch food to freeze or use in lunches, but it is decidedly not my day of recipe experimentation. Plus, today is a special Sunday. A good friend is hosting a fundraiser for Second Chance Wildlife Center at a local winery tonight, and I’ve got to bake a couple cakes to bring. Hmm… so much for that day of rest.

Which is all a big long preamble to explain why I’m cheating on today’s MoFo post. Instead of actually re-creating a dish, I’m telling you how I would do it. But I’m not actually doing it. Because ain’t nobody got time for that. And by “nobody,” I mean me. And by “time,” I mean the inclination to shower, dress in real clothes, and run to the Asian market in between baking my Bundt cakes and finalizing my contribution for tonight’s silent auction, then come home and experiment with a dish I’ve never made before, then photograph it, then upload the photos, then edit them, then post about the whole shebang. Nope. Not happening.

If I did have the time and the inclination, though, I’d re-create my current favorite Thai dish: the generically named spicy Thai eggplant. It’s become my go-to order at Thai Tanium, a local eatery that’s a favorite among my mostly vegan coworkers. I love how the chunks of eggplant break apart and become almost creamy. I love the Thai basil, a bright note among a heavier base. I love it all! If I were making my own spicy eggplant, I would start with these:

Purple Pixie Eggplants

These locally grown Purple Pixies are perhaps the most beautiful vegetables I’ve ever purchased. When I saw them at Wegmans, I couldn’t pass them up! They are tiny, perfect, and I don’t know if I’ll be able to eat them. (Just kidding; I will.)

If I were using them in a Thai eggplant dish, I’d stop by the Asian market and pick up some black bean sauce. I’d also look for vegan fish sauce, but if they didn’t have it, I’d probably make my own. I’d check for Thai basil, but my homegrown regular ol’ basil would work just fine in a pinch. I would base the recipe on this one, but I’d take some notes from this recipe, especially for the sauce. I wouldn’t deep-fry the eggplant, though, and I might add some tofu for added protein. I’d serve it with brown rice, and it would be delicious.

Purple Pixie Eggplant

Apologies for the cop-out — I don’t intend to cheat on any more prompts this month!

My Favorite Sandwich + a Savory Marinated Tofu Recipe

VeganMoFo 2015 banner

Day 5: Best sandwich ever.

I love and hate today’s prompt. Love, because a good sandwich can be sublime. When quality bread meets fresh veggies, a savory protein, and a spreadable fat, beautiful things happen. Hate, because best ever?! How am I supposed to decide? I haven’t tasted all the sandwiches! It’s too much pressure! I can’t do it!

What I can do, however, is share my absolute favorite go-to sandwich, the one I make when I have a little prep time. It doesn’t sound like much more than a glorified TLT, but the flavor profile is totally different thanks to sauerkraut and Dijon mustard. This “recipe” is also flexible; you can modify it based on whatever veggies and toppings you have in the house. Just make sure to include the marinated tofu!

Marinated Tofu Sandwich

Here’s what you’ll need:

  • Quality bread. Homemade is great, but today I’m using Trader Joe’s sourdough pane. I usually prefer a grainier bread, but this is what I have!
  • Spread. Vegan mayonnaise and a good Dijon mustard work perfectly here. Don’t use anything with too much unique flavor, like pesto.
  • Sauerkraut. It adds such a perfect tang!
  • Sprouts. I used home-sprouted mung beans. You don’t need anything fancy; these were only sprouted for a day! I use a Handy Pantry stacking sprout garden and love it, but you can go old-school with a jar and cheesecloth.
  • Marinated Sandwich Tofu. See below! You can make this in advance and use it cold, or eat it hot off the pan. Mmm.
  • Veggies. Sliced fresh tomatoes and a few pieces of lettuce are my go-to. I’ll also add some avocado if I have it!

Marinated Tofu Sandwich

Marinated Sandwich Tofu

Serves two to three

  • 1 block extra-firm tofu (14-16 oz), pressed for at least an hour (if you have time)
  • 2 T low-sodium soy sauce or tamari
  • Scant 1/2 T vegan Worcestershire sauce
  • 1 tsp toasted sesame oil
  • 1/2 tsp hot sauce like Frank’s (optional)
  • 1/2 tsp maple syrup or maple sugar
  • 1/2 tsp garlic powder
  • Dash liquid smoke (more if you’re particularly fond of the flavor)

In a large container with an airtight lid, whisk together all the marinate ingredients (everything except the tofu). It might not look like much marinade, but it’s enough!

Prep your pressed tofu by laying it down on a cutting board and cutting it in half. Turn those two halves on their sides and slice them into four wide slices each, for a total of eight large slices.

Using a fork, poke a few shallow holes in each slab of tofu. Don’t poke too deeply; you’re not trying to go all the way through. You just want to create a few more nooks and crannies for the marinade to penetrate.

One slice of tofu at a time, place each side of the tofu in the marinade so all sides are coated. Depending on the size of your container, you might have enough room for all the tofus to lay flat. If not, you can stack them once they’re coated on each side. Cover the container and refrigerate it.

Marinate for at least 30 minutes, gently flipping the container over halfway through.

When you’re ready to cook the tofu, heat a little vegetable or olive oil in a heavy pan on low-medium heat — I like to use cast iron — and cook as many tofus as fit comfortably at a time. Don’t overcrowd it, though, or you’ll break a tofu! Cook for about 4 minutes on either side, but you can cook for longer if you want a crispy crust.

To assemble the sandwich, toast two slices of bread per sandwich very lightly. Spread liberally with mustard, mayo, or whatever spread you’re using. Place two slices of tofu on one slice of bread and a pile of sauerkraut on the other, being sure to let the sauerkraut drain for a second before adding it so the sandwich isn’t too watery. Then pile on the other ingredients, smoosh together, slice in half, and get your nom on!

My Weird Snack

VeganMoFo 2015 banner

Day #4: Tell us about a weird food combo that you love.

Once, when I was young, my mom told me that when she was young, her older sister used to eat the weirdest food combination: shortening plus granulated sugar. Basically, fat and sugar. My mom told me this in disgust, and on the surface I sympathized, but inside I was curious: What would shortening and sugar taste like? Needless to say, I found out: Sickeningly oily, sweet, and a teeny tiny bit disgustingly good.

Unlike my aunt, I never made a habit of sneaking the infamous shortening-sugar mixture. But, I must admit, I do have a snack habit that’s nearly as weird. These days, when I get the munchies, here’s what I mix up.

Tell us about a weird food combo that you love.

IT’S WEIRD AND GROSS AND UNHEALTHY, I KNOW. It’s a sugar and fat bomb. But it’s MY sugar and fat bomb. I mix up a big spoonful of peanut butter, a small scoop of flour, a small glug of maple syrup, a dash salt, a handful of chocolate chips, and enough powdered sugar to make into a goopier cookie dough texture. And then I eat it. And now that’s out in the open.

…so, what’s YOUR weird snack?!

Quick and Easy Pudla

VeganMoFo 2015 bannerDay 3: Quick, easy, and delicious.

Today’s prompt has me jazzed — I can’t wait to read everybody’s favorite quick, easy, and delicious meals! My contribution is something that most of you probably already know and love: pudla. If you haven’t heard of it, let me enlighten you: pudla is basically a chickpea flour-based omelette or crepe. It comes together in no time, and it’s easily adapted to any chopped veggies and spices you have on hand. I’ve been a pudla fan since Kittee’s seminal pudla post a few years back; pudla is my go-to in-a-rush meal. I’ve perfected my technique over the years, although I’ve certainly had my fair share of undercooked, scrambled, broken-up pudla patties in my day! I chose onions and tomatoes for today’s pudla simply because they’re what I had on hand.

pudla1

Quick & Easy Basic Pudla

Serves 1

  • 1 tablespoon vegetable or olive oil
  • 1/4 cup chickpea flour
  • 1/8 teaspoon baking soda
  • Dash salt
  • Dash cumin
  • Dash turmeric
  • A few twists of freshly ground black pepper
  • 1/4 cup + 1 T water
  • Small dash lemon juice (~ 1 tsp)
  • 1-2 T very finely diced (or grated) onion
  • 1 small tomato, chopped into small pieces (try to remove the juicy/seedy bits)

Add the oil to a thick-bottomed saucepan (cast iron works great) and heat over medium-low.

In a small bowl, whisk together the chickpea flour, baking soda, and spices. Pour in the water and and lemon juice and whisk to form a thick batter. Fold in the onion and tomato.

Pour the batter into the pan and cook over medium-low until the middle of the top side looks just nearly cooked through (i.e. it shouldn’t be runny). It should take 5-6 minutes. Flip and cook the other side for another 3-4 minutes or until golden brown and crispy. The key is to use low heat so it doesn’t burn, while still cooking it all the way through. If you try to flip it too soon, it’ll fall apart. If it’s sticking while you flip it, quickly drizzle a little more oil to the pan while you flip.

pudla2

Disclaimer: This post contains affiliate links. If you purchase something through my link, it costs nothing extra for you, but I get a few pennies to help cover hosting costs.

Veganized American Chop Suey

VeganMoFo 2015 banner

Day 2: Recreate a meal from your childhood.

Me: “Have you ever had American chop suey?”
Steven: “What? No. What is that?!”
Me: “It’s like, elbow macaroni and beef in tomato sauce. My mom used to make it a lot when I was a kid.”
Steven: “OH! I called that cowboy mac!”

American chop suey, cowboy mac… whatever you call it, this ever-so-basic dinner is pure comfort food. Somewhere between a casserole, a chili, and plain old pasta with tomato sauce, it was a dinnertime standby during my childhood, yet I haven’t had it for probably 15 years. Today’s MoFo prompt, therefore, was the perfect excuse!

American Chop Suey

American Chop Suey (aka Cowboy Mac)
Serves four

  • 1 T olive oil
  • 1/2 yellow onion, diced
  • 1 green pepper, diced
  • 1 cup beefy crumbles, store-bought or homemade*
  • 1/2 T garlic powder
  • 14.5 oz can diced tomatoes
  • 14.5 oz can tomato sauce
  • 8 oz elbow macaroni
  • Salt and pepper to taste

Add water to a pot and bring to a boil for the pasta. In the meantime, heat the olive oil in a large sauce pot over medium, then add the onion, pepper, beefy crumbles, and garlic powder. Sauté over medium for 6-8 minutes or until the crumbles are browned. Add both cans of tomatoes, stir to combine, and simmer uncovered on low.

In the meantime, when the water boils, add the pasta and cook according to the package’s instructions.

When the pasta is al dente, drain it and add it to the pot with the sauce. Simmer together for another 5 minutes, add salt and pepper to taste, and serve.

* I made the Basic Seitan Crumbles from 500 Vegan Recipes.

American Chop Suey

Note: This post contains an affiliate link. If you purchase something through my link, it costs nothing extra for you, but I get a few pennies. I’m not looking to make a fortune, just to cover hosting costs. :)

VeganMoFo 2015: PB&J Overnight Oats for Breakfast

VeganMoFo 2015 bannerIf you’re a regular reader, you know that every year I get very into the Vegan Month of Food (aka VeganMoFo). Themes are my JAM, and I love coming up with a new one every year. But not this year. This year, the powers-that-be at MoFo HQ are doing something a little different by offering up daily prompts that participants are highly encouraged to follow. And I’m happy to join! No more MoFo stress for me; this year, I’m going to revel in the simple deliciousness of vegan food. And what better way to start than with breakfast?!

That’s right, today’s prompt is: Rise and Shine! It’s MoFo time! Tell us about your breakfast.

Now, I’m no stranger to breakfast recipes — I’ve shared lots of ’em here. For a work-day morning, I generally keep things simple: oatmeal, a baked good, a piece of fruit… I usually don’t get much more complex than that. So for today’s breakfast, I opted for an easy, make-ahead breakfast: overnight oats. This time, I adapted a classic lunch flavor pairing (PB&J!) for breakfast. The addition of peanut butter adds a little extra hit of protein, helping keep you full for longer. You can use any jam, jelly, or preserve in this recipe; I opted for a homemade blueberry-lavender jam I whipped up a few weeks ago. It’s unsweetened and a little tart, so I added some brown sugar to my oats. Feel free to omit the added sweetener if your jam is sweet enough!

PB and J Overnight Oats

PB&J Overnight Oats
Serves two

  • 1 cup rolled oats (I use Bob’s Red Mill Rolled Oats)
  • 1 cup almond milk
  • Heaping 1/4 cup natural peanut butter
  • 1 T brown sugar, agave nectar, or maple syrup (omit if your jam is sweetened)
  • Dash salt
  • ~1/4 cup jam of choice

Add the almond milk, peanut butter, sweetener, and salt to an airtight container and whisk until the peanut butter is emulsified and fully incorporated in the mixture. Add the oats, cover the container, and shake for about 10-15 seconds. Refrigerate overnight.

To serve, layer oatmeal and jam in a serving jar or bowl. Top with chopped peanuts if desired. Enjoy!

Trying a new jam flavor? Let me know how your vegan PB&J overnight oats turn out!

Note: This post contains affiliate links. If you purchase something through my link, it costs nothing extra for you, but I get a few pennies to help cover hosting costs.

Peanut Butter-Chocolate Chip Granola (and a brief disquisition on protein needs)

LVV MoFo 2014 main

Snickering at the “But where do you get your protein?!” question is a bit of a shibboleth in vegan circles. It’s a tired question, one that’s inspired lots of great memes. And it has a pretty simple answer: From nearly everything I eat. This quote from the American Heart Association just about sums it up:

“You don’t need to eat foods from animals to have enough protein in your diet. Plant proteins alone can provide enough of the essential and non-essential amino acids, as long as sources of dietary protein are varied and caloric intake is high enough to meet energy needs.” (1)

Bam.

Still, protein-related myths abound. There’s a notion that plant proteins are inferior to their animal-derived counterparts because they don’t provide all essential amino acids in a single source (and are thus called “incomplete” proteins). There’s a commonly held and oft-mentioned misbelief that you must consume all of your complementary proteins in a single meal to derive the full protein benefit, but that’s been disproven. Instead, as long as you eat a variety of proteins in a single day, your body can take care of combining them. (2)

So—how much protein do you need? Turns out, not as much as lots of people think. Unless you’re very active, 10-35% of your calories should come from protein. The CDC has a basic set of guidelines here, and you can get more tailored recommendations here. I’ve done a few calculations, and I should be getting between 50 and 70 grams per day. What does that mean in real-world food terms? Well, half a block of tofu has around 18 grams, half a cup of tempeh has 15 grams, and half a cup of black beans has 20 grams. And those are just the protein powerhouses! Most of the incidental foods we eat contain at least a little protein, and those grams add up. For example, bagels often contain around 10 grams of protein. A small handful of almonds gives you around 4 grams. And you could get a whole 7 grams just from eating granola. Not just any granola—Peanut Butter-Chocolate Chip Granola.

This granola.

Peanut butter granola spilling from a mason jar onto a wooden cutting board.

Peanut Butter-Chocolate Chip Granola

Serves 8

  • 2 tablespoons coconut oil
  • 1/3 cup creamy unsalted natural peanut butter
  • 1/4 cup pure maple syrup
  • 2 teaspoons pure vanilla extract
  • 2 cups rolled oats (I like Bob’s Red Mill Rolled Oats)
  • 1/4 cup ground flax seed
  • Scant 1/2 teaspoon salt
  • 1/4 cup roasted unsalted peanuts
  • 1/4 cup chocolate chips

Preheat oven to 325˚ and line a flat baking sheet with parchment paper.

In a small saucepan, add the coconut oil, peanut butter, maple syrup, and vanilla extract. Stir to combine, heating over low so that the oil and peanut butter soften. Once all four ingredients are well mixed, turn off the heat and set aside.

In a large mixing bowl, add all the dried ingredients. Pour the peanut butter mixture into the dry ingredients and mix with a large wooden spoon. Once the dry ingredients are coated with the peanut butter mixture, pour the granola onto the prepared baking sheet and bake for 20-25 minutes or until the oats are golden, removing from the oven and stirring every ten minutes or so. Remove from the oven and let cool for at least ten minutes before eating.

pbgranola3

Let’s be real—you’re probably going to eat this stuff by the handful, grabbing a clump every time you walk by the cooling baking sheet. But you could also serve it in a bowl with some cold almond milk or a dollop of soy yogurt, adding a couple extra grams of protein to your day. Yum.

pbgranola2

So, bottom line about protein? Stop worrying about it. Eat a varied, healthy diet and you’ll be just fine. And remember, protein lurks in the most unlikely places—even a bowl of sweet, salty, peanutty granola.

Sources cited:

(1) http://www.heart.org/HEARTORG/GettingHealthy/NutritionCenter/Vegetarian-Diets_UCM_306032_Article.jsp 
(2) http://www.cdc.gov/nutrition/everyone/basics/protein.html

Note:

I’m neither a doctor nor a dietitian; please don’t treat my posts as medical advice! Consult a medical practitioner for specific medical or nutritional recommendations.

Disclaimer: This post contains affiliate links. If you purchase something through my link, it costs nothing extra for you, but I get a few pennies to help cover hosting costs.