Fusion Challenge: Pumpkin Biscuits for Humans and Dogs

VeganMoFo 2015 banner

Day 30: Fusion Challenge!

Oh boy, I am taking some LIBERTIES with this prompt.

Typically, “fusion” food combines elements of two (or more) culinary traditions — like curry burritos or Thai pineapple pizza (!). I’m all for merging the best of the best to create super-delicious meals with bold flavors. I even recipe tested for Joni Marie Newman’s fusion-inspired cookbook, Fusion Food in the Vegan Kitchen. But I’m looking at fusion food from a different lens today… the lens of “combining human and dog food.”

HEAR ME OUT.

Backstory first. Working at The Humane Society of the United States means that I get to bring my dogs to work. We have a strong Pets in the Workplace policy, along with a committee that governs it. It’s a win for humans and dogs alike, in so many ways. But a few weeks ago, we learned that at least one office dog had bordatella, a highly contagious bacterial infection. On the advice of our staff veterinarians, the committee temporarily suspended the PIW policy. For two weeks, our canine companions stayed home, and we humans remembered what it’s like to work somewhere that doesn’t allow dogs. I missed the frequent excuses to get outside, the sound of the occasional bark from somewhere in the building, and the morning rituals when my coworkers (dogs and humans!) greet each other. Of course we all appreciated the caution that prompted the suspension, but it was no fun. And I wished I could explain to Moria and Luna that we weren’t abandoning them at home; they’d be able to return eventually.

Pups

My babies!

Tomorrow, though, the dogs are back! And I couldn’t be more excited. I knew I wanted to bake some dog treats to give out to any pup I see tomorrow, and then I thought… why not make some people treats, too? The ultimate fusion food!

(Am I stretching it? Eh. Too bad.)

Dog and People Biscuits

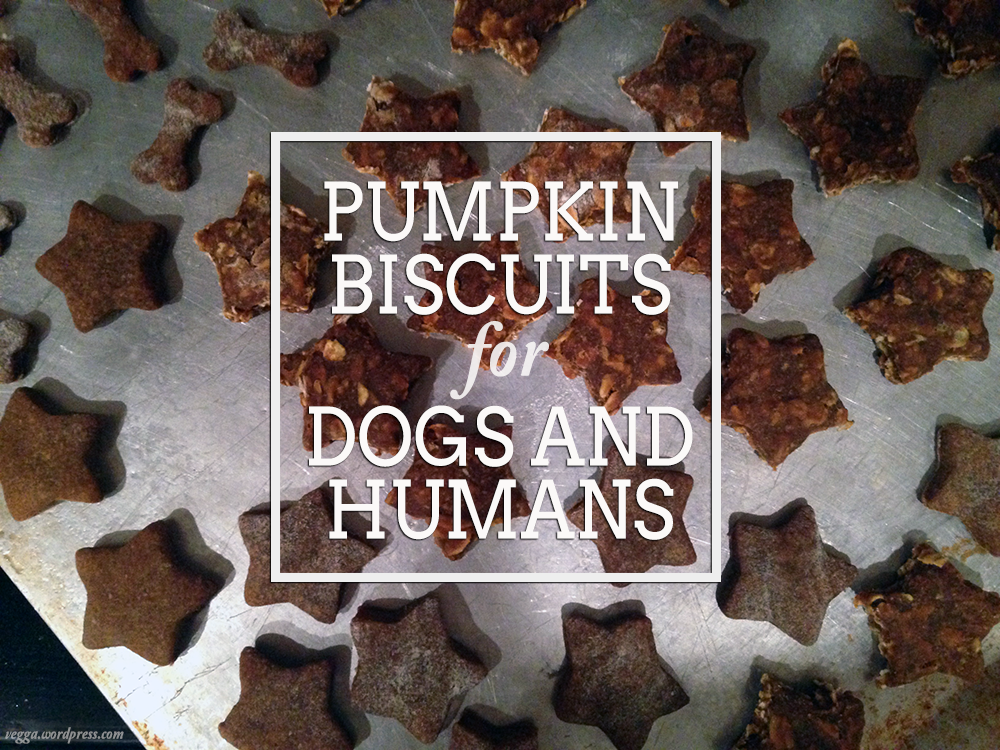
My strategy was to create a base dough that’s then separated in half and flavored for each species. The human variety has sugar and spices, while the dog variety has oats and extra molasses. Note that although you can definitely eat your canine companion’s biscuits, she shouldn’t eat yours — at least not if you include the nutmeg, which isn’t good for pups. And no, these aren’t the most exciting human biscuits, but I have a secret love for chewy, doughy, mildly flavored things I can snack on!

Ed. note: Okay, this is embarrassing. The human biscuits are… not great… the day after baking, so I can’t really recommend them. Instead, you can double the dog-biscuit ingredients and make a LOT of dog treats, or halve the first set of ingredients. I’m sorry!

Pumpkin Biscuits Two Ways
Makes many tiny biscuits

  • 1 15 oz. can pumpkin puree
  • 1/3 cup coconut oil, softened
  • 1 cup whole wheat flour
  • 1/2 cup wheat germ
  • 1 1/2 T blackstrap molasses
  • 1 T cinnamon

For the human biscuits (not recommended)

  • 1 cup + 1 T all-purpose flour
  • 1/2 cup dark brown sugar
  • 1/4 tsp allspice
  • 1/4 tsp nutmeg
  • 1/8 tsp cloves

For the dog biscuits

  • 1/2 cup all-purpose flour
  • 1 1/2 cup rolled oats

Combine the first set of ingredients in a large bowl, then split the dough and move one half into a new bowl. Preheat the oven to 350˚ and oil two cookie pans.

This second bowl will be your human-biscuit bowl. Add all the human-biscuit (HB) ingredients and mix until well-combined; it will take a few minutes to come together. Refrigerate this dough while you prepare the dog-biscuit (DB) dough. To do that, mix in all the DB ingredients. Refrigerate that dough while you roll out the HB dough.

Roll out he HB dough on a well-floured surface with a rolling pin. Using your favorite cookie cutters, cut the dough into shapes. Repeat the process with the DB dough. If your cookie cutters are vastly different sizes, try to group the small biscuits on a single sheet and the large biscuits on another sheet.

Bake small biscuits for about 15 minutes and larger ones for about 18. They’ll harden as they cool, so don’t worry if they’re soft when they come out of the oven.

~~~

And with that, I say goodbye to Mofo 2015! I’ve been a little burned out this past week, so honestly I’m not sorry it’s over! But I do like the prompts — Steven and I are already musing about ways to incorporate fun/surprise prompts into my blogging practice, and I have some good ideas. Stay tuned!

…and now I’m gonna go eat some roasted potatoes and Gardein tenders. Night, y’all!

Advertisement

Strawberry-Coconut Granola

I’ve got a pretty robust travel tag going, and for good reason: I love, love, love to travel. And I love talking about traveling! Besides daydreaming about my next trip, planning a detailed itinerary, and overthinking my suitcase strategy, every trip I take involves lots of pre-departure food research. This New Zealand trip has been no exception! And one very important part of my food planning is deciding what travel snacks to bring.

My strategy hasn’t deviated much from the one I employed when I went to Italy a few years ago. It’s all about nutritious, protein-rich snacks to keep my tummy full. I made a Wegmans and Trader Joe’s run to stock up on pre-made snacks, and I also whipped up a batch of granola for munching. Since I knew I’d mostly be eating this by the handful (not in yogurt or with plant milk), I needed to make sure this granola had lots and lots of big ol’ clumps. I’ve seen oil-free granola recipes that use applesauce for moisture, so I decided to try something similar. But I wanted to experiment with a different, bolder pureed fruit, one that would add flavor as well as moisture. Strawberries seemed like the perfect choice, and they worked wonderfully, especially when paired with coconut. Mmm.

Strawberry-Coconut Granola

Strawberry-Coconut Granola

  • 1 cup fresh or frozen strawberries
  • 1/4 cup maple syrup
  • 2 tablespoons coconut oil
  • 1/2 tablespoon vanilla extract
  • 1/3 cup shredded unsweetened coconut
  • 2 cups rolled oats
  • 1/4 cup ground flax seed
  • 1/4 teaspoon salt
  • 1/2 cup mix-ins of choice (I used chopped almonds and chocolate chips)

Preheat oven to 350˚ and line a baking sheet with parchment paper or spread liberally with coconut oil.

In a food processor, blend the strawberries until they’re nearly pureed. (If you’re using frozen strawberries, they should be the texture of a slushie.) Set aside.

In a small saucepan, add the coconut oil, maple syrup, and vanilla extract. Stir to combine, heating over low so that the oil melts. Once all three ingredients are well mixed, stir in the dried coconut. Let sit for a minute, then turn off the heat. Add the pureed strawberries and stir to combine, then set aside.

In a large bowl, mix the oats, ground flax, and salt together, then pour in the wet ingredients. Stir to combine, then fold in any mix-ins you’re using.

Pour the granola onto the prepared baking sheet and spread into a thin layer. Bake for 35-40 minutes, stirring every 10 minutes or so, then remove from oven and let cool completely before eating.

Pumpkin Quinoa Muffins

Ah, weekends. I truly enjoy my job, but I still relish the no-obligations charm of the weekend. With a few exceptions, this Saturday morning was top of the charts. Reading, coffee, toast, cool autumn air, yesterday’s Diane Rehm show, the scent of pumpkin muffins in the oven… what’s not to love? (Cleaning Luna’s mucus-puke off the sofa, but let’s not get into that.)

I don’t know about you, but when I cook a pot of grains, I always make extra. Brown rice, quinoa, whatever—it’s a sure thing that we’ll use it up, whether it’s in a lazy lunch like a burrito bowl or a slightly more time-consuming meal like Sweet Potato and Red Lentil Soup. So when I prepped the quinoa for last week’s Nutty Quinoa-Stuffed Delicata Squash, I made extra. Instead of incorporating it into a savory dinner dish, though, I decided to try putting quinoa into muffins. And I’m really glad I did. I love the slightly nutty taste and the not-quite-crunchy texture it adds, not to mention the nutrition boost!

Pumpkin Quinoa Muffins

Pumpkin Quinoa Muffins
Makes 12 muffins

  • 1 1/2 cups unbleached all-purpose flour
  • 1/3 cup wheat germ (or more flour)
  • 1 teaspoon baking powder
  • 1/2 teaspoon ground cinnamon
  • 1/2 teaspoon ground ginger
  • 1/2 teaspoon salt
  • 1/4 teaspoon baking soda
  • 1/4 teaspoon ground nutmeg
  • Dash cloves
  • 1 cup unsweetened almond milk
  • 2/3 cup pumpkin puree
  • Heaping 1/3 cup granulated sugar or coconut sugar
  • 2 tablespoons dark brown sugar (or more regular sugar)
  • 2 tablespoons melted coconut oil (or vegetable/canola oil)
  • 1 teaspoon pure vanilla extract
  • 1 cup cooked and cooled quinoa

Preheat the oven to 350˚ and prepare a dozen-muffin tin using liners or a light spray of oil.

In a large mixing bowl, sift together the flour, baking powder, baking soda, salt, and spices. Stir in the wheat germ, if using.

In a small bowl, whisk together the wet ingredients (not including the quinoa) and the sugar(s) until well combined. Make a well in the center of the dry ingredients and add the wet. Using a plastic spatula or a wooden spoon, stir gently to combine, but don’t over-mix. Fold in the quinoa, then add the batter to the prepared muffin tin with a spoon. Fill each well about 3/4 full. Bake for 22-25 minutes, or until a toothpick inserted in the center of a muffin comes out clean. Remove from oven and let cool for a few minutes before eating.

~~~

Fair warning: If you have a major sweet tooth, you might want to add more coconut or brown sugar to these babies. Although my younger self would probably recoil in disgust at this development, I find myself less drawn to sugary-sweet baked goods these days. (With a few notable exceptions!) Especially when those baked goods might well constitute my breakfast. So these muffins, which are spicy and quinoa-y and not so sweet, are my perfect fall breakfast snack. I think they could only be more perfect if I’d used spelt or whole-wheat pastry flour, but alas—we have neither in the house right now, and S took the car this morning, and I was too lazy to walk over to the grocery store. Ah, Saturday.

What’s your ideal Saturday breakfast? What else should I put quinoa in?!

Note: This post contains an affiliate link. If you purchase something through my link, it costs nothing extra for you, but I get a few pennies. I’m not looking to make a fortune, just to cover hosting costs. :)

Pumpkin Spice Baked Oatmeal Bars

LVV MoFo 2014 main

I’m writing this post on Thursday night and I’m so very antsy! On Friday afternoon, S and I will be taking off for Rhode Island to meet baby Charlie. I don’t know how I’ll get through the work day tomorrow; I’m so excited! And then we’ll be in the car for eight hours or so… I wish we could fast-forward to the minute I get to wrap my arms around the teeny-tiny newest member of my family. But alas, time marches onward steadily! At least S and I will be armed with snacks galore so we don’t need to make a stop for dinner. He’s picking up fruit and a bag of Earth Balance white cheddar popcorn (SO GOOD), and I’ve made a sweet treat to keep us energized.

Pumpkin Spice Baked Oatmeal Bars

Pumpkin Spice Baked Oatmeal Bars

Makes eight bars

  • 1/4 cup + 2 tablespoons coconut sugar (or brown sugar)
  • 1/4 cup coconut oil
  • 2 tablespoons blackstrap molasses
  • 2 tablespoons agave nectar (or pure maple syrup)
  • 1 teaspoon pure vanilla extract
  • 1 cup pumpkin puree
  • 3 cups rolled oats (I like Bob’s Red Mill Rolled Oats)
  • 1/3 cup wheat germ
  • 1/2 teaspoon cinnamon
  • Scant 1/2 teaspoon salt
  • 1/4 teaspoon allspice
  • 1/4 teaspoon ginger
  • 1/4 teaspoon nutmeg
  • Dash cloves

Preheat the oven to 350˚. Spray an 8″ x 8″ baking pan or line with parchment paper.

In a small saucepan, heat the coconut sugar, coconut oil, molasses, agave nectar, and vanilla extract over low. Stir to combine as the oil melts. Once all ingredients are well mixed, turn off the heat and stir in the pumpkin puree.

In a large bowl, add all the dry ingredients and mix. Pour in the wet ingredients and stir with a wooden spoon or plastic spatula until the oats are coated and all ingredients are well mixed. Transfer the mixture to the prepared baking pan and press down evenly.

Bake for about 30 minutes until the oats begin to pull away from the sides of the pan. Remove from oven and let cool for at least 10 minutes before slicing with a sharp knife. If you’re patient, let them cool before eating. If not, they might be a little crumbly!

Inspired by this recipe from Two Peas and Their Pod.

Pumpkin Spice Baked Oatmeal Bars

Baked oatmeal bars strike again! I can’t help it; I just love this easy, on-the-go method of enjoying oatmeal. These bars are just sweet enough for me, but if you like a sweeter breakfast, you could substitute maple syrup for the blackstrap molasses. But then, of course, you’d lose out on the stellar benefits of my beloved blackstrap! Each bar gives you 13% of your RDV of iron, about 6 grams of protein, substantial fiber, and nearly your entire day’s requirement of vitamin A. Not a bad way to keep your tummy full on a drive up the east coast!

What are your favorite road trip snacks?

Disclaimer: This post contains affiliate links. If you purchase something through my link, it costs nothing extra for you, but I get a few pennies to help cover hosting costs.

Navy Bean Biscuits & Roasted Garlic Gravy

LVV MoFo 2014 main

Real talk: Finding substantial sources of calcium has been more difficult than finding sources of protein or iron. I’m learning that although lots of foods contain calcium, they usually don’t contain a whole lot of calcium. That’s not necessarily bad; if you eat a varied diet, you probably acquire little bits of calcium from lots of sources. There just aren’t a lot of calcium powerhouses out there. So far this week, I’ve relied heavily on chia seeds, but let’s face it: woman cannot live on chia alone. It’s time to stop relying on the chia crutch.

In my search for a new calcium crutch, I looked to the ever-faithful bean. Most beans offer a bit of calcium, but nothing to write home about (per cup, black beans have 5% of the RDV, dark red kidney beans have 6%, and pinto beans have 8%). But one bean stands out: the unassuming navy bean. With 13% of the RDV in a cup, they outpace their legume companions by a long shot.

With this recipe, I’m taking full advantage of my new discovery. Navy beans make their way into the two main components of this savory plate of biscuits and gravy, and almond milk and tempeh help increase the calcium content.

Navy Bean Biscuits & Roasted Garlic Gravy

Navy Bean Biscuits with Roasted Garlic Gravy
Makes 16 biscuits and about 5 cups of gravy

For the biscuits:
1 cup whole-wheat pastry flour
1 cup unbleached all-purpose flour
1 tablespoon baking powder
1/4 teaspoon baking soda
1/2 teaspoon salt
1 cup cooked navy beans
3/4 cup unsweetened almond milk
3 tablespoons very cold vegan butter, cubed

Preheat oven to 450˚ and line a baking pan with parchment paper or spray it lightly with oil and then dust with flour. (If you’re going to chill your dough before baking, you can wait to preheat the oven.)

Using a standard blender or an immersion blender, puree the navy beans and almond milk until smooth. Set aside.

Add flour, baking powder, baking soda, and salt to a large mixing bowl and stir to combine. Using a fork, pastry cutter, or your fingertips, cut in the vegan butter until the mixture is coarse and sandy. Make sure there are no large lumps of butter remaining. Add the almond milk and bean mixture and stir with a plastic spatula or wooden spoon until the dough comes together. Don’t over-mix. It’ll be sticky, but that’s okay.

At this point, you can either refrigerate the dough for at least 20 minutes or go ahead and make the biscuits. Refrigerating the dough cools down the butter so that it melts into flaky pockets in the oven, but it’s not strictly necessary. When you’re ready to bake, place the dough on a clean, floured surface. Using a rolling pin, roll it to a little more than 1/2″ thickness. Use a floured glass rim or your favorite round cookie cutter to cut the dough into circles. Place circles on the prepared baking dish about 3/4″ apart. Ball up the dough, roll it out again, and cut more circles. Repeat until you’ve used up all the dough. Bake for 15-17 minutes or until the tops just begin to turn golden. There won’t be a big color change, so watch carefully.

For the gravy:
1 head roasted garlic, removed from papery skins
1 1/2 cups cooked navy beans
3 cups unsweetened almond milk
2 tablespoons vegan butter
1/4 cup flour, any kind
1/2 teaspoon salt
1/4 teaspoon fennel
1/4 teaspoon paprika
1/4 teaspoon sage
8 oz. tempeh
Freshly ground black pepper to taste

First, brown the tempeh. Add a little oil to the bottom of a large saucepan and heat over medium. Using your hands, crumble the tempeh into small chunks and add it to the pan. Cook for about 10 minutes, stirring frequently, until the tempeh is lightly browned on all sides. Be careful that it doesn’t burn.

While the tempeh browns, use a standard blender or an immersion blender to puree the navy beans, almond milk, and roasted garlic until smooth. Set aside.

Once the tempeh is browned, turn the heat down to medium-low and add the spices and butter to the pan. Once it melts, sprinkle on some of the flour and stir so the tempeh is coated. Pour in about a quarter of the liquid mixture and stir. Add a little more flour and liquid and whisk thoroughly. Continue until you’ve added all the flour and the liquid, whisking carefully to prevent lumps. When all ingredients are thoroughly mixed, turn the heat up a bit (if necessary) until the mixture just begins to bubble. Turn down again and let the gravy thicken, stirring frequently.

Slice biscuits in half, top with gravy, and enjoy!

Navy Bean Biscuits & Roasted Garlic Gravy

The navy beans stand in for some of the fat in the biscuits, making them less flaky than a full-fat biscuit. But once you top them with the rich, creamy, garlicky gravy, you won’t miss the fat! And you can’t taste the beans at all—I can testify to that. S was thoroughly surprised when I told him about that secret ingredient.

Two of these biscuits will give you 5 grams of protein, 11% of your daily recommended value of iron, and 7% of your RDV of calcium. Half a cup of the gravy offers nearly 7 grams of protein, 8% of your RDV of iron, and a whopping 17% of your RDV of calcium.

Now that’s something to write home about.

Gingerbread Granola

LVV MoFo 2014 main

S and I were at Whole Foods the other day, trying to stay focused, stick to our shopping list, and ignore the siren’s call of the bulk aisle, when he casually asked me whether I would be making granola again anytime soon. I opted to interpret that as a thinly veiled request and decided it was the perfect opportunity to play with a granola flavor I’d wanted to try for a while: gingerbread.

This granola took two attempts to perfect. I tried to get fancy with the first batch, substituting my beloved raw buckwheat groats for some of the oats, going a bit wild with the spices, and playing fast and loose with the oven temperature. The result was a crumbly, overly ginger-y, and slightly burnt batch. Don’t get me wrong; I still nibbled the crap out of it as I prepared the second batch. And that second batch was much improved.

Gingerbread Granola

Gingerbread Granola
Serves six

  • 1/4 cup coconut oil
  • 3 tablespoons blackstrap molasses
  • 3 tablespoons pure maple syrup or dark brown sugar
  • 2 cups rolled oats (I like Bob’s Red Mill Rolled Oats)
  • 1/4 cup chia seeds
  • 2 tablespoons ground flaxseed
  • 1 heaping teaspoon ground ginger
  • 3/4 teaspoon ground cinnamon
  • Scant 1/2 teaspoon salt
  • 1/4 teaspoon ground cloves
  • 1/4 teaspoon ground nutmeg
  • 1/4 C crystallized ginger, diced

Preheat oven to 300˚ and line a flat baking sheet with parchment paper.

In a small saucepan, add the coconut oil, molasses, and maple syrup or brown sugar. Stir to combine, heating over low so that the oil melts. Once all ingredients are well mixed, turn off the heat and set aside.

In a large mixing bowl, add all the dry ingredients. Pour the wet mixture into the dry ingredients and mix with a large wooden spoon. Once the dry ingredients are thoroughly mixed and coated with the wet ingredients, pour the granola onto the prepared baking sheet and bake for 30-35 minutes, removing from the oven and stirring every ten minutes or so. Remove from the oven and let cool for at least ten minutes before eating.

Note: If you prefer a sweeter granola, feel free to reduce the molasses by a tablespoon.

Gingerbread Granola

Second time’s the charm, I guess! (Although I have to admit that I did slightly burn this batch as well… oy.) I imagine this granola would be fantastic atop a bowl of vanilla soy yogurt—the spicy flavors would play perfectly with the sweet, cool yogurt. Sans yogurt, you’re looking at nearly 17% of your recommended daily value of calcium in a serving, along with 6 grams of protein and 19% of your recommended daily value of iron. Adding a 6-ounce carton of soy yogurt will increase your calcium intake by about 30% of your RDV, depending on the brand. Take that, Whole Foods.

Disclaimer: This post contains affiliate links. If you purchase something through my link, it costs nothing extra for you, but I get a few pennies to help cover hosting costs.

Chocolate-Orange Chia Pudding

LVV MoFo 2014 mainIt’s probably impossible to write anything about chia seeds that hasn’t been said before—all the jokes have been made, y’know? And I think we’ve moved beyond regarding chia seeds as a novelty. They’re firmly ensconced in the arsenal of cooks who enjoy experimenting with their gelatinous properties and appreciate their nutritional profile. Three tablespoons offer 20% of your recommended daily value of calcium, 15% of your daily value of iron, and 5 g of protein, along with a substantial amount of fiber.

I personally go through phases with chia seeds. I’ll be all into them for a month, then have a pudding or overnight oat bowl that’s just too gelatinous, and then I’ll be over them. But with this vibrantly flavored Chocolate-Orange Chia Pudding, I’m back in the chia game.

Chocolate-Orange Chia Seed Pudding

Chocolate-Orange Chia Pudding
Serves one

  • 1/4 cup freshly squeezed orange juice
  • 1/2 cup water (you could probably use nondairy milk, but I was a little leery of mixing it with the orange juice!)
  • 3 T chia seeds
  • 2 T cocoa powder
  • 2 T maple syrup (you can add more if you’d like a sweeter pudding)
  • Dash salt
  • Cacao nibs, coconut shreds, or mini chocolate chips for topping (optional but recommended!)

Add all ingredients to a jar or container with an airtight lid and shake vigorously for at least 15 seconds. Refrigerate for at least 30 minutes or until the pudding reaches desired consistency. Add any toppings and enjoy!

Chocolate-Orange Chia Seed Pudding

Although the three tablespoons of chia seeds carry the main nutritional heft in this pudding, the two tablespoons of maple syrup add a surprising 8% of your daily value of calcium. That’s a total of 28% of your daily value of calcium in a single serving of pudding. Not bad for dessert!

What’s your favorite chia seed recipe?

Chocolate-Hazelnut Buckwheat Bites

LVV MoFo 2014 main

In just a couple days, S and I devoured all the Apricot Buckwheat Bites I made earlier this week. I’m surprised they lasted longer than a day, to be honest!

“Mmm. I really like these,” S said when he tried the first one. And then, a few bites later, “You should make a chocolate version.”

A chocolate version. Once the idea was in my head, it wouldn’t leave. I had to make it happen.

Chocolate-Hazelnut Buckwheat Bites

Chocolate-Hazelnut Buckwheat Bites
Makes 25 balls about 1.25″ in diameter

  • 1 C raw hazelnuts
  • 1/4 C raw buckwheat groats
  • 18-20 raw Medjool dates
  • 2 T raw shelled hemp seeds
  • 1/3 C chocolate chips
  • 1 T maple syrup
  • 1/2 tsp sea salt

Add the hazelnuts, buckwheat groats, the hemp seeds, and about 15 dates to a food processor and process until well combined. Add the chocolate chips, maple syrup, and sea salt and process for 10-15 seconds. Check the mixture—if it’s not holding together at all, add a few dates, process, and check again. Add more dates if necessary until the mixture is sticky but holds together.

Using your hands, roll the mixture into balls about 1.25″ in diameter. Store in the refrigerator for best results.

Chocolate-Hazelnut Buckwheat Bites

Between the chocolate chips and the crunchy buckwheat, these little bites taste more like candy than anything else. But five balls give you 20% of your daily value of iron, along with 9 grams of protein, 7% of your daily value of calcium, and a decent dose of fiber. Sweet!

Apricot Buckwheat Bites

LVV MoFo 2014 mainOne of the best parts of MoFo this year has been discovering new and unexpected nutrition sources. The internet is full of top-ten lists, touting the best ways to get various nutrients on a vegetarian/vegan/paleo/gluten-free/whatever diet. But those lists only take you so far—I’ve found plenty of great protein and iron sources simply by rifling through my pantry. Today’s mostly raw recipe combines a few surprising sources of iron into a super satisfying snack.

Apricot Buckwheat Bites

Apricot Buckwheat Bites
Makes 20 balls about 1.5″ in diameter

  • 1/3 cup raw whole hazelnuts
  • 2/3 cup raw buckwheat groats, divided
  • 8-10 medjool dates, pitted and halved
  • 2/3 cup dried apricots, roughly chopped (measure before chopping)
  • 2 T raw shelled hemp seeds
  • 1 tsp pure vanilla extract
  • Dash sea salt

Add the hazelnuts and half the buckwheat groats to a food processor and pulse a few times. Add the dates (start with 8), apricots, and vanilla extract and process until all ingredients are combined—the mixture will be a little sticky, but it should hold together. If it’s too dry, add the remaining dates. Add the remaining groats, hemp seeds, and sea salt and pulse a few more times until all new ingredients are incorporated.

Using your hands, roll the mixture into balls about 1.5″ in diameter. Store in the refrigerator for best results.

Note: Vanilla bean seeds would work great here, but I couldn’t find mine… so, vanilla extract it was.

Apricot Buckwheat BitesThese little bites have a satisfying crunch to them thanks to the raw buckwheat groats. If you’ve never used raw buckwheat, do yourself a favor and try it. Just be careful not to buy toasted buckwheat accidentally—that satisfying crunch will be much less satisfying and a little more unpleasant in that case. (Toasted buckwheat is also called kasha, and it makes a nutty replacement for your favorite cooked grain.) Raw buckwheat is—surprise!—a great source of iron, as are the apricots, dates, and hemp seeds. Four of these bites will give you 13% of your daily value of iron, along with 4 grams of protein and 6.4% of your daily value of calcium. Impressive!

Have you tried raw buckwheat groats? How do you like to use them?

Peanut Butter-Chocolate Chip Granola (and a brief disquisition on protein needs)

LVV MoFo 2014 main

Snickering at the “But where do you get your protein?!” question is a bit of a shibboleth in vegan circles. It’s a tired question, one that’s inspired lots of great memes. And it has a pretty simple answer: From nearly everything I eat. This quote from the American Heart Association just about sums it up:

“You don’t need to eat foods from animals to have enough protein in your diet. Plant proteins alone can provide enough of the essential and non-essential amino acids, as long as sources of dietary protein are varied and caloric intake is high enough to meet energy needs.” (1)

Bam.

Still, protein-related myths abound. There’s a notion that plant proteins are inferior to their animal-derived counterparts because they don’t provide all essential amino acids in a single source (and are thus called “incomplete” proteins). There’s a commonly held and oft-mentioned misbelief that you must consume all of your complementary proteins in a single meal to derive the full protein benefit, but that’s been disproven. Instead, as long as you eat a variety of proteins in a single day, your body can take care of combining them. (2)

So—how much protein do you need? Turns out, not as much as lots of people think. Unless you’re very active, 10-35% of your calories should come from protein. The CDC has a basic set of guidelines here, and you can get more tailored recommendations here. I’ve done a few calculations, and I should be getting between 50 and 70 grams per day. What does that mean in real-world food terms? Well, half a block of tofu has around 18 grams, half a cup of tempeh has 15 grams, and half a cup of black beans has 20 grams. And those are just the protein powerhouses! Most of the incidental foods we eat contain at least a little protein, and those grams add up. For example, bagels often contain around 10 grams of protein. A small handful of almonds gives you around 4 grams. And you could get a whole 7 grams just from eating granola. Not just any granola—Peanut Butter-Chocolate Chip Granola.

This granola.

Peanut butter granola spilling from a mason jar onto a wooden cutting board.

Peanut Butter-Chocolate Chip Granola

Serves 8

  • 2 tablespoons coconut oil
  • 1/3 cup creamy unsalted natural peanut butter
  • 1/4 cup pure maple syrup
  • 2 teaspoons pure vanilla extract
  • 2 cups rolled oats (I like Bob’s Red Mill Rolled Oats)
  • 1/4 cup ground flax seed
  • Scant 1/2 teaspoon salt
  • 1/4 cup roasted unsalted peanuts
  • 1/4 cup chocolate chips

Preheat oven to 325˚ and line a flat baking sheet with parchment paper.

In a small saucepan, add the coconut oil, peanut butter, maple syrup, and vanilla extract. Stir to combine, heating over low so that the oil and peanut butter soften. Once all four ingredients are well mixed, turn off the heat and set aside.

In a large mixing bowl, add all the dried ingredients. Pour the peanut butter mixture into the dry ingredients and mix with a large wooden spoon. Once the dry ingredients are coated with the peanut butter mixture, pour the granola onto the prepared baking sheet and bake for 20-25 minutes or until the oats are golden, removing from the oven and stirring every ten minutes or so. Remove from the oven and let cool for at least ten minutes before eating.

pbgranola3

Let’s be real—you’re probably going to eat this stuff by the handful, grabbing a clump every time you walk by the cooling baking sheet. But you could also serve it in a bowl with some cold almond milk or a dollop of soy yogurt, adding a couple extra grams of protein to your day. Yum.

pbgranola2

So, bottom line about protein? Stop worrying about it. Eat a varied, healthy diet and you’ll be just fine. And remember, protein lurks in the most unlikely places—even a bowl of sweet, salty, peanutty granola.

Sources cited:

(1) http://www.heart.org/HEARTORG/GettingHealthy/NutritionCenter/Vegetarian-Diets_UCM_306032_Article.jsp 
(2) http://www.cdc.gov/nutrition/everyone/basics/protein.html

Note:

I’m neither a doctor nor a dietitian; please don’t treat my posts as medical advice! Consult a medical practitioner for specific medical or nutritional recommendations.

Disclaimer: This post contains affiliate links. If you purchase something through my link, it costs nothing extra for you, but I get a few pennies to help cover hosting costs.