Seasonal Fruits Gone Savory: Pumpkin Fauxsage


On the third day of MoFo, I blogged about my infused vodka fail.The one upside to the debacle, at least to my optimistic (ha) self, was that I thought I’d gotten my requisite MoFo fail out of the way early. Ah, hubris. As if I couldn’t mess up twice in a month!

Tonight, I messed up. I returned home from work with a headache and a bit of nausea. I didn’t particularly feel like cooking, but I needed something to blog about. So I decided it was time to use pumpkin in a savory application—fauxsage! I liked the idea of making an apple fauxsage and then a pumpkin fauxsage to compare the two. Once again, 500 Vegan Recipes offered a promising recipe.

Because I wasn’t feeling my best, I was not in the mood for particularly careful measuring of the spices. So when it came time to add a quarter teaspoon of nutmeg, I figured I’d just shake a few dashes into the bowl. I reached into my alphabetized spice drawer and grabbed a small jar from the location the nutmeg belonged. The nutmeg has one of those perforated tops that lets you shake out small amounts at a time, so I swiftly unscrewed the cap and upended the jar.

I’m sure you can imagine what happened next.

My “nutmeg” was actually dried lemongrass, and my dried lemongrass does not have a perforated lid. A couple tablespoons of the fragrant herb spilled out and tumbled into my dry ingredients, crowning the mound of wheat gluten and nutritional yeast and various spices with a pale green dust.

Whoops.

Shockingly, I didn’t become enraged and start cursing aloud. I just chuckled to myself and started skimming the lemongrass off the top with a spoon. I guess I did an okay job (or our lemongrass is super old and taste-faded) because the fauxsage had no discernible citrus tang.

pumpkin-fauxsage_9942109303_o

Like I did with the apple fauxsage, I served this pumpkin fauxsage with potatoes and sauerkraut again. Instead of boiling the taters, I did a lazy girl’s Hasselback potato and roasted the small sliced spuds with olive oil, salt, pepper, and paprika in a tinfoil packet. They were quite yummy! I wish I could say the same for the fauxsage, but alas—we both found it very bland and in need of a much stronger umami note. (The fact that I used water instead of vegetable broth probably contributed to that lack of savory flavor, but I did try to make up for it by using some seasoned garlic salt in the recipe… I should’ve added some soy sauce!) With a big ol’ forkful of sauerkraut, though, it was just fine.

Have you had any silly spice mishaps?

Meals I Didn’t Make: S Does Dinner!

S and I maintain a very fair relationship. We share our household duties, with the general principle that whoever likes a particular task more (or dislikes it less!) does it. He sweeps the stray hairs off the bathroom floor; I clean Moria-pee* from the carpet (shh, don’t tell my landlord!). When it comes to cooking, we try to take turns, but I often end up cooking more frequently for a few reasons – I enjoy it more, I’m more comfortable in the kitchen, and I’m usually better able to whip up a quick meal than S is (he’s fine following recipes but doesn’t quite yet have the kitchen confidence or experience that I have). However, dinnertime often devolves into the two of us standing in front of the fridge or the pantry, poking at things, shooting down each other’s ideas (or, um, that might just be me) and getting increasingly irritated as our stomachs start rumbling. It’s no good.

So, last week, we finally implemented meal planning, something I’d wanted to do for a while. On Saturday or Sunday, we each choose two recipes to make for the week. We write down ingredients we need, do a grocery store run, and then take turns cooking throughout the week. We’re only on week two, but it’s already made a world of difference. Dinnertime is less stressful, and the meals we’ve cooked so far have been much better than the “Well, I guess we could do pasta and a cheezy sauce…” meals we might’ve resorted to in the past.

In celebration of our newfound – and oh-so-simple – solution to the mealtime quandary, here are some shots of a couple delicious meals S has cooked up lately!

Small white plate with a six-inch long baguette sliced nearly in half and stuffed with veggies, seitan, and a paté.

Sandwich heaven!

We had these delicious bánh mì sandwiches on Friday. S made some lightly pickled carrot strips, sliced up some daikon and cucumbers, and whipped up the Walnut-Mushroom Pâté from Veganomicon. We spread a bit of Vegenaise on a fresh baguette; added the pâté, veggies, and some seitan strips (err, chunks…); and topped it all with a sprinkling of cilantro. So yummy and fresh-tasting!

Nonstick pan filled with a dark sauce that features mushrooms, seitan, and peas.

Stroganoff.

This pan is full of the Seitan-Portobello Stroganoff from Vegan with a Vengeance. Although I’ve made a whole lot of recipes from VwaV, this was a first for me! S did most of the work on this one, but I did some chopping sous-chef style to speed along the process. I also made a big batch of seitan ahead of time using the PPK recipe; I couldn’t bring myself to shell out nearly $10 for 3.5 cups of seitan when I could make it myself for a fraction of the cost! It worked perfectly in this recipe, and we served it up with whole-wheat linguine.

Bowl full of linguine and stroganoff sauce.

Saucy!

This whole meal-planning thing? Yep, I’m a fan. It reduces stress and results in extra-delicious dinners. Everybody wins!

Do you do meal-planning?

* No joke – Moria peed on the carpet as I was drafting this post! I don’t know what gets into her, but every so often she goes through a period of floor-peeing. Then it stops. Daft doggy!

Cheesy Mac & Broccoli

Orange rectangle with the white fist-shaped Vegan MoFo logo and the text "Vegan Month of Food 2012."

Some nights you get home from work and just want something easy, cheesy, and… something else that ends in “-eesy.” Ahem. And that’s when you make a mish-mash of a meal, throwing ingredients together, dousing it in a creamy sauce, and calling it dinner. It’s like a vegan Hamburger Helper (not that I’ve ever eaten non-vegan HH!) and some sort of beefy macaroni and cheese dish all mixed into one bowl of comfort-food deliciousness.

Top-down view of a bowl full of creamy elbow macaroni, broccoli, and crumbled Gardein burgers.

Cheesy, creamy goodness.

Last night, I used elbow pasta, canned diced tomatoes, fresh broccoli, and a crumbled Gardein burger patty. I covered it all with a simple sauce, a hodge-podge of a recipe that’s versatile and easy to customize. This time, it contained:

  • Nutritional yeast
  • Unsweetend soy milk
  • Flour
  • Garlic and onion powders
  • Paprika
  • Frontier No-Chicken Broth powder
  • Mild yellow miso
  • Salt & pepper
  • A bit of Earth Balance

I also threw a bit of cornstarch in at the end to help thicken it up. It was the perfect mild accompaniment to the macaroni mish-mash. I have to say, though, that I was very disappointed in the Gardein burger. I’ve really liked the other Gardein products I’ve tried, but the burger tasted like a slightly improved Boca patty – blech. Luckily for me, S liked it, and I gave him all of my burger bits. :)

What’s your go-to cheesy sauce?

Beefless and Broccoli

My meals last week were less than inspired. Things have been stressful at work, what with deadlines lurking around every corner, and as the produce in my refrigerator slowly dwindled, I didn’t have the energy to go grocery shopping to replace it. I ended up eating more “meals” that consisted of snack foods or cereal than I’d like to admit, due to the lack of fresh food and (admittedly) my own laziness. But inspiration struck late last week when the Random Thought Fairy struck and filled my head with one phrase: Beef and Broccoli.

I don’t think I’ve ever actually eaten beef and broccoli with real beef, but when the notion of it popped into my head, I had to have it. I serendipitously had Gardein beefless tips and broccoli in the freezer, and my pantry is always well-stocked with grains, so I knew I was set. I roughly followed this recipe and came up with a super simple, delicious meal.

Simple and delicious.

I don’t often use frozen broccoli, but I like to keep various frozen veggies on hand for moments of laziness like this one. And in this recipe, it worked perfectly – the star of the show was the simple, sweet sauce. Other than the 45 or so minutes it took to cook the brown rice, it came together pretty quickly, too. I’ll definitely be adding this recipe to my roster of quick, go-to meals!

Are there any foods you never had as an omnivore but now enjoy in their vegan versions?

Sweet Potato, Corn, & Black Bean Burritos

Apples weren’t the only produce we took home when we hit up the orchard/farm a few days ago. We also bought a couple pounds of sweet potatoes, and I’ve been itching to use them since then. To be honest, I used to dislike (read: hate) sweet taters. I know, I know. But I have issues when foods that I expect to be savory are actually sweet, and the idea of a sweet potato never really did it for me. Add in my aversion to oddly textured foods (I’m a freak, I know) and sweet potatoes were low on my list of likes.

However, in the interest of fairness, last spring I decided to give sweet potatoes another chance. I started with oven-baked sweet potato “fries” and discovered that they were actually pretty darn tasty. I cautiously raised my acceptance level from “get that crap away from me” to “I suppose I could try some.” After oh-so-bravely trying plain ol’ baked sweet potatoes (loaded with cinnamon, of course), I realized that my childhood aversion to the pretty orange tubers was just silly.

Still, though, I can’t help but harbor a secret well of distrust for using sweet potatoes in certain situations, and sweet potato burritos were definitely high on that list of dubious delicacies. But since I knew I couldn’t use those beautiful local sweet taters for anything less than an exciting, explorative dish, I knew I had to face my fears one last time. So last night I came up with a sweet potato burrito recipe that surprised and delighted me. Now my sweet potato rating has rocketed from “yeah, these are good” to “GIMME MOAR PLZ!” Take a look at these little lovelies, pre-oven.

So innocent looking...

Okay, I realize that they look like plain Jane burritos right there, but trust me – these were bursting with a delightful blend of flavors. I absolutely loved the textural contrast, too; I saw one recipe online that recommended mashing the potatoes and the beans, but that just seems silly to me. The whole beans and corn kernels work to give your mouth a little textural surprise in each bite. Not to toot my own horn, but this super-easy recipe is definitely a winner!

Dinner is served.
(Mom’s photo, again!)

Sweet Potato, Corn, & Black Bean Burritos
Ingredients
2-3 sweet potatoes, cooked and mashed
1 ear corn, de-kerneled (you know what I mean!)
1 can black beans, drained and rinsed
1/2 yellow onion, roughly chopped
1/2 T minced garlic
Cumin
Chili powder
Cayenne pepper powder
Salsa (I used some of my dad’s homemade salsa)
4 whole wheat tortillas

Preheat oven to 350˚F.

Cook and mash your sweet potatoes using method of your choice. I nuked mine (for convenience reasons) and that worked just fine. While your potatoes are cooking, heat a bit of olive oil in a pan and add onion and garlic. When they’ve begun to brown, throw in your corn kernels and black beans. Reduce heat, add spices to taste, and let the mixture sit for a bit while you mash your potatoes.

Once your beans and corn are nice and warm, lightly heat your tortillas. Spread a couple of spoonfuls of the mashed sweet potatoes on a tortilla and cover with the bean and corn mixture. Top with salsa if desired and fold burrito-style. Be careful not to overfill! If necessary, use toothpicks to secure the burritos. Arrange them in a lightly sprayed pan – I used an 8 x 8″ pan and packed them fairly close together – and place in oven. Cook for about 12 minutes, remove from oven, and let cool for a minute or two. At this point, you can slice them diagonally down the middle and garnish as desired.

I’m on a [Zucchini] Boat!

The late-summer zucchini lovin’ continues! Inspired by a couple of fantastic-looking recipes I’ve seen floating around the blogworld recently, I made some zucchini boats of my own for dinner a few nights ago.

Using recipes as a vessel for a delicious stuffing is always genius in my book, but somehow I’d never thought of using zucchini in this capacity. How stupid! They make perfectly charming and delicious boats, and you can improvise the stuffing based on whatever veggies/leftovers/grains strike your fancy on a given night. When I served them, I only had two zucchini in the fridge, so I ended up serving quite a bit of the stuffing as a side dish. With a couple of slices of rye bread, this made an excellent dinner.

Zucchini looove.
(Mom photographed the meal again… hehe.)

Although I basically opened the fridge and pulled out random bits of food, I’m going to post a really rough recipe anyway. :)

Zucchini Boats Stuffed with Israeli Cous Cous
Ingredients
3/4 cup Israeli cous cous
A few zucchini
Veggies for stuffing – I used grated carrot, chopped mushrooms, fresh corn, chopped olives, and chopped onions
Spices – I think I used oregano, thyme, a bit of cayenne, and herbes de Provence
Tomato sauce, if you have a jar you want to finish
Whole wheat breadcrumbs

First, preheat your oven to ~375. Next, make your cous cous or grain of choice; I’ve seen rice and quinoa used in different recipes. As your grain is cooking, start choppin’ your veggies and and heat a bit of oil in a pan. Cut your zucchini in half and use a teaspoon to scoop out their innards. Throw all your veggies (including the zucchini innards) into the pan and let them saute up a bit; spice as desired. When they seem properly softened, add them to your grain and combine. Then add tomato sauce (or chopped tomatoes or a bit of tomato paste) and flavor with some nutritional yeast if desired. Add breadcrumbs if you feel like it.

Next, stuff your zucchini boats with the grain and veggie mixture; heap the mixture as high as it’ll go without causing your boats to capsize when you put them on a lightly oiled baking pan or dish. Liberally douse the boats with bread crumbs for a nice crunchy top, put ’em on the pan, and pop the pan in the oven. Cook until the zucchini is soft and the bread crumbs are crunchy.

…I told you it’d be a rough recipe. :) If you do try it out, I’d recommend maybe using a higher oven temperature and adjusting as needed during the cooking process.

And this concludes my latest zucchini lovefest. Have a fantastic night, folks!

Chana, Chana, Chana Masala! (+ a recipe, yo)

When I had a small army of visitors last week, we ate out fairly often, and although I didn’t appreciate the strain on my wallet, I did enjoy discovering a few new restaurants. The vegan paella I found hidden at the bottom of the menu at a restaurant that focused on seafood was a surprising treat. When I placed my order, I had no idea that I was about to receive what was probably somewhere around a pound of a deliciously seasoned paella, spiced with saffron and brimming with meaty mushrooms. I barely finished a quarter of it; the bowl looked like I’d barely nibbled on a few grains of rice! I got at least three more meals out of those leftovers. We also ate at a few Asian-inspired restaurants, and I enjoyed one of my favorite dishes ever, pad thai. On girls’ night, my best friend and I had some delicious mooshu and spring rolls. But one thing we didn’t have was Indian food.

So I decided to remedy that a few nights ago. I’ve recently taken over dinner duty for my parents and myself three nights a week, since they’re both educators and are therefore back to work. Since I am mostly unemployed, I figured it was the least I could do to stop feeling like a financial drain. :) I now get to do most of the grocery shopping and can exercise my culinary prowess on Mondays, Wednesdays, and Fridays. I decided that Indian food had to be on the menu for my first Monday in the kitchen.

Deciding what to make was simple. I’ve been craving chana masala lately, so I whipped up a batch based loosely on this recipe from VegWeb. Since I was cooking for three, I augmented the recipe by adding extra chickpeas, and I added lots of garam masala, curry powder, and crushed red pepper flakes because my family likes it hot. ;) The result was a fragrant, spicy dish that tasted delicious over brown rice.

Yum.
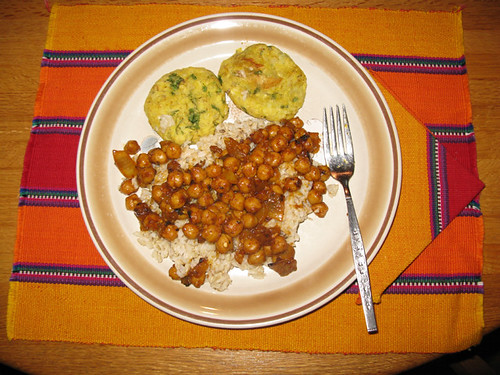
(My mama was so impressed with my meal that she photographed it! Silly mommy. Doesn’t it look like a funny little open-mouthed face, though?)

For a side dish, I consulted my growing list of “Crap I Want to Make,” a Pages document of recipes I will try at some point in the vague future. I immediately zeroed in on the Potato Vada from The Voracious Vegan. But then I realized that these tasty-looking morsels are deep fried, and I’m not really a fan of frying (read: large amounts of hot oil frighten me) and I’m trying to keep things healthy. So I decided to create my own vada-like dish. Thus, Potato-Corn Vada were born! These are a healthier, baked variation on the potato vada recipe that looked so good. I took a few ideas from a few sources, combined them with the local corn my dad had picked up, and came up with a yummy side dish for any Indian meal.

These are a delicious counterpart to a spicy main dish. The corn provides a burst of fresh sweetness that helped temper the spice of the chana masala. Because they’re baked, you can eat two or three without feeling uncomfortably full.

I will note that this recipe is a work in progress. I’d recommend making the vada thinner than the 3/4 inch patties I created, which is why I say 1/2 inch in the recipe. Also, even after baking for 20 minutes and broiling for ~2, they didn’t quite stay together. I might try using a slightly higher oven temperature. With that said, here’s my recipe!

Baked Potato-Corn Vada
Ingredients
2 large potatoes
1 1/2 ears corn, raw (yields just over a cup)
1/4 cup cilantro, roughly chopped
1/4 cup onion, chopped
2 T chickpea powder
1/4 t turmeric
1/4 t salt
1/2 t garam masala

First, you’re going to boil your potatoes. Start the potatoes ahead of time, because the rest of the recipe doesn’t require very much prep time at all. Heat up some water in a medium saucepan, chop your potatoes into medium pieces, and throw ‘em in the boiling water.

While your potatoes are cooking, de-kernelize your corn. Stand it up lengthwise and use a sharp knife to remove all kernels. This can get messy, so keep a towel underneath your cob to catch errant kernels. Once you’ve got your corn removed from the ear, place the kernels in a small food processor and pulse it a few times. It’s okay to have some kernels that are still whole; you just want to get some variety and have some that are in smaller pieces.

Next, chop up your onion and cilantro. You can adjust these measurements to taste or even omit the cilantro if you’re not a fan. Now’s probably a good time to start preheating your oven to 350˚F and to spray a nonstick pan with oil.

By now, hopefully your potatoes are cooked through. Dump ‘em into a strainer, and once they’ve cooled a bit, transfer them to a large bowl and mash those babies! Next, add the corn, onion, and cilantro to your taters. Now comes the fun part – it’s time to get your hands dirty! Mix up the big ol’ mess until it’s well combined. Then add the chickpea flour and spices (again, adjust as necessary) and stir these in with a large spoon.

Now start forming your patties. Take a decent sized ball of the mixture (about 1/3 cup, I’d guess) and form it into a ball. Flatten it a bit (about 1/2 inch thick) and then place it on your pan. Continue until you finish up the mixture. You can lightly brush the tops with a bit of oil if you’d like, but that’s probably not necessary. Now pop the pain in the oven for about 20 minutes until they’re slightly browned on the top.

You could also make thinner patties, bake ‘em for ~15 minutes, and then put them under the broiler for a few minutes to crisp them up. Or you could certainly shallow-fry thinner patties. The possibilities are endless!

Brain Games, Wheat Berries, & Pudding for Breakfast

I’m happy to report that my grumblings about the weather seem to have driven it away, as yesterday was sunny and generally lovely. I celebrated the return to summer by taking Tamale on a nice long walk, which would have been perfect if half my neighbors hadn’t decided it was a perfect day to mow their lawns. You’ll probably think I’m a freak, but I severely dislike the smell of freshly cut grass, most likely because I think I’m allergic to it since I get headaches whenever I smell it. But whatevs – I’ll gladly take a headache if it means I get to feel the sun on my face and hear the delighted screams of youth as I walk past a group of children bouncing on a trampoline. Ah, summer.

Anyway, on to the healthiness. Let’s start with my healthy mind, shall we? I think you should all check out GamesfortheBrain, a fun little website with a nice selection of games to help wake up your grey matter and justify all the time you spend puttering around the internetz! “But, ma, I was developing my brain’s ability to adapt quickly to new situations!” Heh heh heh. Brilliant.

Although some of the games are kind of lame – “Marsmoney” seems better suited for some sort of elementary school exercise – others are fun. “What Was There?” is one of those pesky ones that asks you to memorize a scene and then questions you on its details. “Memocoly” asks you to repeat patterns of colors. There are also a bunch of word games, but I haven’t tried them yet – I’m too addicted to Word Warp to branch out just yet. ;) All in all, these are not incredibly mentally taxing, but they’re still a fun way to give your brain a mini-workout. And the little “brain tips” you get when you answer a question correctly challenge you to do more – try taking a shower with your eyes closed to let your other senses take over! Hmm… we’ll see about that one. So check it out and have some fun!

But I don’t spend all my time playing on the internetz – I’m workin’ on having a healthy body, after all! Last night I experimented with wheat berries for the first time. I know I came late to the wheat berry party, but better late than never, right? Anyway, I cooked these suckers according to the package and used them as a bed for some tofu I marinated in a variation of the Italian marinade from Vegan with a Vengeance and then grilled on the George Foreman grill my aunt gave our family. I’d never used ol’ George’s grill for tofu, but it worked pretty well, even if one piece was a little more blackened than grilled.

Tofu & wheat berries & veggies, oh my!

To be honest, I was a little wary of all the balsamic vinegar in Isa’s marinade – I kinda sorta despite vinegar in all forms – but I couldn’t taste the acidity of the vinegar once the tofu was cooked, so overall it was a success. Since it was a clean out the fridge kind of night – more on that in a later post – I had some leftover garlicky green beans and sliced the corn off a leftover half corncob for my veggie sides. Yum. The wheat berries were chewy yet tasty, and I felt satisfied knowing that I was filling my body with lots of fiber and protein.

While I was hunting around in the fridge for leftovers, I noticed a big container of cooked rice. “Aha!” I thought to myself, “I can do something with that!” After dinner, I took some soy creamer that needed to be used up and poured it over a big bowl of the rice. I added some dried cranberries (because raisins are nasty, y’all – they’re like big bloated bugs when they swell up in liquid!) and a bit of almond extract and let that bowl marinate overnight. This morning I heated the conglomeration up in the microwave and had Brekkie Rice Pudding!

Rice pudding for breakfast? You bet!

So it’s not the most gorgeous mixture in the world, but I thought it tasted pretty darn good. Next time I’ll add less almond extract, because the taste was *almost* a little too strong. But overall, I was pleased with my fridge emptying skillz.

Ciao!