Lazy Sunday III: Calcium-Laden Recipes You Should Totally Make

LVV MoFo 2014 main

Sunday again! Time to share some inspiring and mouthwatering calcium-rich recipes from my blogging compatriots. But first: happy birthday, Dad! Thanks for being one of my biggest fans. ;)

Now—on to the food!

And with that, calcium week draws to a close. So far this MoFo, I’ve covered protein, iron, and calcium. So what’s left? Everything else, of course! The next week will be a bit of a free for all; I’ll share recipes and break down all the details on their vitamin and mineral makeup. Any requests?!

What are your favorite calcium-rich recipes?

Advertisement

Hot Pumpkin-Molasses Mug

LVV MoFo 2014 main

Real talk part deux: I nearly considered moving my Lazy Sunday posting schtick to today because, um, it’s Friday night and I’ve got things to do. (“Things” being “sitting around in my flannel PJ pants reading Agatha Christie and maybe drinking some wine if things get crazy.”) And then I thought, No, because “Lazy Friday” just sounds stupid. And then I thought, Maybe I can repurpose my Hot Molasses Mug! Blackstrap molasses has tons of calcium, and so does almond milk! And then I thought, No, you lazy fool. Stop being so lazy.

And then I remembered the Kathy Patalsky’s Hot Pumpkin Mug that I made last year for MoFo, and I realized that those mugs needed to meet. Stat.

Hot Pumpkin-Molasses Mug

Hot Pumpkin-Molasses Mug
Serves one

  • 1 cup unsweetened almond milk
  • 2 tablespoons pumpkin puree
  • 1 tablespoon blackstrap molasses
  • 1/2 tablespoon pure maple syrup
  • 1/4 teaspoon ground cinnamon
  • Dash ground nutmeg
  • Dash salt

Blend all ingredients with a standard blender or an immersion blender until well combined. Transfer to a small saucepan and head over medium-low until the mixture begins to steam. Pour into a mug and enjoy.

~~~

I am, admittedly, still pretty lazy, because this recipe is obscenely easy. But holy heck is it good! It’s the perfect blend of two of my favorite flavors, with just a touch of pumpkin pie spices. And—get this—you will get 65% of your recommended daily value of calcium in this mug. 65%! (Well, assuming you use Trader Joe’s Unsweetened Original Almond Milk…) The iron content is not too shabby either at 24%. Guess my laziness paid off this time!

Navy Bean Biscuits & Roasted Garlic Gravy

LVV MoFo 2014 main

Real talk: Finding substantial sources of calcium has been more difficult than finding sources of protein or iron. I’m learning that although lots of foods contain calcium, they usually don’t contain a whole lot of calcium. That’s not necessarily bad; if you eat a varied diet, you probably acquire little bits of calcium from lots of sources. There just aren’t a lot of calcium powerhouses out there. So far this week, I’ve relied heavily on chia seeds, but let’s face it: woman cannot live on chia alone. It’s time to stop relying on the chia crutch.

In my search for a new calcium crutch, I looked to the ever-faithful bean. Most beans offer a bit of calcium, but nothing to write home about (per cup, black beans have 5% of the RDV, dark red kidney beans have 6%, and pinto beans have 8%). But one bean stands out: the unassuming navy bean. With 13% of the RDV in a cup, they outpace their legume companions by a long shot.

With this recipe, I’m taking full advantage of my new discovery. Navy beans make their way into the two main components of this savory plate of biscuits and gravy, and almond milk and tempeh help increase the calcium content.

Navy Bean Biscuits & Roasted Garlic Gravy

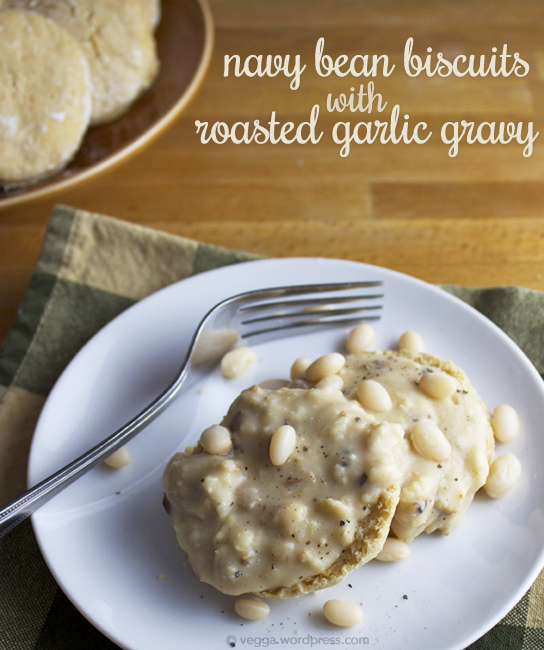
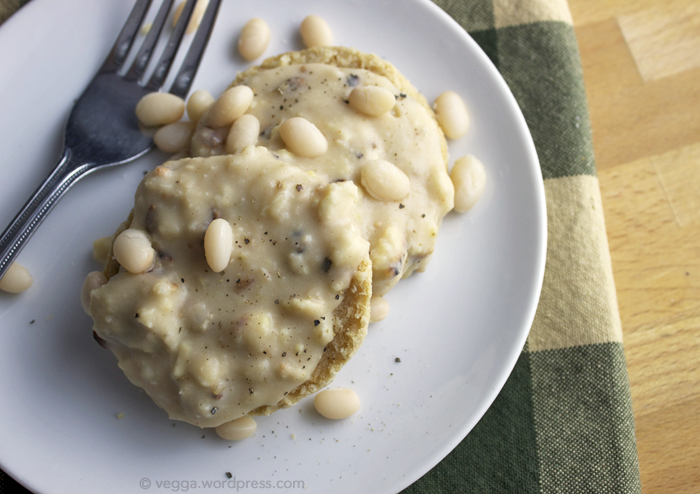
Navy Bean Biscuits with Roasted Garlic Gravy
Makes 16 biscuits and about 5 cups of gravy

For the biscuits:
1 cup whole-wheat pastry flour
1 cup unbleached all-purpose flour
1 tablespoon baking powder
1/4 teaspoon baking soda
1/2 teaspoon salt
1 cup cooked navy beans
3/4 cup unsweetened almond milk
3 tablespoons very cold vegan butter, cubed

Preheat oven to 450˚ and line a baking pan with parchment paper or spray it lightly with oil and then dust with flour. (If you’re going to chill your dough before baking, you can wait to preheat the oven.)

Using a standard blender or an immersion blender, puree the navy beans and almond milk until smooth. Set aside.

Add flour, baking powder, baking soda, and salt to a large mixing bowl and stir to combine. Using a fork, pastry cutter, or your fingertips, cut in the vegan butter until the mixture is coarse and sandy. Make sure there are no large lumps of butter remaining. Add the almond milk and bean mixture and stir with a plastic spatula or wooden spoon until the dough comes together. Don’t over-mix. It’ll be sticky, but that’s okay.

At this point, you can either refrigerate the dough for at least 20 minutes or go ahead and make the biscuits. Refrigerating the dough cools down the butter so that it melts into flaky pockets in the oven, but it’s not strictly necessary. When you’re ready to bake, place the dough on a clean, floured surface. Using a rolling pin, roll it to a little more than 1/2″ thickness. Use a floured glass rim or your favorite round cookie cutter to cut the dough into circles. Place circles on the prepared baking dish about 3/4″ apart. Ball up the dough, roll it out again, and cut more circles. Repeat until you’ve used up all the dough. Bake for 15-17 minutes or until the tops just begin to turn golden. There won’t be a big color change, so watch carefully.

For the gravy:
1 head roasted garlic, removed from papery skins
1 1/2 cups cooked navy beans
3 cups unsweetened almond milk
2 tablespoons vegan butter
1/4 cup flour, any kind
1/2 teaspoon salt
1/4 teaspoon fennel
1/4 teaspoon paprika
1/4 teaspoon sage
8 oz. tempeh
Freshly ground black pepper to taste

First, brown the tempeh. Add a little oil to the bottom of a large saucepan and heat over medium. Using your hands, crumble the tempeh into small chunks and add it to the pan. Cook for about 10 minutes, stirring frequently, until the tempeh is lightly browned on all sides. Be careful that it doesn’t burn.

While the tempeh browns, use a standard blender or an immersion blender to puree the navy beans, almond milk, and roasted garlic until smooth. Set aside.

Once the tempeh is browned, turn the heat down to medium-low and add the spices and butter to the pan. Once it melts, sprinkle on some of the flour and stir so the tempeh is coated. Pour in about a quarter of the liquid mixture and stir. Add a little more flour and liquid and whisk thoroughly. Continue until you’ve added all the flour and the liquid, whisking carefully to prevent lumps. When all ingredients are thoroughly mixed, turn the heat up a bit (if necessary) until the mixture just begins to bubble. Turn down again and let the gravy thicken, stirring frequently.

Slice biscuits in half, top with gravy, and enjoy!

Navy Bean Biscuits & Roasted Garlic Gravy

The navy beans stand in for some of the fat in the biscuits, making them less flaky than a full-fat biscuit. But once you top them with the rich, creamy, garlicky gravy, you won’t miss the fat! And you can’t taste the beans at all—I can testify to that. S was thoroughly surprised when I told him about that secret ingredient.

Two of these biscuits will give you 5 grams of protein, 11% of your daily recommended value of iron, and 7% of your RDV of calcium. Half a cup of the gravy offers nearly 7 grams of protein, 8% of your RDV of iron, and a whopping 17% of your RDV of calcium.

Now that’s something to write home about.

Gingerbread Granola

LVV MoFo 2014 main

S and I were at Whole Foods the other day, trying to stay focused, stick to our shopping list, and ignore the siren’s call of the bulk aisle, when he casually asked me whether I would be making granola again anytime soon. I opted to interpret that as a thinly veiled request and decided it was the perfect opportunity to play with a granola flavor I’d wanted to try for a while: gingerbread.

This granola took two attempts to perfect. I tried to get fancy with the first batch, substituting my beloved raw buckwheat groats for some of the oats, going a bit wild with the spices, and playing fast and loose with the oven temperature. The result was a crumbly, overly ginger-y, and slightly burnt batch. Don’t get me wrong; I still nibbled the crap out of it as I prepared the second batch. And that second batch was much improved.

Gingerbread Granola

Gingerbread Granola
Serves six

  • 1/4 cup coconut oil
  • 3 tablespoons blackstrap molasses
  • 3 tablespoons pure maple syrup or dark brown sugar
  • 2 cups rolled oats (I like Bob’s Red Mill Rolled Oats)
  • 1/4 cup chia seeds
  • 2 tablespoons ground flaxseed
  • 1 heaping teaspoon ground ginger
  • 3/4 teaspoon ground cinnamon
  • Scant 1/2 teaspoon salt
  • 1/4 teaspoon ground cloves
  • 1/4 teaspoon ground nutmeg
  • 1/4 C crystallized ginger, diced

Preheat oven to 300˚ and line a flat baking sheet with parchment paper.

In a small saucepan, add the coconut oil, molasses, and maple syrup or brown sugar. Stir to combine, heating over low so that the oil melts. Once all ingredients are well mixed, turn off the heat and set aside.

In a large mixing bowl, add all the dry ingredients. Pour the wet mixture into the dry ingredients and mix with a large wooden spoon. Once the dry ingredients are thoroughly mixed and coated with the wet ingredients, pour the granola onto the prepared baking sheet and bake for 30-35 minutes, removing from the oven and stirring every ten minutes or so. Remove from the oven and let cool for at least ten minutes before eating.

Note: If you prefer a sweeter granola, feel free to reduce the molasses by a tablespoon.

Gingerbread Granola

Second time’s the charm, I guess! (Although I have to admit that I did slightly burn this batch as well… oy.) I imagine this granola would be fantastic atop a bowl of vanilla soy yogurt—the spicy flavors would play perfectly with the sweet, cool yogurt. Sans yogurt, you’re looking at nearly 17% of your recommended daily value of calcium in a serving, along with 6 grams of protein and 19% of your recommended daily value of iron. Adding a 6-ounce carton of soy yogurt will increase your calcium intake by about 30% of your RDV, depending on the brand. Take that, Whole Foods.

Disclaimer: This post contains affiliate links. If you purchase something through my link, it costs nothing extra for you, but I get a few pennies to help cover hosting costs.

Pumpkin Overnight Oats (and a brief disquisition on calcium needs)

LVV MoFo 2014 mainMany of us think of essential nutrients in relatively simple terms: protein is for your muscles, iron is for your blood, and calcium is for your bones. Though the full story is obviously more complex, it’s not a bad summary in the case of calcium. 99% of the calcium in your body is stored in and used by your teeth and bones, and this is the calcium that’s affected by your diet. The other 1%, called serum calcium, is stored in your blood and isn’t affected by diet. (1) So for our purposes, we won’t concern ourselves with the 1% (insert your favorite wealthy-person joke here).

The other 99% of our bodily calcium takes on the crucial job of keeping our bones and teeth firm and strong. Throughout our lives, our bones actually remodel themselves frequently, taking up calcium and using it to form new bone-bits. (1) That’s why we can’t just stop worrying about our calcium when we “stop” growing—our bones actually don’t stop changing. They need constant sources of dietary calcium to perform that vital work. When we don’t get enough calcium, we’re at risk for osteopenia—a thinning of bone density. (2) Left unaddressed, osteopenia can lead to full-blown osteoporosis (“porous bone”). Folks with osteoporosis have significantly less bone density than they should, and they’re at an increased risk of bone fractures. (3)

As most of us know, postmenopausal women are one of the most at-risk groups for this disease. That’s because decreases in estrogen production during menopause reduce calcium absorption and increase bone resorption (the actual process by which your body breaks down calcium stored in bone and releases it into the blood). (1) But just being female puts you at an increased risk for osteoporosis, as does being caucasian, having a small body size, and being physically inactive. It’s important for children—especially girls—to reach their peak bone mass before adulthood, because having a high bone mass as a young adult is a solid indicator that you’ll retain that bone mass throughout your life. (3)

So, now to the million-dollar question(s): What should one eat to obtain maximum calcium? And how much calcium do we need, exactly? The NIH’s recommendations are a great place to start. As a non-pregnant, non-lactating female between 19 and 50, I need 1,000 mg a day. Where can I find those milligrams? Well, I can get 400 mg in just two tablespoons of my BFF blackstrap molasses. A cup of collard greens has 357 mg. Four ounces of tofu processed with calcium sulfate can offer anywhere between 200 and 400 mg. Various beans, greens, and calcium-fortified non-dairy products are also great places to start. There are a few factors that affect calcium absorption, however:

  • Vitamin D (whether food- or sun-derived) improves calcium absorption. (1)
  • Phytic acid and oxalic acid, which occur naturally in some plants (e.g. spinach) can inhibit calcium absorption. (1)
  • A high-protein diet can increase calcium excretion, but recent research indicates that simultaneous processes actually improve absorption, so the effects could cancel one another out. (1)

Whew! That’s a lot to think about. Let’s get to some food now.

Horizontal view of a small mason jar filled with a thick dark orange oat mixture.

Pumpkin Overnight Oats
Serves one

1/2 C + 1 T nondairy milk
1/3 C pumpkin puree
1 T blackstrap molasses (you can add more if you’re a fan like I am)
1 T pure maple syrup
1/2 tsp cinnamon (I actually prefer closer to 1 tsp, but again, that’s just me!)
Dash nutmeg
1/2 C rolled oats

In a mason jar or other container with a tight lid, combine all ingredients except the oats. Shake vigorously until well-combined. Add the oats and shake again. Place in fridge and cool overnight.

Diehard readers might recognize this recipe from last year’s MoFo. I have to share it again, though, because it’s a great source of calcium! One jar gives you at least 30% of your daily value (more if you load up on the blackstrap molasses). That’s a great way to start your day.

Sources cited:

(1) http://ods.od.nih.gov/factsheets/Calcium-HealthProfessional/
(2) http://www.spineuniverse.com/conditions/osteoporosis/osteopenia-osteoporosis-there-difference
(3) http://www.cdc.gov/nutrition/everyone/basics/vitamins/calcium.html

Note:

I’m neither a doctor nor a dietitian; please don’t treat my posts as medical advice! Consult a medical practitioner for specific medical or nutritional recommendations.

Hot Molasses Mug (and a brief disquisition on iron needs)

LVV MoFo 2014 main

If you’re a woman and you’ve ever gone through a spell of exhaustion, chances are you’ve gotten the “Maybe you’re anemic!” suggestion from a concerned friend or family member. Although anemia is technically a lack of hemoglobin in the blood, the term tends to be used colloquially for an iron deficiency. (1)

So—why can an iron deficiency make you tired, both mentally and physically? In over-simplified terms, it’s because iron is an “essential component of hemoglobin,” a protein that carries oxygen from your lungs to your tissues… tissues like your brain and muscles. (2) In truth, it’s actually rare for people in developed countries to have a serious iron deficiency; it’s more common in the developing world. Most of us get enough iron from our diets. However, pregnant women are often encouraged to take iron supplements because their bodies require more iron—it takes a lot of red blood cells (which carry hemoglobin) to feed the fetus and placenta. (2)

One complication for us vegans stems from the difference between heme and non-heme iron sources. Heme iron comes from animal sources and is absorbed more efficiently than non-heme iron, which comes from plants. Therefore, you technically should consume more iron if you’re vegan. However, you can increase non-heme iron absorption by eating foods containing vitamin C at the same meal—and many iron-rich foods are also naturally high in vitamin C. (1) And the good news is that as far as we can tell, vegetarians don’t have greater incidences of iron-deficiency anemia than meat-eaters. (3)

The CDC’s recommended daily allowances (RDA) for iron vary by age and sex, and it’s good to have a sense of how much you need. As a 27-year-old ciswoman, I need 18 mg according to the CDC. However, the Vegetarian Resource Group notes that vegetarians could require up to 1.8 times more iron than omnivores. (3) That’s about 32 mg for me.

Luckily for us, non-heme iron is not hard to find. One cup of lentils has 6.6 mg. An ounce of pumpkin seeds has 4.2 mg. One cup of cooked fresh spinach has 6.4. And blackstrap molasses—that unassuming viscous liquid!—has a whopping 7 mg in just two tablespoons.

Blackstrap molasses, as it turns out, makes an excellent hot beverage when whisked with hot almond milk. (Thanks for the inspiration, Pinterest!) Beats taking it by straight by the spoonful, as I’ve been known to do.

Hot Molasses Mug

Hot Molasses Mug
Serves one

  • 1 cup almond milk (or other nondairy milk of choice)
  • 2 T blackstrap molasses
  • Dash pure vanilla extract

In a small saucepan over low-medium heat, warm the almond milk until it begins steaming. Transfer to a mug and add the molasses and vanilla extract. Whisk vigorously until combined. Enjoy.

Hot Molasses Mug

With one warming beverage that could barely be any easier to prepare, I’ve got nearly a third of my iron requirement fulfilled. And—bonus!—I’ve found my new favorite fall beverage.

How do you take your molasses?

Sources cited:

(1) http://www.cdc.gov/nutrition/everyone/basics/vitamins/iron.html
(2) http://ods.od.nih.gov/factsheets/Iron-HealthProfessional/
(3) http://www.vrg.org/nutrition/iron.php

Note:

I’m neither a doctor nor a dietitian; please don’t treat my posts as medical advice! Consult a medical practitioner for specific medical or nutritional recommendations.

Baked Sweet Potato & Mung Bean Croquettes with Peanutty Coconut Sauce

LVV MoFo 2014 main

As I said to S yesterday, “One of the best parts about Vegan MoFo is that we eat really well.” Spurred on by my desire to offer up high-quality recipes, I force myself to overcome my laziness and get creative. So far this week, I’ve dug deep into my pantry and fridge; I haven’t had to make any special grocery store trips (other than my weekly shopping on Sunday). Today, though, I ran to the store for a red bell pepper, because I knew this particular dish needed it.

Sweet Potato and Mung Bean Croquettes with Peanutty Coconut Sauce

These baked croquettes not only taste amazing, but they feature two nutritional superstars: sweet potatoes and mung beans. The combination offers a one-two punch of protein and iron (and don’t you worry, we’ll be talking about iron soon!). Three of these patties will load you up with 23 grams of protein, 39% of your daily recommended value of iron, 17% of your daily calcium needs, and goodly doses of fiber, potassium, and vitamin C. And that’s not even including the coconut-peanut sauce, a creamy topping that’s a breeze to prepare. And did I mention these are gluten-free if you use a GF tamari or soy sauce? Celiac friends, rejoice!

Baked Sweet Potato & Mung Bean Croquettes with Peanutty Coconut Sauce
Makes 15 croquettes and one cup of sauce

  • 2 cups whole mung beans, ideally soaked overnight
  • 1 lb. sweet potatoes (about three medium-sized potatoes), peeled and roughly chopped
  • 2 cloves garlic, minced
  • 1/4 cup scallions, chopped (measure after chopping)
  • 1/2 red bell pepper, diced small
  • 2 T toasted black sesame seeds
  • 1 to 2 T sambal oelek (depending on your heat tolerance)
  • 1 tsp low-sodium soy sauce
  • 2-3 T coconut flour (or other gluten-free flour of choice)

For the sauce:

  • 3/4 C full-fat coconut milk
  • 1/4 C unsalted creamy natural peanut butter
  • 2 tsp sambal oelek
  • 1 tsp low-sodium soy sauce
  • 1/2 tsp garlic powder

Boil the sweet potatoes for about 15 minutes or until soft. At the same time, either boil or steam the mung beans. You can boil them right along with the sweet potatoes, or if you have a steamer pot set, steam them right on top of the potatoes. (I have a set like this one and that’s what I did.) When the sweet potatoes are soft, drain the pot and set them and the mung beans aside to cool.

While the mung beans and potatoes are cooking and subsequently cooling, chop the garlic, scallions, and red bell pepper and set aside. Next, make the sauce by whisking all five sauce ingredients together in a small bowl.

Preheat your oven to 375˚ and line a baking sheet with parchment paper or oil it lightly (coconut oil works great here!).

When the potatoes and mung beans have cooled a bit, add all the sweet potatoes, all the garlic, and about half the mung beans to a food processor and pulse a few times. Add half the remaining mung beans, pulse again, and then add the remaining mung beans. Process until the sweet potatoes are fully mashed and most of the mung beans are incorporated into the mixture. It’s okay if some of the beans are still whole; you want a nice variation.

Transfer the mixture to a large mixing bowl and add the scallions, red bell pepper, sesame seeds, sambal oelek, and soy sauce. Mix until combined using a wooden spoon or plastic spatula. Add 2 tablespoons of coconut flour and mix again. Depending on how much sambal oelek you added, your mixture might need another tablespoon. The mixture should stick together easily but shouldn’t be at all dry—you want it just the tiniest bit sticky.

Using your hands, scoop about 1/4 cup of the mixture at a time and flatten it into patties about 3/4″ thick. Spread evenly on the prepared baking sheet. Place in the oven and cook for 15-20 minutes, or until the tops are beginning to brown. At that point, remove from the oven and spray or brush lightly with coconut oil, then broil for another 3-5 minutes, being sure not to burn them. Remove from oven and let sit for at least 5 minutes before serving.

Top with coconut sauce, a sprinkle of sesame seeds, and extra scallions if you have ’em. Enjoy!

Sweet Potato and Mung Bean Croquettes with Peanutty Coconut Sauce

What’s your favorite use for mung beans or sweet potatoes?