How to Make Vegan Minestrone: Easy and Pantry-Friendly!

A quiet sort of chaos reigns in my household these days. We’ve been fostering a super sweet hound mix named Margaret for four (!) months, and she’s got all sorts of fun little health issues that keep cropping up. The latest? Polyps in both ears, requiring an expensive, complex surgery. As the rescue tries to find a surgeon who’ll offer a discount, they’re fundraising to mitigate the (substantial!) cost of the surgery. (Margaret isn’t in pain, by the way, but the polyps are causing chronic ear infections and could become malignant. She is truly the gentlest, sweetest little girl, though, and I hope an adopter steps up soon.)

For the last two weeks, we’ve also been dealing with a (human) health crisis on Steven’s side of the family. The details aren’t mine to share, but we (mostly Steven!) have been making lots of long trips to the hospital and dealing with the uncertainty of a potentially serious affliction. It’s been draining and scary and exhausting.

And on top of all that, our beloved Prius started making some seriously odd noises — like a prop plane taking off. Our mechanic thinks it’s caused by low tire treads and hasn’t been able to find anything more serious, but as someone who deals with car-related anxiety, the noises leave me discomfited.

Basically, we’ve got a lot of ongoing, unresolved issues. For two chronic worriers prone to anxiety, it’s… stressful.

In times like these, healthy eating tends to fall by the wayside, even for the best of us. We haven’t meal-planned in weeks, grocery trips have taken a backseat to hospital trips, and we’ve been relying on a combination of leftovers, whatever we can scrounge (hey-o, random pot of black-eyed peas, kale, and pizza sauce!), and the occasional dinner shared by our super thoughtful friends who happen to be vegan and live just down the street. Things are finally getting back to normal, but we’re not quite back in our regular meal-planning mode yet.

Collard leaves from the garden
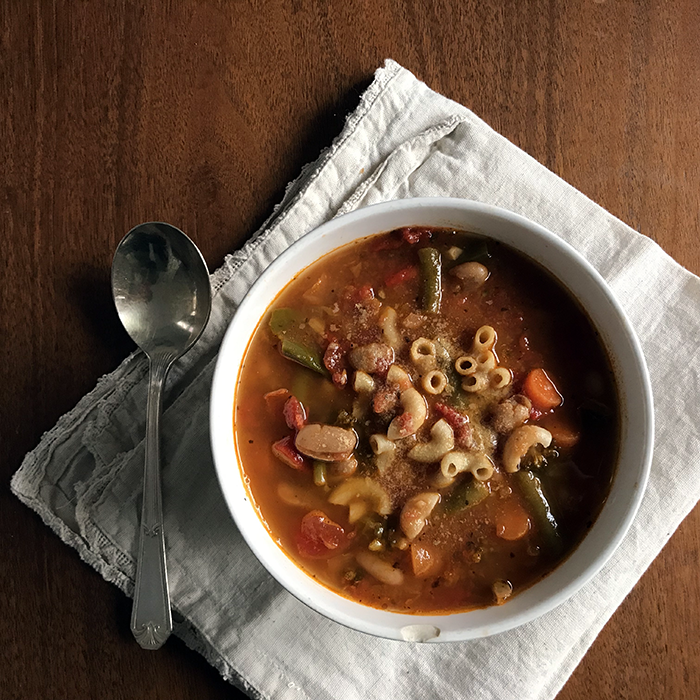
I have managed to make one solid meal in the past couple weeks, though: minestrone. A steaming hot, big ol’ pot of veggie-laden soup, perfect for delivering a dose of the nutrients we’re sorely lacking. I put it together with all sorts of scraps found in the fridge — half a jar of canned tomato sauce from god knows when, baby carrots, a jar of roasted red peppers, some sad little garlic cloves beginning to shrivel and sprout. I didn’t have celery, so I forewent the traditional mirepoix base. I added some little collard leaves picked from the garden; thank goodness for cold-hardy vegetables! Green beans and broccoli — the only fresh veggies in the fridge — went into the pot, along with a small can of diced tomatoes and a big can of cannellini beans. A liberal dusting of herbs, plenty of nooch, and some veggie bouillon rounded out the flavors, and elbow macaroni provided the pasta component. A nice long simmer while Steven drove home from his hospital visit helped meld all the flavors, and we sat down to big bowls of surprisingly delicious soup two Sundays back. A brief moment to catch our breaths, and much appreciated.

So, today, in the style of my template for making lentil soup, a template for making minestrone with whatever you’ve got on hand. Start with these five tips for homemade minestrone, and then read on for more detailed instructions

Cook your pasta separately.

My texture issues might be speaking here, but who wants to eat leftover soup laden with soggy, bloated pasta? Avoid that nastiness by cooking your pasta separately (in bulk) and adding individual portions to each serving of minestrone.

Embrace liberalism (with your seasonings).

Do not skimp on the herbs! Big scoops of dried basil, oregano, parsley, and thyme make all the difference. I’d opt for at least one teaspoon of each herb per 3-4 cups of liquid, but don’t sweat the measurements.

Say yes to yeast.

A big scoop of nutritional yeast adds a funky kick you’d get from parmesan in a non-vegan minestrone. Don’t skip it!

Get creative with your veggies.

Do not feel beholden to traditional minestrone recipes that “suggest” a very particular blend of vegetables! Instead, feel free to add whatever’s in your fridge or freezer. Aim for a blend of veggies with different sizes and shapes to keep things interesting.

Take your time.

Tempting thought you might find it to dig in to your minestrone as soon as you’ve dumped all the ingredients in the pot, give it some time to rest! Simmer your soup for at least an hour to build and deepen your flavors. (If you’re using any veggies that are prone to sogginess, feel free to add them closer to serving time.)

Vegan minestrone soup // govegga.com
One-Pot Vegan Minestrone

Serves 4-6

The basics

  • 2 T olive oil (you can use more if you prefer, or even just water-sauté the veggies if you want to avoid added oil)
  • Diced onion, carrot, and celery (the amounts don’t really matter, but aim for about 1/2 cup of each)
  • 3-5 cloves garlic, minced
  • 1 teaspoon dried basil
  • 1 teaspoon dried thyme
  • 1 teaspoon dried oregano
  • 1 teaspoon dried parsley
  • 1/4 cup nutritional yeast
  • A small shake red pepper flakes (optional)
  • 3-4 cups vegetable broth (I like Better than Bouillon)
  • 14 ounces diced canned tomatoes (if using whole, smash them up a bit)
  • 14 ounces crushed tomatoes (optional but recommended; use 8 ounces tomato sauce and a little extra broth in a pinch)
  • 14 ounces cannellini beans (or other white beans)
  • Salt and pepper to taste
  • 6 ounces small pasta, like ditalini or elbows

The veggies (choose 2-3)

  • 1/2 to 1 cup green beans, ends trimmed and sliced into 3/4″ inch pieces
  • 1/2 to 1 cup small broccoli florets
  • 1/3 cup roasted red peppers, roughly chopped
  • Additional 1/2 cup sliced carrots
  • 2 cups greens, roughly chopped (kale, collards, spinach)
Method

Heat the olive oil in a large stockpot on medium. When it begins to shimmer, add the mirepoix (onion, carrot, and celery) and garlic. Heat for 3-5 minutes, stirring frequently so nothing burns, until the onion is translucent.

Add your spices and give everything a good stir, then add all remaining ingredients except pasta. Bring everything to a boil, give it a good stir, and then turn it down to low. Let simmer for about 45 minutes, stirring occasionally.

While the soup is simmering, cook your pasta according to the package’s instructions, then set aside.

After about 45 minutes, check to ensure that all veggies are nice and tender. Season with salt, pepper, and more nutritional yeast to taste. Serve piping hot, with 1/3 to 1/2 cup of cooked pasta per bowl. Top with additional nutritional yeast or vegan parmesan as desired.

PIN IT

How to make vegan minestrone soup // govegga.com
Note: This post contains affiliate links, which help keep the lights on. Thanks for supporting Go Vegga!

Advertisement

Back to Basics: How to Cook with Tofu

back to basics -- how to cook with tofu; how to use tofu

The very first time I cooked tofu was, to put it mildly, an unpleasant experience. I’d been a vegetarian for nearly five years at that point and really should’ve known better, but alas: I made the classic error of purchasing silken tofu instead of regular tofu. (Not sure why that’s such a big no-no? This post is for you — read on!)

There I was, a college senior excited to be mostly off the meal plan and to cook for myself at the townhouse I shared with two of my best friends. My college was in walking distance of a lovely co-op, and I’d purchased the tofu with stars in my eyes, ready for a meat-free meal I’d share with my friends to wow them. As I basted the slices of tofu with barbecue sauce, their squishy jiggliness should’ve been a dead giveaway that something was amiss. “Maybe they’ll firm up in the oven,” I thought.

Of course, there was no magic firming action, and my baked tofu slices came out just as jiggly as their unbaked selves… except they now had a very thin, chewy crust of barbecue sauce on them. Not exactly the gourmet dinner I’d been envisioning.

Needless to say, this was not a meal I shared with my friends.

Seven years later, I’ve come a long, long way in my tofu knowledge. It’s now a staple in my kitchen, and I use it every which way, in all its forms, for savory and sweet recipes alike.

So today, let’s get back to basics and talk all about tofu! Read on for tips on how to cook with tofu, which type to use, and how best to take advantage of everything this beautifully neutral protein has to offer.

Green beans and tofu in a spicy sauce -- how to cook with tofu.

A much better use of tofu.

What is tofu?

Simply put, it’s bean curd. Less simply put, it’s “a food made by coagulating soy milk and then pressing the resulting curds into soft white blocks.” (Thanks, Wikipedia.) It’s been used for thousands of years in various East Asian cuisines, and happily made its way to the western world in the late 19th century. That’s good news for us western vegans, because tofu is high in protein (with about 40 grams in a 14 ounce block) and often calcium (because it’s frequently treated with calcium sulfate, a coagulant).

Tofu comes in a few varieties, which can be hard to keep straight at first.

  • Silken tofu. This is very soft and almost gelatinous in texture. It’s quite delicate; silken tofu falls apart easily and easily blends into something like a cream. (And it’s what I mistakenly used in place of regular firm tofu!) Within the category of silken tofus are different levels of firmness. For example, you can find soft silken tofu and firm silken tofu, but remember that any kind of silken tofu will be softer and more delicate than regular firm tofu. Silken tofu is available in both shelf-stable and refrigerated varieties. I personally use them interchangeably.
    • Shelf-stable silken tofu comes in small boxes and doesn’t need to be refrigerated. You can keep it in your pantry for quite a while.
    • Refrigerated silken tofu needs to be, well, refrigerated. The block of tofu is packed in water in a sealed plastic container.
  • Regular (firm) tofu. This is much hardier than silken tofu and almost grittier. It’s always refrigerated, packed in water in a sealed plastic container. The most common varieties are firm and extra-firm, although you might see super-firm. You can also find sprouted tofu, which is made from soybeans that were allowed to sprout first.

Where can I buy tofu?

Good news — most grocery stores sell tofu. Even big-box chains usually have at least one variety. Fresh tofu needs to be refrigerated, so it’s typically shelved by the dairy or veggie section. (If the store sells faux meats, they’ll usually be here too.) Shelf-stable silken tofu is typically housed with the Asian foods. (Mori-Nu is the most common brand.)

At health food stores, co-ops, and other specialty stores, you might want to check the faux-meat/non-dairy section to find refrigerated tofu. Just ask if you can’t find it! Shelf-stable tofu will likely still be alongside Asian ingredients.

At Asian markets and some health food stores, you might get lucky enough to find fresh tofu. You can get it in the refrigerated section, usually stored in a big bucket filled with so-called tofu water. In this case, the store will usually have plastic bags available for you to transport the tofu. (You could also bring your own container.)

Finally, recall that not all silken tofu is shelf-stable — in other words, you might find silken tofu in the refrigerated section, right alongside the firmer tofu. Always double-check the label, or you might end up making a mistake similar to my college-era error! ;)

What kind of tofu should I use?

To avoid mishaps, follow these general tips:

  • If using a recipe, heed the author’s advice! Any quality recipe will tell you what kind of tofu to use. It’ll usually be written like “extra-firm tofu” (meaning the extra-firm variety of the regular kind) or “soft silken tofu” (meaning the soft variety of the silken (usually shelf-stable) kind). So you need to know the kind (regular vs. silken) and the level of firmness (e.g., soft, firm, extra-firm).
  • If a recipe calls for extra-firm regular tofu but you can only find firm, don’t sweat it. You can usually substitute a softer tofu by being a little gentler with it and making sure to press it. (More on that below.)
  • In general, savory recipes use regular tofu (because the tofu is a specific component of the meal, designed to stand on its own) whereas sweet recipes use silken (because it’s going to be blended up to create a creamy texture, like in a pudding or cream pie). This is not a hard and fast rule, of course, so always read the recipe and ask the author if you have questions.
Eggless tofu sandwich -- how to cook with tofu.

Tofu for lunch.

How do I prepare tofu?

  • Press it. If you’re using firm or extra-firm regular tofu, the recipe might call for it to be pressed. Why would you do this? Well, pressing the tofu squeezes out the excess liquid, improving the texture and getting the tofu ready to soak up more delicious marinade or seasonings. Is it necessary? Strictly speaking, no. But it does tend to improve the overall consistency and mouthfeel, especially when it’s a main component of your meal. How do you do it? There are a few methods:
    • The old-fashioned way. Wrap a block of tofu (the regular, refrigerated kind, remember?) or individual slices of the tofu in either a regular towel or paper towels. Put it on a shallow plate and put something heavy on top of the wrapped tofu. People often use books for this. The goal is to squeeze and drain all the water you can. The longer you press your tofu, the better, but if you don’t have 24 hours to spare, any time at all will help.
    • The new-fangled way. Get yourself a fancy-schmancy tofu press! There are a few designs on the market, but I use a Tofu Xpress Gourmet Tofu Press. It served me well for years, although recently the plastic spring housing broke and I’ve yet to replace it. There are some simpler, less expensive options available (like this EZ Tofu Press), but I can’t vouch for them personally.
  • Freeze it. When you freeze tofu, the texture magically changes into something a little more toothsome. Simply take regular tofu out of the package, drain it, press it (or not), and freeze it in a freezer-safe container. When you’re ready to use it, thaw it in the fridge for about 8 hours ahead of time. (You can also try to thaw it in the microwave if you’re short on time, but I don’t recommend this.)
  • Marinate it. People like to describe tofu as a sponge because it’s always ready to soak up delicious flavors. I personally find that description a little off-putting, but it’s also spot-on. You can use any marinade or flavor combo you’d like (see below for suggestions). Here are some tips for infusing your tofu with as much flavor as possible.
    • Slice or cube the tofu to increase surface area. Marinating a whole block won’t be as efficacious as marinating individual pieces.
    • Use a fork to poke tiny, not too deep holes so the marinade has more of a chance to permeate.
    • Start marinating as early as possible, but don’t sweat it if you only have 15 minutes. It’s better than nothing, and it’ll still help!

How do I cook tofu?

Pshhh, don’t cook it at all — eat it raw! Just me? Okay then. If you’re set on cooking your tofu, here are some basic methods.

  • Bake it. You can’t go wrong with baked tofu. I like to bake marinated cubed or sliced tofu at 400˚F for 20-30 minutes, flipping once on each side. To get nice crispy edges, be sure to use a shallow pan (better yet, one without rims) and use a little oil or aluminum foil underneath the tofu.
  • Dry-fry it. If you’re avoiding oil or just want a super-simple way of preparing tofu, this is the method for you. At the end, you’ll have chewy, golden-brown tofu. Keep in mind, though, that this is for plain tofu, not flavored, so it’s best in a recipe with lots of other flavors going on. This is the method I use.
  • Pan-fry it. Unlike the previous method, this one uses a little oil and works great with marinated tofu. It couldn’t be simpler: Heat 1-2 tablespoons of your favorite oil (vegetable, olive, or coconut all work, although coconut will add a little flavor) in a nonstick or cast-iron pan, then add the tofu and cook for 7-10 minutes, flipping every so often, over medium. Every pan and every stove is different, so keep a watchful eye on your tofu as it cooks. You don’t want it to burn, but you do want it to start crisping up. Once you get the hang of how your setup works, you can adjust the amount of oil and heat level.
  • Scramble it. Vegans freaking love scrambled tofu. It’s a protein-packed stand-in for eggs that can be prepared so many ways and with so many different flavor profiles. I’ll include some recipes below, but at its core, scrambled tofu is just what it sounds like: crumbled tofu mixed with seasoning and often additional liquid, cooked like you’d cook scrambled eggs.
  • Grill it. Got a grill? You’re in luck — tofu stands up well to heat! Marinated tofu is great on the grill, but make sure to keep the slabs nice and thick so they don’t fall apart. You can also use it in kebabs with lots of veggies! For tofu cooked directly on the grill, make sure the grill is well-oiled and opt for lower heat and a longer cooking time (~20 minutes should do it). Remember to flip occasionally, especially if you want sweet cross-hatch action.
Marinated Tofu Sandwich -- how to cook with tofu

A tasty way to enjoy marinated, pan-fried tofu.

Okay, sold — I’m ready to cook! What are some great tofu recipes?

Yes! Here’s the fun part. These are some of my favorites.

  • Scrambled tofu. There are two main styles: egg-like and, well, tofu-like.
    • For a classic vegan tofu scramble, start with this recipe (yes, you can use soy sauce instead of the shoyu). Once you get the basic method down (sauté veg, add tofu and spices, scramble till your preferred level of doneness), you can play around with ingredients and flavor palettes. Try this one for a full-bodied scramble packed with veggies, or this red-curry version for something Thai-inspired.
    • For a more scrambled-egg-like tofu (one that doesn’t included added veggies and works great as a side dish for brunch), you just can’t beat the Tofuevos recipe from Vegicano. (Tip: reduce the soy sauce if you’re salt-averse.)
  • Tofu that stands on its own. Ready to show off your mad tofu-cooking skills? Read on!
  • Tofu that shares the spotlight. Tofu is an integral part of these recipes, but it works alongside other ingredients to create a final product that’s greater than the sum of its parts.
  • Tofu that’s masquerading as something else. This versatile protein easily plays many roles.

Where can I learn more?

Books, duh. Here are some you should check out from your library. (I haven’t personally read or used them all, but they seem worth a look!)

  • 101 Things to Do with Tofu by Donna Kelly and Anne Tegtmeier. I owned this book for a while and was impressed by the range of recipes. It’s vegetarian, not vegan, but many of the recipes are easily veganizable.
  • The Great Vegan Protein Book by Celine Steen and Tamasin Noyes. The dynamic duo is at it again with recipes that focus on protein — and unsurprisingly, many of them feature tofu. We own this cookbook and it has quite a few neat ideas.
  • Making Soy Milk and Tofu at Home by Andrea Nyugen. I know, I know — we just covered how to use tofu at all, never mind how to make it from scratch! But this looks like such a neat deep-dive into soy-based foods, and I’d imagine that homemade tofu has a depth of flavor unmatched by its store-bought counterpart.
  • The Tofu Cookbook for Vegans: 50 Vegan-Friendly Tofu Recipes by Veganized. (Yeah, I dunno what’s up with that byline either.) This is a bit of a wild card, but I love the idea of a cookbook dedicated solely to vegan tofu recipes. If you try it out, let me know what you think!
  • Tofu Cookery (25th Anniversary) by Louise Hagler. I’m almost ashamed not to have at least looked through this book — it’s a bit of a legend. Even Isa Chandra herself name-drops it on occasion!

But isn’t soy bad for you?!?

Nope. See here, here, here, and here.

~~~

Okay — what did I miss?! Or do you feel ready to conquer tofu cookery? Let me know!

PIN IT

beginnersguide_tofu

Note: This post contains affiliate links. If you purchase something through my link, it costs nothing extra for you, but I get a few pennies. I’m not looking to make a fortune, just to cover hosting costs. :)

Save

Save

Save