Crisper Drawer Risotto | VeganMoFo 2018 Day Twenty

Week Three: Budget Week
This week, we’re going to prove once and for all that veganism is affordable!

Risotto might not be top of mind when you think of budget meals, but hear me out. What better way to glam up the floppy carrots, wilty greens, and otherwise less-than-perfect produce languishing in your crisper drawer than by throwing it all in a pot of creamy, rich rice, a dish that’s more than the sum of its parts? Sure, you could make a stew or a soup or a chili, but risotto is just a little fancier, a little more elevated.

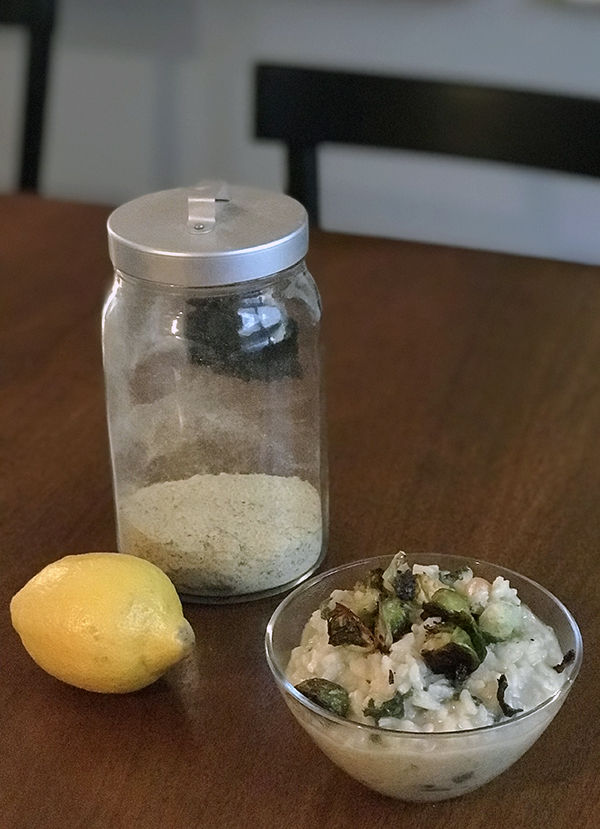
In my kitchen sink, crisper drawer, leftover-friendly risotto, I used carrots, okra, and kale that were past their prime. I chopped them all up small and cooked my rice in vegetable broth, adding vegan butter towards the end for extra richness, then topped my dish with roasted Brussels sprouts for added texture, nutrition, and deliciousness. A squeeze of lemon brought it all together, adding a little acidic punch to the savory dish.

I’ve provided a recipe below, but you can use it as a template for any ingredients that would otherwise go to waste (and waste your money). Peas, broccoli, carrots, squash… anything and everything can find a home in risotto with a little creativity. I left my flavors pretty basic, but you can fancy up your DIY risotto by cooking the rice in tomato sauce thinned with water, adding a splash of white wine, stirring in a couple cloves of roasted garlic, topping it with vegan parmesan, etc. Be creative and have fun! (And check out the recipe notes below for a few more suggestions.)

Risotto is NOT as intimidating a dish as many folks make it out to be, and it’s just about guaranteed to taste good no matter what you throw in it. (Just be sure to cook those grains until they’re soft.) And if arborio rice is not in the budget, try it with any short-grain rice: They are a fine stand-in for arborio if you cook ‘em low and slow with lots of liquid.

Crisper Drawer Risotto with Crispy Roasted Brussels Sprouts

Serves 4-6

Ingredients

  • 2 cups arborio rice
  • 6-8 cups low-sodium vegetable broth
  • 5 cloves garlic, sliced thin
  • 1 – 2 cups chopped veggies (I used carrots, okra, and kale)
  • 3 tablespoons nutritional yeast
  • 2 tablespoons vegan butter (optional)
  • Salt and pepper to taste
  • 1 lemon, juiced

Optional topping:

  • 1 pint Brussels sprouts, trimmed and quartered (cut into sixths if the sprouts are particularly large)
  • 1 tablespoon olive  oil
  • Salt and pepper

Method

  1. Preheat oven to 415˚F and start heating about 1 tablespoon olive oil in a medium pot over medium-low heat
  2. Toss trimmed and quartered Brussels sprouts with a little oil, salt, and pepper, then tip onto baking sheet. (I don’t usually line my sheet; the oil prevents sticking and I actually like the near-burnt bits on my sprouts!) Place in preheated oven and set timer for 15 minutes.
  3. When the oil in the pot is just shimmering, add the chopped vegetables and cook for a couple minutes, then add the sliced garlic and cook for about 2 minutes, just until the garlic begins to turn golden.
  4. Add the rice and stir so that the rice is coated with the oil, veggie, and garlic mixture. Add a cup of the vegetable broth and stir to combine.
  5. Over the next 20-30 minutes, keep checking the rice and adding more broth as it starts to get soaked up. Give the rice a good stir every couple minutes, but don’t feel like you need to stand over the pot the entire time. You might not use all the broth, and that’s okay.
  6. After the sprouts have roasted for about 15 minutes, use a spatula to flip most of them over. Roast for another 10-15 minutes until they’re as crispy as you’d like them. Turn off the heat and leave them in the oven. (If they’re too blackened, remove from oven and set aside.)
    Bonus! If the leaves of your sprouts start to burn in the oven, just scoop them out with your spatula and give yourself a little mid-cooking treat. They are like crispy little sprout chips.
  7. Taste the risotto as the rice begins to soften to test whether it’s done. Towards the end of the cooking process, add the nutritional yeast, salt, pepper, and any additional spices you want to try. Turn off the heat and stir in the vegan butter (if using).
  8. Drizzle with lemon juice, top with roasted Brussels sprouts, and serve right away.
Notes:
  • Use whatever veggies you have available. They likely won’t add a ton of flavor but will provide fiber and nutrients while bulking up the rice.
  • Increase the garlic to as many cloves as you’d like, or substitute with diced shallots or onions. Do try to use at least one allium, though!
  • If you want to cut down on the veggie broth (or don’t want to make too much and waste it), you can use hot water and just add a bouillon cube to the risotto to taste.
  • Feel free to swap out the crispy roasted Brussels sprouts for another roasted veggie (like broccoli) or something crunchy (like toasted nuts). You don’t absolutely have to use a crunchy, crispy topper, but I think it provides a really nice textural counterpoint.
  • The lemon juice at the end is non-negotiable! :)

Check out my Butternut Squash Risotto with Sage and Toasted Hazelnuts for another take on risotto, and share your favorite risotto recipe with me!

PIN IT

Vegan risotto made with leftover veggies from your crisper drawer // govegga.com

Advertisement

Creamy Vegan Butternut Squash Gratin

VeganMoFo 2016 graphic

Week Four: Memories and Traditions

Memories and traditions! An appropriate theme this week. Today I bring you a recipe that’s not quite a tradition, but does hearken back to a dish my family served pretty frequently at holidays: scalloped potatoes. But this version features squash instead of potatoes, and a creamy cashew-based sauce instead of cheese.

Sometimes I think that squash varieties don’t quite match their names. With gorgeous, ethereal names like butternut, delicata, and pattypan, you expect something light and, well, delicate. Instead, you get an oddly thick, bulbous, often warty fruit that is decidedly not delicate. But it’s what’s inside that counts, and squashes lend themselves so well to dozens of applications.

Creamy vegan butternut squash gratin // govegga.com

This savory butternut squash recipe would not be out of place doubled and served as a side for Thanksgiving dinner. Roasting squash brings out its inherent sweetness, and seasonal herbs (sage, thyme) add a complementary savory note. A beautifully simple yet complexly flavorful cashew cream sauce elevates the dish, and a sprinkling of toasted panko adds just a little crunch. Thanks to the coconut milk and cashews in the sauce, this dish is surprisingly filling and nutrient-rich; you might be surprised that you’re full after a small helping! Eat straight out of the oven for optimal deliciousness.

Creamy Butternut Squash Gratin

Serves 2 as a main dish or 4 as a side dish

For the squash

1 butternut squash
5-7 fresh sage leaves, rolled and sliced into ribbons
2 tsp fresh thyme
1/2 tsp salt
fresh black pepper
1.5 – 2 T olive oil (start with less and add more if needed for a larger squash)
2-3 T panko

For the cashew cream sauce

1/2 cup whole raw cashews, either soaked for 6 hours ahead of time or boiled for 15 minutes
1/3 cup full-fat coconut milk
1 large clove garlic
2 T nutritional yeast
1/2 tsp salt (or more, to taste)

Method

Preheat the oven to 400˚F.

Using a sharp knife, cut each end off the squash, then cut it half both vertically and horizontally. Stand each piece on end and use your knife to cut off the peel, then scoop out the seeds with a fork. Slice the squash into half-moon shapes about 3/4″ thick.

Combine the olive oil, sliced sage, thyme, salt, and a few grinds of black pepper to a large mixing bowl, then add the squash slices. Stir to coat evenly, then add the squash to a 9 x 13″ glass casserole dish.

Bake for 20 minutes while you prepare the cream sauce.

Add all ingredients to a high-speed blender or food processor and blend/process until you have a smooth, creamy sauce. It will be fairly thin — that’s okay. Taste and adjust for salt. Set cream aside while the squash bakes.

At the 20 minutes mark, use a fork to check whether the squash is done. You want it just about tender. Remove from the oven and pour the sauce over the squash; aim to drizzle it and don’t worry about coating each piece.

Return the dish to the oven and bake for another 5 minutes until the sauce thickens and starts to bubble. Remove it from the oven and sprinkle the panko on top; you want a nice layer. Broil the casserole for 2-3 minutes and remove just as the panko begins to turn golden brown.

Let sit for about 3 minutes, then serve.


Kabocha Squash Pizza Sauce

VeganMoFo 2015 banner

Day 22: Make a dish using all seasonal produce.

What a perfect prompt for this autumnal day! I had a big ol’ kabocha squash sitting on my counter, and all day long I mused about how to use it. Simple roasted slices? This beautiful soy-braised preparation? A gingery soup?

And then, on the give-and-take bookshelf at work, I found a copy of Mark Sutton’s Heart Healthy Pizza cookbook up for grabs, and pizza sounded mighty appealing. I’ve seen butternut squash-based cheezy pizza toppings, so why not kabocha?! I decided to make a thick sauce to top a pizza, and it exceeded all my expectations. This sauce is creamy, complex, and perfectly flavored with roasted garlic. And it’s a unique, unexpected way to use kabocha squash!

kabocha

You can prepare the sauce ahead of time, but I did everything in one night. It’s a little time-consuming, but there’s downtime for each component that lets you prep the next component. I included my workflow in the steps below.

Kabocha Squash Pizza Sauce

  • One kabocha squash
  • One head garlic
  • 3/4 cup unsweetened almond milk
  • 2 T nutritional yeast
  • 1 T yellow or white miso
  • 1/2 tsp kosher salt
  • 1/4 tsp cumin
  • A few grinds black pepper

Toppings

  • Basil
  • Caramelized onions

One recipe of your favorite pizza dough

Preheat your oven to 400˚ and pour a little water into a rimmed baking tin. Leaving the rind on, roughly slice the kabocha squash into sixths; don’t worry about how even they are. Place the slices rind-down into the baking dish, drizzle with a little olive oil, and place in the oven. Next, prepare the garlic for roasting. Add the foil packet to the oven and bake both the squash and the garlic for about 45 minutes, or until the squash is fork-tender.

In the meantime, prepare the pizza dough, following your recipe’s instructions. Let it rise while the squash and garlic are in the oven. If you’re topping your pizza with caramelized onions, start caramelizing them now.

When the squash is ready, remove it (and the garlic) from the oven and let them cool for a few minutes while you roll out the pizza dough. Give the dough a brief second rise (after rolling it out) while you prepare the sauce. (If using onions, they should be done by now — just turn off the heat and leave them on the stove until ready to use.)

Preheat the oven to 450˚.

To make the sauce, carefully scoop the squash out of the rinds and add it to a food processor. Squeeze the garlic out of the papery skins into the processor. Be careful here too; it’ll be hot. Add the rest of the sauce ingredients and process until it’s very smooth and creamy.

Spread the sauce as thick as you’d like on the dough. (Save any extra to use with pasta!) Top with caramelized onions and bake for 12 minutes. Remove from the oven, sprinkle with basil, and let cool for about 3 minutes before slicing. Enjoy!

Note: This post contains an affiliate link. If you purchase something through my link, it costs nothing extra for you, but I get a few pennies. I’m not looking to make a fortune, just to cover hosting costs. :)

Spicy Potato Casserole with Tofu “Chorizo”

One of my favorite workday lunches (and quick weeknight dinners) is a baked potato smothered in baked beans, chili, or broccoli and a cheezy sauce. Keeping a few baked potatoes ready in the fridge or freezer is a great form of insurance against going lunch-less or having to go out and grab something. Cover that tater with last night’s chili or that can of baked beans you stashed in the pantry, and you’re good to go with a filling, hearty meal.

Last time I had a baked potato, I enjoyed it with Trader Joe’s veggie chili. As I ate, I began to wonder why potatoes and chili don’t meet more often. The flavor combination is perfect! I started picturing a dish that would take advantage of the flavors of chili but rely on potatoes for bulk. This casserole is the result, with layers of thinly sliced potatoes doused in a spicy tomato-based sauce. Adding black beans and tofu “chorizo” increases the protein content and gives lots of texture to a saucy dish. Cooking the potatoes right in the spicy sauce really infuses them with the spicy flavors, but it also adds substantial baking time. If you’re in a rush, feel free to boil or steam the sliced potatoes ahead of time and then bake the assembled casserole for 15-20 minutes.

Spicy Potato Casserole with Tofu Chorizo

I opted for a smoky, back-burner type spiciness, but if you love big, bold spices, go wild with adding more chili powder or red pepper flakes! The sauce is customizable to your tastes.

Spicy Potato Casserole with Tofu “Chorizo”
Serves 5-6

For the Tofu Chorizo

  • One block (14 oz) extra-firm tofu, pressed
  • 1 tablespoon red wine vinegar
  • 1 tablespoon soy sauce
  • 1 tablespoon Cholula (or your favorite hot sauce)
  • 1/2 teaspoon achiote powder or chili powder
  • 1/2 teaspoon cumin
  • 1/2 teaspoon garlic powder
  • 1/2 teaspoon Mexican oregano
  • 1/2 teaspoon onion powder
  • 1/4 teaspoon coriander
  • 1/4 teaspoon paprika
  • A few dashes liquid smoke
  • A dash cinnamon

For the Casserole

  • 1 tablespoon sunflower or canola oil
  • 1/2 large yellow onion (about 7 oz), diced
  • 2 cloves garlic, minced
  • 1.5 lbs Yukon Gold potatoes
  • 1 28-oz can tomato puree
  • 1 15-oz can black beans

First, prepare the tofu chorizo. In a container with a watertight lid, mix together all chorizo ingredients (except the tofu) and whisk to combine. Using your hands, crumble the tofu into the spice mixture. The tofu crumbles should be small but not fine; it’s okay if they’re not uniform. Put the lid on the container and shake until all the tofu is coated with the mixture. Set aside.

Preheat the oven to 425˚ F.

In a large saucepan, heat the oil on medium. Add the diced onions and cook for about 4 minutes, then add the minced garlic and the tofu chorizo. Cook for another 5-7 minutes, or until the onions are translucent, stirring periodically. While this mixture is cooking, prepare the potatoes. Leave the skins on and slice them lengthwise into about 1/4″ slices. It’s okay if some of them are larger. Once you’ve prepared the potatoes, set them aside.

By now, the onions, garlic, and tofu should be cooked. Turn the heat down to low and add two cups of the tomato puree and all the black beans. Stir to combine and let sit for a minute while you prepare a 9″ x 13″ casserole dish. Spray or lightly brush the dish with a little oil, then pour the remaining plain tomato puree into the dish so it covers the bottom.

Taste the chorizo-tomato mixture and add additional seasonings to taste (chili powder, salt, etc.). Turn the stove off.

Place roughly 1/3 of the sliced potatoes into the prepared baking dish, right on top of the tomato puree. Create a single layer; it’s okay if there are some open spaces, but don’t overlap the potatoes. Using a ladle, spoon 1/3 of the chorizo-tomato mixture over the potatoes and spread to cover them. Repeat with another 1/3 potatoes and 1/3 chorizo-tomato mixture two more times, until everything is used.

Cover the dish with aluminum foil and bake for an hour. Remove the foil and bake for another 20 minutes or until the potatoes are fork tender. If you’re feeling fancy, top with your favorite vegan cheese shreds or cheezy sauce and broil the dish for another 3-5 minutes.

Enjoy!

***

(A note about the tofu chorizo: I based the spice blend on Vegicano‘s Lentil Chorizo. That chorizo de lenteja is out-of-this world delicious! I highly recommend making it and serving it with corn tortillas, pico de gallo, guac, and a simple cabbage slaw. HEAVEN.)

Lemon-Dijon Broccoli & Quinoa Bowl

“I could eat this for lunch seven days a week,” said Steven, after tasting a forkful of last night’s dinner. High praise? Well, coming from a guy who is actually notorious for eating the same lunch every workday for nearly a month… maybe not. But I’ll take it.

On any given day, I’ve got a couple recipe ideas buzzing around my brain. I toy with them, mull them over, research similar recipes. Sometimes I actually make them. Every so often, though, a wholly unplanned meal idea just pops, fully-formed, into my head. I don’t ignore impulses like those—I head straight to the kitchen to cook. Thus was born Monday night’s dinner.

Lemon-Dijon Broccoli & Quinoa Bowl

Tangy and abundantly flavorful, this dish is a winner. A zesty, creamy lemon-Dijon sauce is the perfect accompaniment for the more subdued flavors of broccoli and quinoa. This bowl is a surprisingly filling, fun-to-eat side dish that probably tastes just as good cold from the fridge as it did warm from the pot. You could add some baked tofu for some extra protein and to kick this into entree territory.

Lemon-Dijon Broccoli & Quinoa Bowl
Serves six (as a side dish); four (as an entree)

For the Bowl

  • 1 cup quinoa (uncooked)
  • 1 1/2 cup vegetable broth (I used a salt-free homemade broth)
  • 3 heads broccoli, chopped into small florets
  • 1/4 cup toasted pine nuts (optional; for topping)

For the Lemon-Dijon Sauce

  • 1/4 cup lemon juice
  • 1 T Vegenaise
  • 1 T olive oil
  • 2 T Dijon mustard
  • 1/4 tsp garlic powder
  • Salt and pepper to taste

Combine the quinoa and vegetable broth in a small saucepan on high heat. Once the broth boils, reduce heat to low and cook for 15-20 minutes, or until the quinoa has soaked up all the water and is light and fluffy.

In the meantime, prepare the sauce. Vigorously whisk the wet ingredients together until emulsified, then add the spices to taste. (You could use a food processor or immersion blender, but this is such a small portion that you can easily whisk it by hand.) Place the finished sauce in the fridge.

As the quinoa finishes cooking, chop the broccoli into small florets (if you haven’t already) and steam it lightly, for about five minutes. You want it to be not-quite fork tender; it should still have a little bite. I used a steamer pot, but you can use your favorite steaming method.

When the quinoa and broccoli are both done, mix them together in a large bowl. Remove the lemon-Dijon sauce from the fridge, shake it, and pour it over the quinoa-broccoli mixture. Let it sit for at least five minutes to absorb the flavors, top with pine nuts, and eat!

Lemon-Dijon Broccoli & Quinoa Bowl